Every stitch tells a story · Free PDF Pattern with Weekly Newsletter Claim Free Guide →

Every stitch tells a story · Free PDF Pattern with Weekly Newsletter Claim Free Guide →
Crochet Off The Shoulder Sweater: 5 Amazing Ways To Make It Step By Step
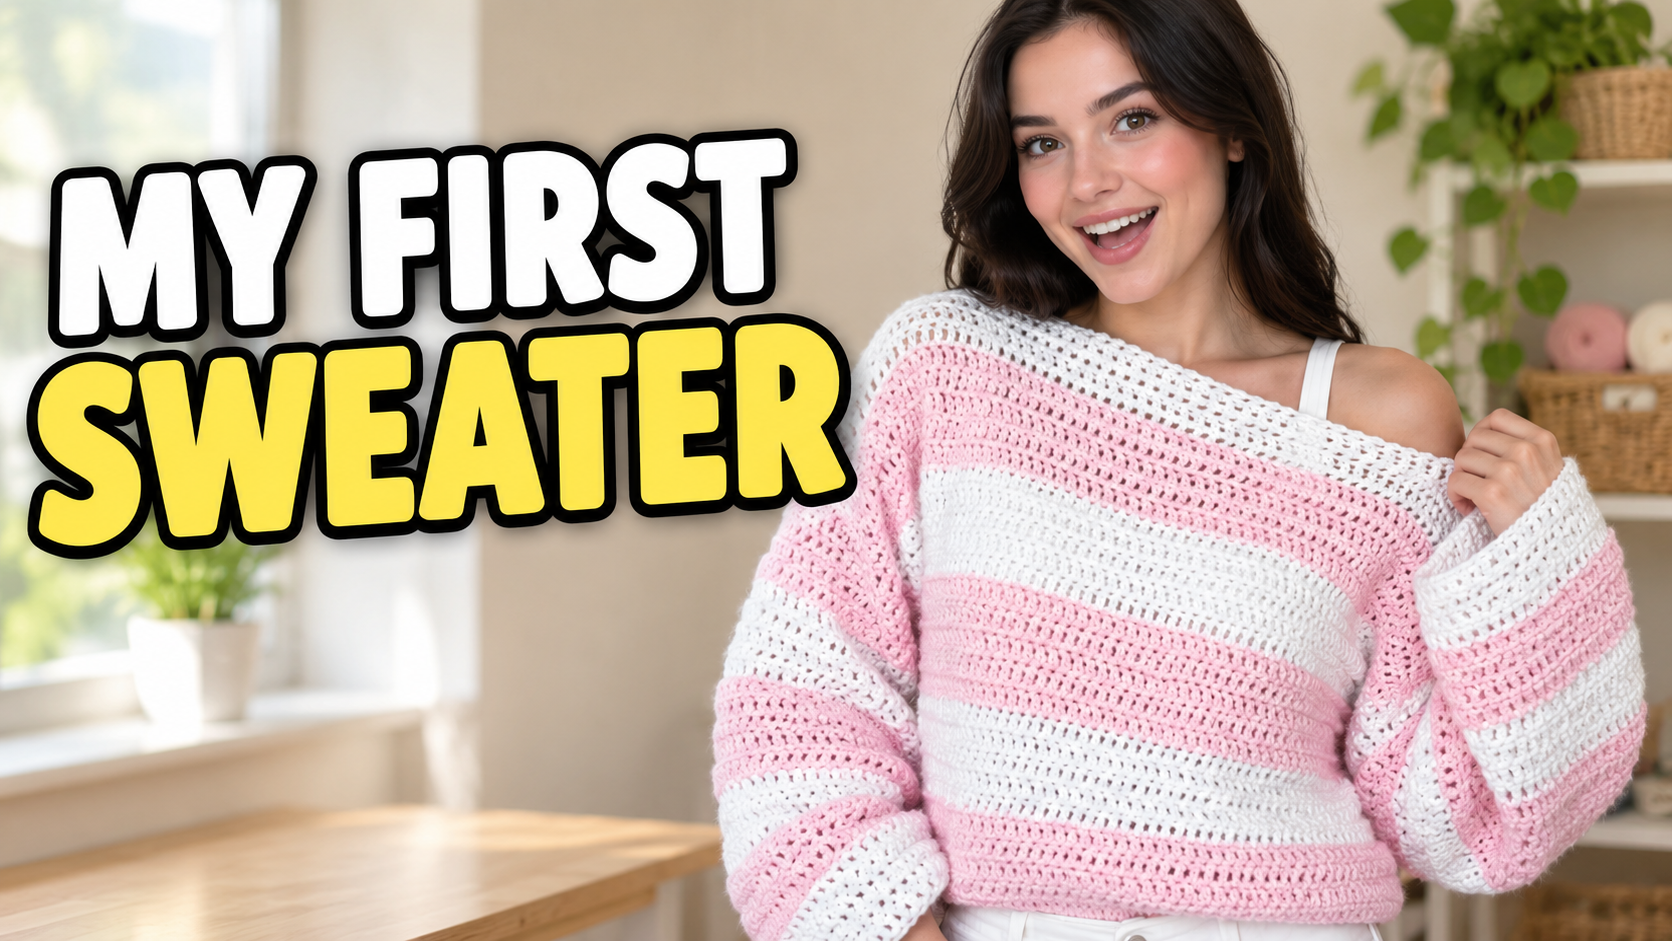
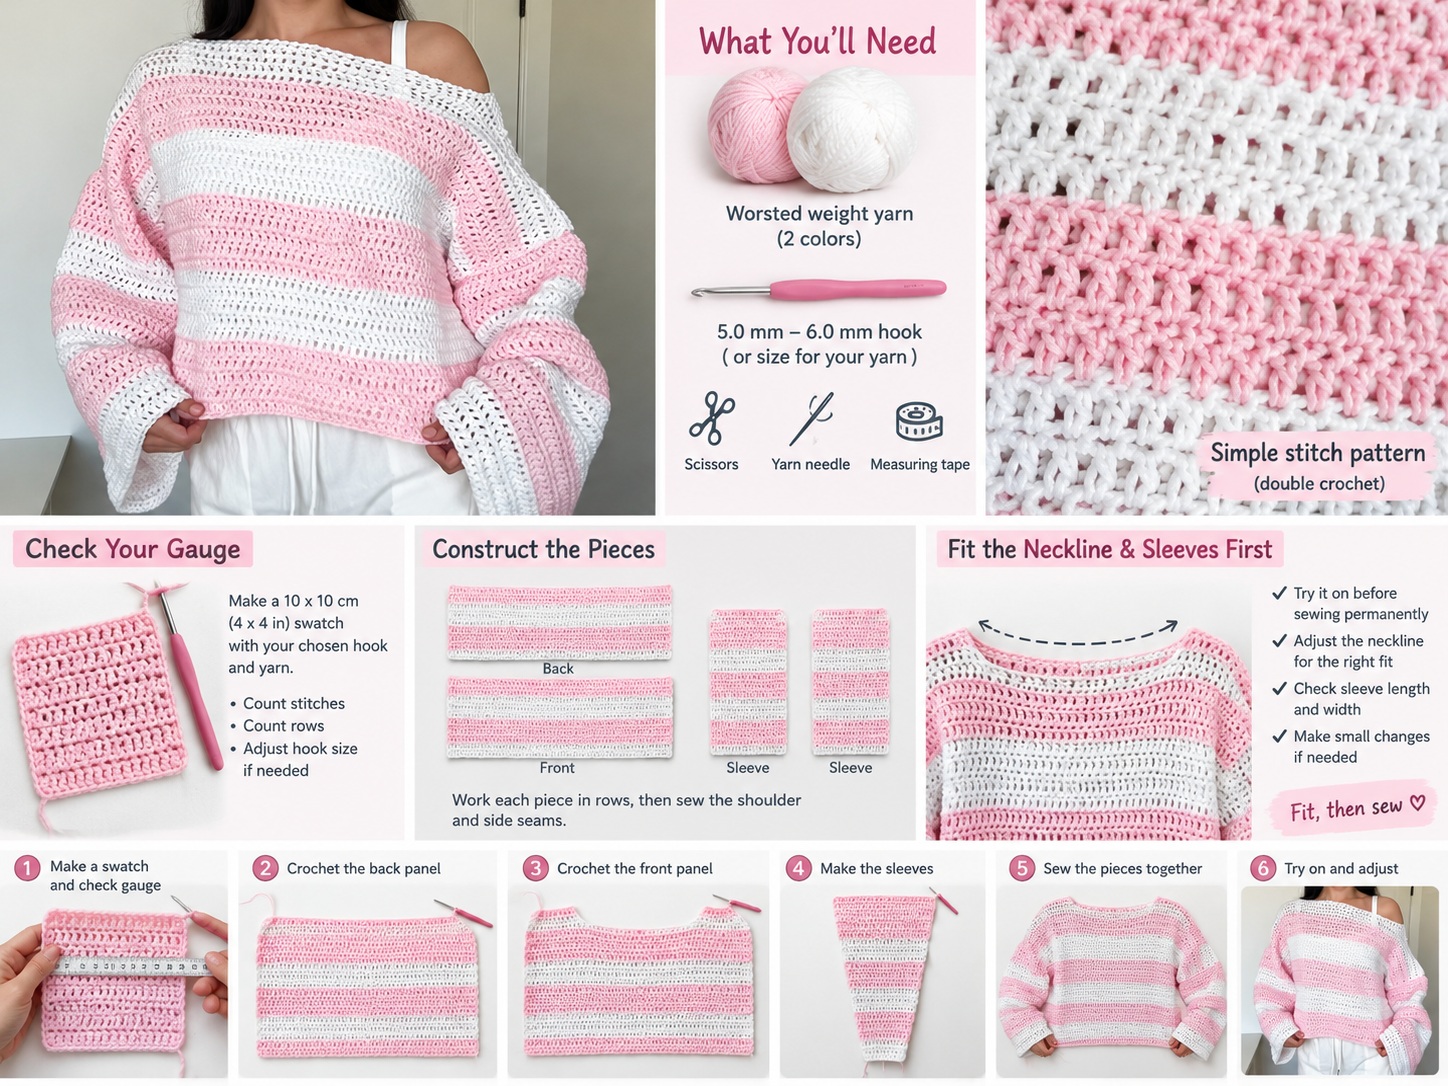
This crochet off the shoulder sweater is a customizable, relaxed fit project made from simple double crochet rectangles. It is designed for beginners who know how to chain, double crochet, turn work, count stitches, and sew seams. Two flat body panels and two flat sleeve panels make the construction straightforward, while the unseamed part of the shoulder edges creates the neckline opening.
Table of Contents
Easy Off the Shoulder Crochet Sweater Pattern
Key Takeaways
- Make two flat body panels and two flat sleeve panels, then seam the pieces together.
- This beginner crochet sweater pattern uses double crochet and basic seaming.
- Customize the body width and length, sleeve length, neckline opening, and optional stripes.
Pattern Overview
- Description: A customizable, relaxed fit sweater made from simple double crochet rectangles. Adjust the body width and length, neckline opening, and sleeve length to suit your preferred fit.
- Style: Off the shoulder, relaxed fit, with optional stripes.
- Construction method: Crochet two flat body panels and two flat sleeve panels, then seam them together. The sleeves are seamed into tubes and attached around the arm openings.
- Skill level: Beginner. You should know how to chain, double crochet, turn your work, count stitches, and sew seams.
- Finished measurements: Choose a body circumference and length from the size chart, or use the adjustment formulas below. The size chart is a starting point, not a substitute for measuring yourself and checking the fit.
The pattern information does not include a tested gauge, complete measurements, or yarn amounts for each size. The figures below are planning estimates based on the stated 6 mm hook and worsted weight yarn. Make and block a gauge swatch before starting, then adjust stitch and row counts to match your own fabric. Explore more crochet sweater patterns and crochet sweater tutorials.
Materials
- Yarn: Worsted weight acrylic or cotton yarn. Estimates assume approximately 200 yd (183 m) per 100 g and include a modest allowance for seaming and swatching. Actual use varies with yarn, gauge, sleeve length, and stripes.
- Hook: 6 mm crochet hook, or size needed to match gauge.
- Notions: Scissors and a yarn needle for sewing and weaving in ends.
- Optional tools: Stitch markers, measuring tape, row counter, and spare yarn in a contrasting color for marking.
For stripes, use two or more colors. The yarn quantities in the size chart are total estimates for the garment, not per color. Browse crochet tools and maker essentials if you need to gather supplies.
Gauge and Terms
Target gauge: 12 double crochet stitches and 7 rows = 4 in (10 cm), measured after washing or blocking. Gauge is the number of stitches and rows in a measured area. It matters because it determines the finished size of your panels.
How to Check Gauge
- With your 6 mm hook, chain 20.
- Work a dc into the third chain from the hook and into each remaining chain. You should have 18 dc.
- Ch 2, turn, and work 1 dc in each stitch across. Repeat until the swatch is at least 5 in (12.5 cm) tall.
- Wash and dry or block the swatch as you plan to care for the sweater.
- Measure across the center of the swatch. For the target gauge, 4 in should contain about 12 stitches and 7 rows.
If you have more than 12 stitches in 4 in, your stitches are smaller than the target; try a larger hook. If you have fewer, try a smaller hook. Row gauge affects length, so use your measured rows per inch when calculating panel length.
Abbreviations and Pattern Notes
US crochet terms are used.
- ch = chain
- dc = double crochet
- st(s) = stitch(es)
- rep = repeat
- RS = right side, the side you want facing outward
- WS = wrong side, the inside of the garment
- Turning chain: At the start of each row, ch 2. In this pattern, the turning chain does not count as a stitch.
- Double crochet: Yarn over, insert the hook into the indicated stitch, yarn over and pull up a loop (3 loops on hook), yarn over and pull through 2 loops, then yarn over and pull through the last 2 loops.
- Panel stitch count: Every row must have the same number of dc. Place a marker in the first and last stitch if helpful. Work the final dc into the last stitch at the row edge; missing it makes the panel narrower.
- Foundation chain math: To make a panel with N dc, chain N + 2. Work the first dc into the third chain from the hook.
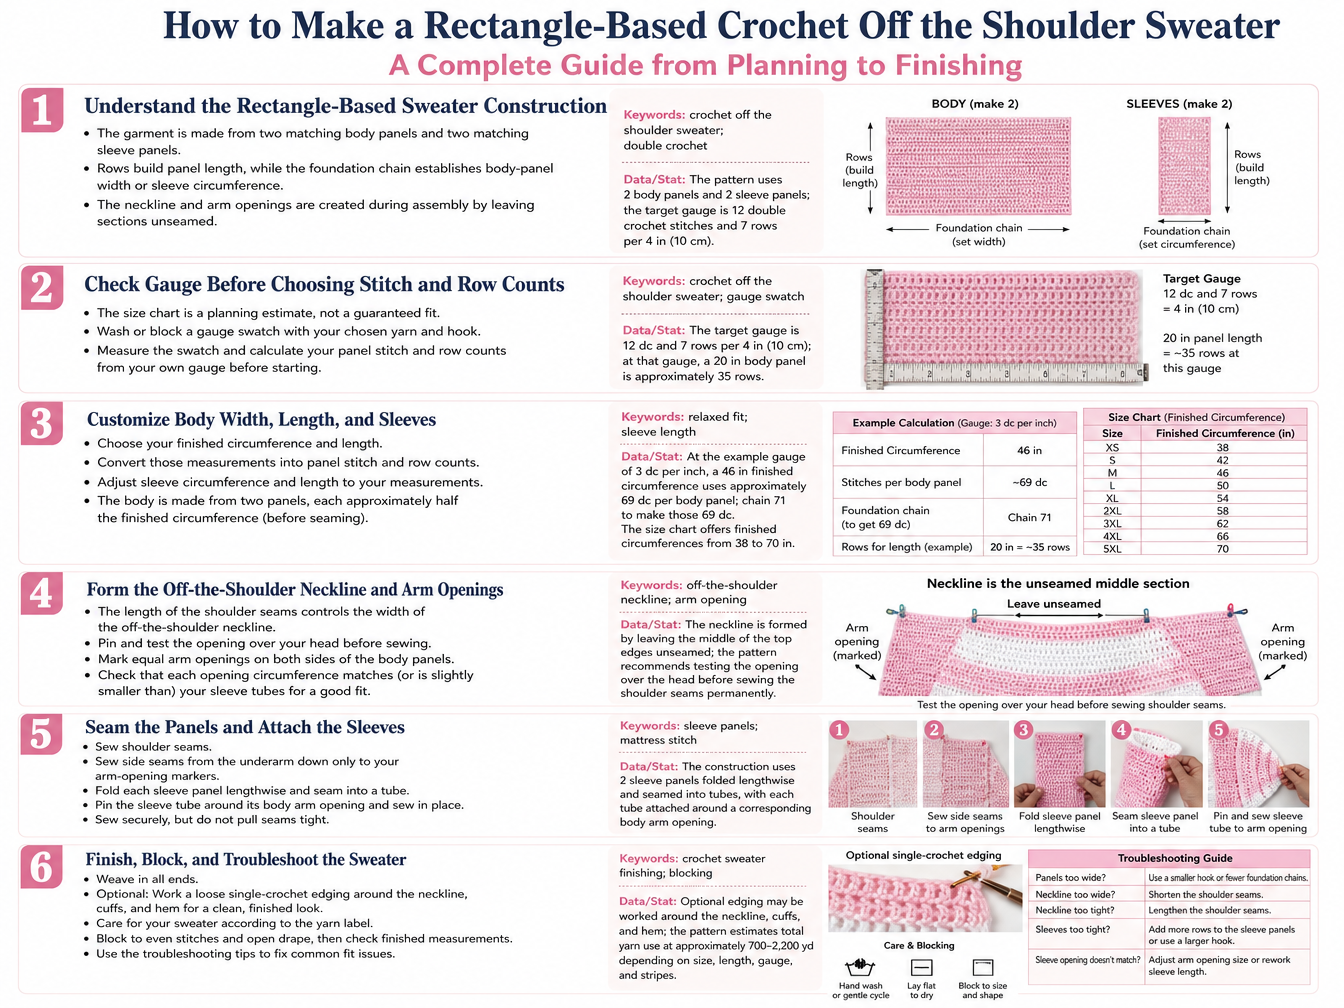
- Panel orientation: The body panel starting chain forms its width across the wearer. Rows build its length from shoulder to hem. The sleeve panel starting chain forms its circumference around the upper arm; rows build its length from shoulder to wrist.
- Fit: This is a relaxed, drop shoulder style. Measure a sweater you like or your body, then choose the desired finished circumference. The neckline is formed by leaving part of the top edges unseamed. Pin the shoulder seams and try the neckline opening over your head before sewing permanently.
- Seam allowance: Keep seams neat but do not pull them tight; a tight seam can reduce the garment width or restrict the arm opening.
- Stripes: The example stripe sequence is 5 rows in Color A, then 5 rows in Color B. Work each color sequence as a multiple of 5 rows, or choose your own stripe width.
Size Chart
These are illustrative finished garment targets, not body size guarantees. The suggested body circumference uses approximately 8 in (20 cm) of positive ease over the example body measurement. Choose based on your own measurements and preferred fit.
For this construction, each body panel is approximately half the finished circumference. At the target gauge of 3 dc per inch, use Body panel stitches = desired finished circumference in inches × 1.5. Round to a whole stitch, then chain 2 more than that stitch count.
| Size | Bust/Width | Length | Sleeve Length | Yarn Required |
|---|---|---|---|---|
| XS | 38 in finished circumference (example body: 30 in) | 20 in | 17 in | 700–900 yd |
| S | 42 in finished circumference (example body: 34 in) | 21 in | 17 in | 800–1,000 yd |
| M | 46 in finished circumference (example body: 38 in) | 22 in | 18 in | 900–1,150 yd |
| L | 50 in finished circumference (example body: 42 in) | 23 in | 18 in | 1,000–1,300 yd |
| XL | 54 in finished circumference (example body: 46 in) | 24 in | 19 in | 1,100–1,450 yd |
| 2X | 58 in finished circumference (example body: 50 in) | 25 in | 19 in | 1,250–1,600 yd |
| 3X | 62 in finished circumference (example body: 54 in) | 26 in | 20 in | 1,400–1,800 yd |
| 4X | 66 in finished circumference (example body: 58 in) | 27 in | 20 in | 1,550–2,000 yd |
| 5X | 70 in finished circumference (example body: 62 in) | 28 in | 21 in | 1,700–2,200 yd |
Planning example: For a 46 in finished circumference, each body panel is approximately 23 in wide. At 3 dc per inch, 23 × 3 = 69 dc per row. Chain 71 to make 69 dc.
Yardage is a rough estimate. Longer sleeves, longer body panels, dense personal tension, or extensive stripes may require more yarn. Buy extra yarn if dye lot matching is important.
Complete Crochet Pattern
Body Panels
Make 2 identical panels, one front and one back. Before chaining, choose the finished circumference and length. Divide the finished circumference by 2 to find the approximate width of each panel.
- Row 1: Make a slip knot. Ch the required number of stitches plus 2. Dc in the third ch from the hook and in each ch across. Count your stitches; this is your panel stitch count.
- Row 2: Ch 2 and turn. Dc in the first st and in each st across, including the final stitch. Stitch count stays the same.
- Row 3: Ch 2 and turn. Dc in each st across. Count the stitches.
- Repeat: Rep Row 3 until the panel reaches your chosen length, measured from the shoulder edge to the hem. At the target row gauge, 20 in is approximately 35 rows; use your own row gauge and measure the fabric rather than relying on row count alone.
- Example length calculation: At 7 rows per 4 in, the row gauge is 1.75 rows per inch. For a 20 in panel: 20 × 1.75 = 35 rows.
Fasten off after the final row. Make a second panel with the same starting chain count and row count.
Optional Stripes
Work 5 rows in Color A, then 5 rows in Color B, repeating as desired. To change color on the last dc of a row, begin the dc in the old color. When 2 loops remain on the hook, drop the old color, yarn over with the new color, and pull through both loops. Secure the yarn tails and crochet over them for a short distance on the next row, then weave in the remaining ends.
Sleeve Panels
Make 2 identical sleeve panels. First measure the upper arm. Also plan the arm opening in the body: after pinning the body side seams, measure around the opening where the sleeve will attach. The sleeve tube opening and body arm opening should be close in size. If they differ, adjust the sleeve panel stitch count or the arm opening before sewing.
- Sleeve foundation: Decide the desired sleeve circumference, usually based on the upper arm measurement plus ease. At the target gauge, multiply the desired circumference in inches by 3 to estimate the number of dc. Chain that number plus 2.
- Row 1: Dc in the third ch from the hook and in each ch across. Count the stitches.
- Row 2: Ch 2 and turn. Dc in each st across, including the last st.
- Repeat: Rep Row 2 until the sleeve panel measures from the shoulder to the desired wrist or cuff length. At the target row gauge, 17 in is approximately 30 rows. Measure your own arm and fabric for the best result.
Fasten off. Make the second sleeve panel with the same stitch count and row count. Each sleeve panel will be folded and seamed along its long edges to form a tube. The starting chain edge becomes the circumference of the sleeve opening.
Assembly
Lay the front and back panels with their RS facing each other. The shoulder edges are the top edges; the side edges run from shoulder to hem.
- Pin the shoulders: Match the top edges. Starting at each outer edge, pin a shoulder seam toward the center, leaving the middle unseamed for the head and neckline. Try the garment on carefully before sewing, or test the opening over your head. Adjust the unseamed opening until it fits comfortably and sits at the preferred off the shoulder position.
- Sew the shoulders: Use a yarn needle and mattress stitch, whip stitch, or another neat seam. Mattress stitch is worked by passing the needle through corresponding edge loops from one panel to the other, alternating sides. Do not pull the yarn so tightly that the seam puckers.
- Mark the arm openings: With the panels still aligned, pin each side seam from the hem upward, stopping below the shoulder to leave an opening for the sleeve. Make the two openings the same depth. Check that each opening is large enough for the planned sleeve tube.
- Sew the side seams: Sew each side seam from the hem upward to the arm opening marker. Fasten off securely.
- Form the sleeves: Fold each sleeve panel lengthwise with RS together. Match the long edges and sew them together to make a tube. Turn RS out.
- Attach sleeves: Match the sleeve seam to the underside of the arm opening. Pin the sleeve tube evenly around the opening, easing small differences without gathering tightly. Sew the sleeve edge to the body arm opening. Repeat for the second sleeve.
- Neckline and edges: The neckline is formed by the unseamed shoulder area; no edging is required. For a cleaner edge, work one loose round of sc around the neckline, cuffs, and hem, taking care not to draw the fabric in. This optional edging is not included in the gauge or size calculations.
Custom Adjustments
Use your blocked swatch gauge for the calculations. The examples below use 3 dc per inch and 1.75 rows per inch.
- To increase width: Measure the desired finished circumference. Each body panel should be approximately half of that measurement. Calculate body stitches per panel: desired panel width in inches × stitches per inch = stitches per panel. With the example gauge: panel width × 3 = dc per row. Add 3 dc per inch of extra panel width. Because there are two panels, adding 1 in to each panel increases the finished circumference by about 2 in. Chain 2 more than the desired dc count.
- To increase length: Calculate rows to add: extra length in inches × rows per inch = rows to add. At the example row gauge, add about 7 rows for each 4 in of extra length. To shorten the garment, work fewer rows by the same calculation.
- To adjust sleeves: Add about 3 dc to the sleeve panel foundation for each extra inch of sleeve circumference. Chain 2 more than the desired stitch count. Check that the finished sleeve tube fits the body arm opening. Add about 1.75 rows for each extra inch of sleeve length at the example row gauge. Make both sleeves with matching stitch and row counts unless intentionally designing an asymmetrical garment.
- To adjust the neckline: Change how far the shoulder seams extend inward from the outer edges. A shorter seam leaves a wider opening; a longer seam leaves a smaller opening. Pin and test the opening before sewing permanently.
Customization Options
Use the blocked swatch gauge for every adjustment. For width, multiply the desired panel width in inches by your stitches per inch. At the example gauge, each panel width in inches × 3 gives the dc per row, and adding 1 in to each panel increases finished circumference by about 2 in. Chain 2 more than the desired dc count.
For length, multiply the extra length in inches by rows per inch to find rows to add. At the example row gauge, add about 7 rows for each 4 in of extra length, or work fewer rows to shorten the garment. For sleeves, add about 3 dc to the sleeve panel foundation for each extra inch of sleeve circumference, and about 1.75 rows for each extra inch of sleeve length. Check that the sleeve tube fits the body arm opening.
For the neckline, change how far the shoulder seams extend inward from the outer edges. A shorter seam leaves a wider opening, while a longer seam leaves a smaller opening. Pin and test the opening before sewing permanently. For more fit guidance, see the crochet sweater pattern sizing guide and this off the shoulder neckline guide.
Finishing
- Weave in all yarn ends with a yarn needle, securing them on the inside without pulling the fabric.
- Check that shoulder seams, side seams, and sleeve attachments are secure and comfortable.
- Wash and block the garment according to the yarn label. Acrylic and cotton can behave differently; test your care method on the swatch first. Do not apply high heat to acrylic yarn.
- Lay the sweater flat to dry and shape it to the measurements you chose. Avoid stretching the neckline or sleeve openings.
- Measure the blocked sweater and compare it with your intended finished measurements. If the panels are wider or longer than planned, remember that blocking may have changed the fabric.
Troubleshooting
| Problem | Solution |
|---|---|
| The panel edges are uneven or the panel gets narrower. | Count stitches after every few rows. Make sure you work into the first stitch after the turning chain and into the final stitch at the far edge. The ch 2 does not count as a stitch in this pattern. |
| My gauge is wrong. | Wash or block the swatch before measuring. If you have too many stitches per 4 in, try a larger hook; if you have too few, try a smaller hook. Recalculate the foundation and row counts using the new gauge. |
| The sweater is too small or too large. | Check the blocked panel width and multiply it by 2 to estimate the body circumference. For more width, add the stitch count calculated in Custom Adjustments. For less width, subtract stitches evenly from both panels. |
| The neckline slips too far or feels too tight. | Before completing the shoulder seams, pin them at a different length and test the opening. Shorten the shoulder seams for a wider opening; lengthen them for a smaller opening. |
| The arm opening and sleeve do not fit together. | Measure around the body arm opening and compare it with the sleeve tube opening. Adjust the sleeve stitch count or arm opening size before sewing. Pin the sleeve in place first and distribute any small difference evenly. |
| I may run out of yarn. | Check the yarn label for yardage, weigh the yarn used for a swatch or finished panel, and buy extra before starting if possible. Longer body or sleeve lengths and stripes may use more yarn than the estimates. |
For additional sweater construction help, read common crochet sweater mistakes and step by step fixes.
Pattern Summary
- Final size range: Customizable; the chart gives XS to 5X planning targets, and formulas allow further adjustment.
- Yarn amount: Approximately 700–2,200 yd, depending on finished size, length, sleeve length, gauge, and stripes.
- Hook size: 6 mm, or size needed to meet gauge.
- Main stitch: Double crochet.
- Construction method: Two seamed body panels and two seamed sleeve panels; shoulders and sides are sewn, leaving a neckline and arm openings for the sleeves.
Conclusion
This easy panel construction creates a relaxed fit sweater from four rectangles, with a neckline shaped by the shoulder seams and sleeves attached around the arm openings. Use the size chart as a planning guide, check your blocked gauge, and customize the body, sleeves, neckline, or stripes to suit your measurements. Save this crochet off the shoulder sweater pattern and gather your yarn and hook to get started. You can also explore more crochet fashion ideas for styling inspiration.
Video Tutorial
Watch the Step by Step Crochet Tutorial
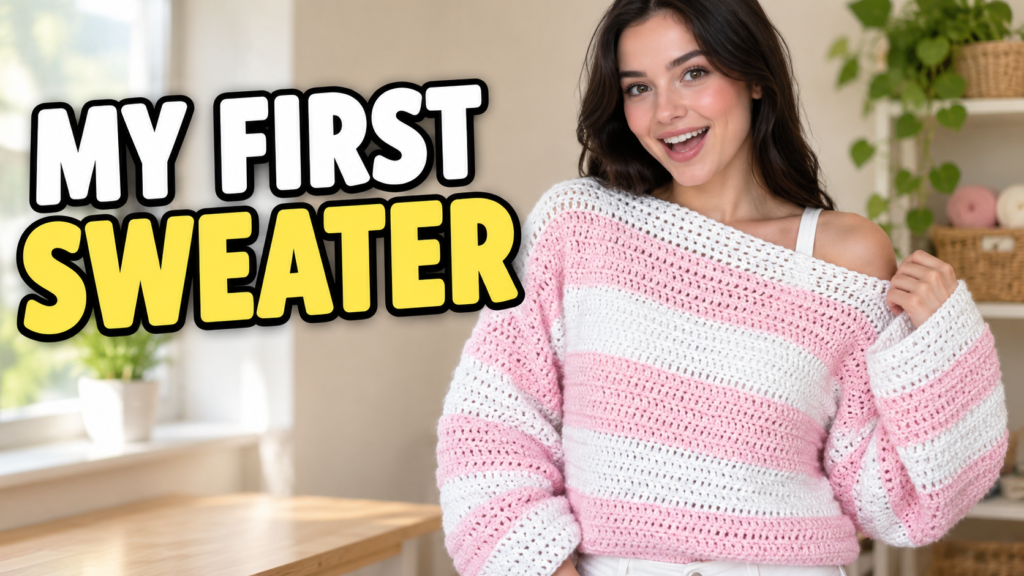
Follow the video tutorial to see the construction, crochet techniques, and assembly process explained visually.
Frequently Asked Questions
Is this off the shoulder crochet sweater suitable for beginners?
Yes. The pattern is rated beginner. You should know how to chain, double crochet, turn your work, count stitches, and sew seams.
What yarn and hook are used for this crochet sweater pattern?
Use worsted weight acrylic or cotton yarn and a 6 mm crochet hook, or the hook size needed to match the target gauge. The yarn estimates assume approximately 200 yd (183 m) per 100 g.
How do I choose a size for the sweater?
The chart gives illustrative finished garment targets from XS to 5X, not body size guarantees. Measure yourself or a sweater you like, choose the desired finished circumference, and check the fit as you work.
How is the neckline made?
The neckline is formed by leaving part of the top edges unseamed. Pin and test the opening over your head before sewing permanently. A shorter shoulder seam leaves a wider opening; a longer seam leaves a smaller opening.
Can I change the body or sleeve length?
Yes. Use your blocked row gauge to calculate rows to add or remove. At the example row gauge, add about 7 rows for each 4 in of body length or about 1.75 rows for each extra inch of sleeve length.
Free Pattern Delivery
Get Your FREE Crochet Pattern PDF
Love this pattern? Enter your name and email below to get your free printable crochet pattern PDF delivered straight to your inbox!