Every stitch tells a story · Free PDF Pattern with Weekly Newsletter Claim Free Guide →

Every stitch tells a story · Free PDF Pattern with Weekly Newsletter Claim Free Guide →
Crochet Sweater Tutorial: 4 Amazing Steps In This Guide
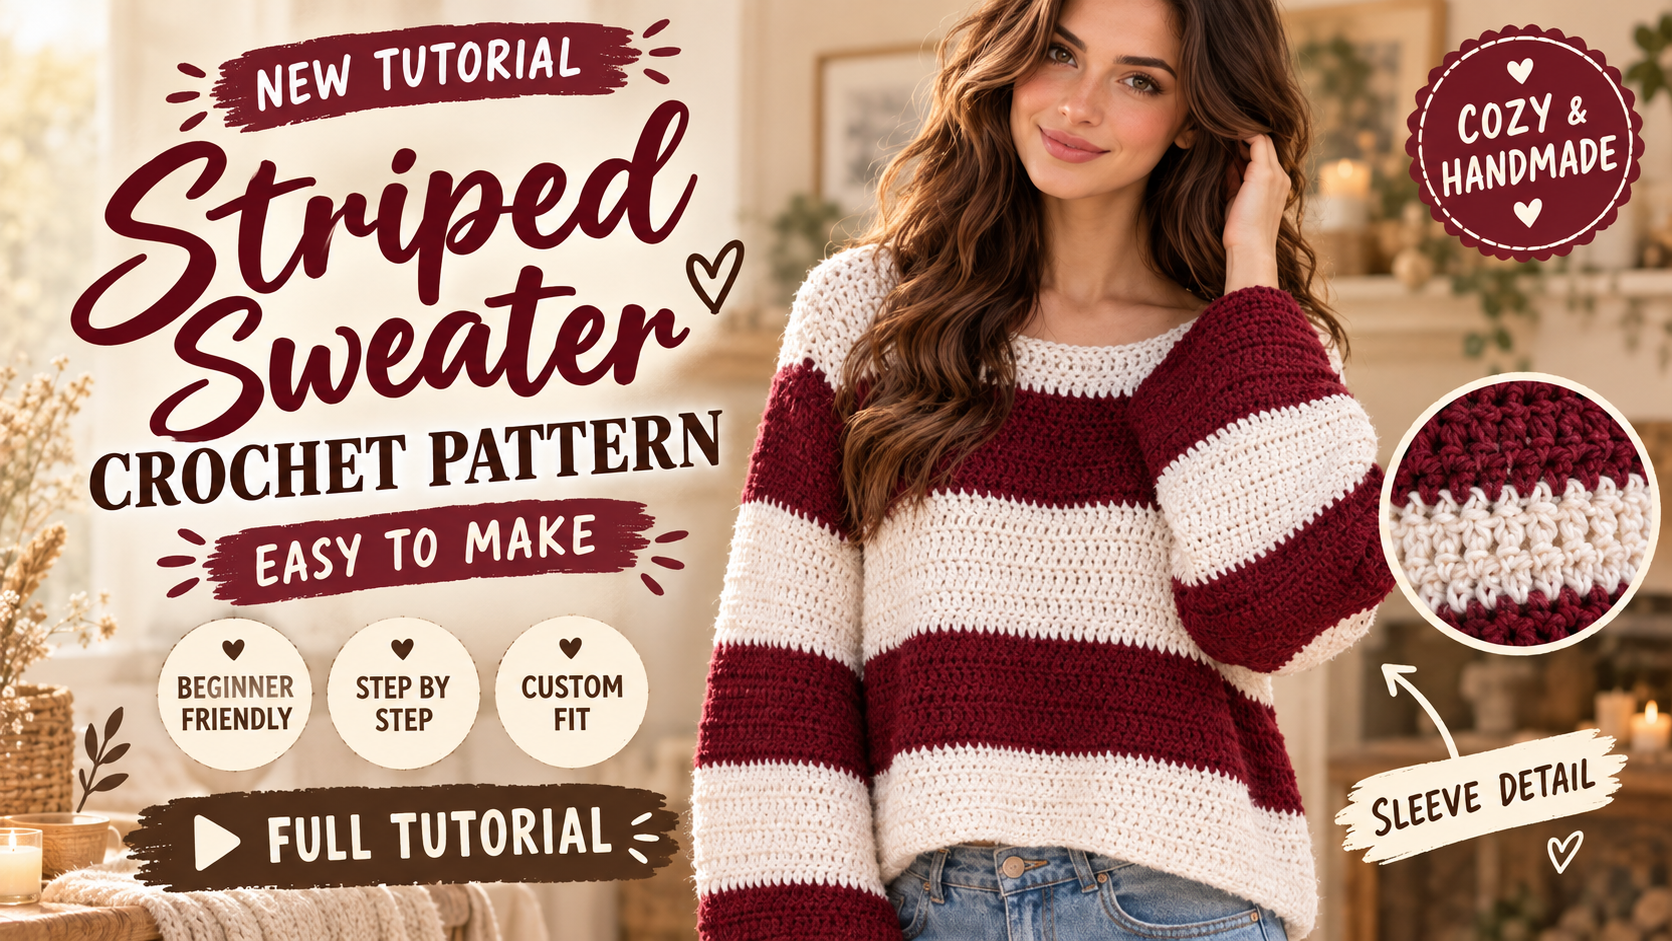
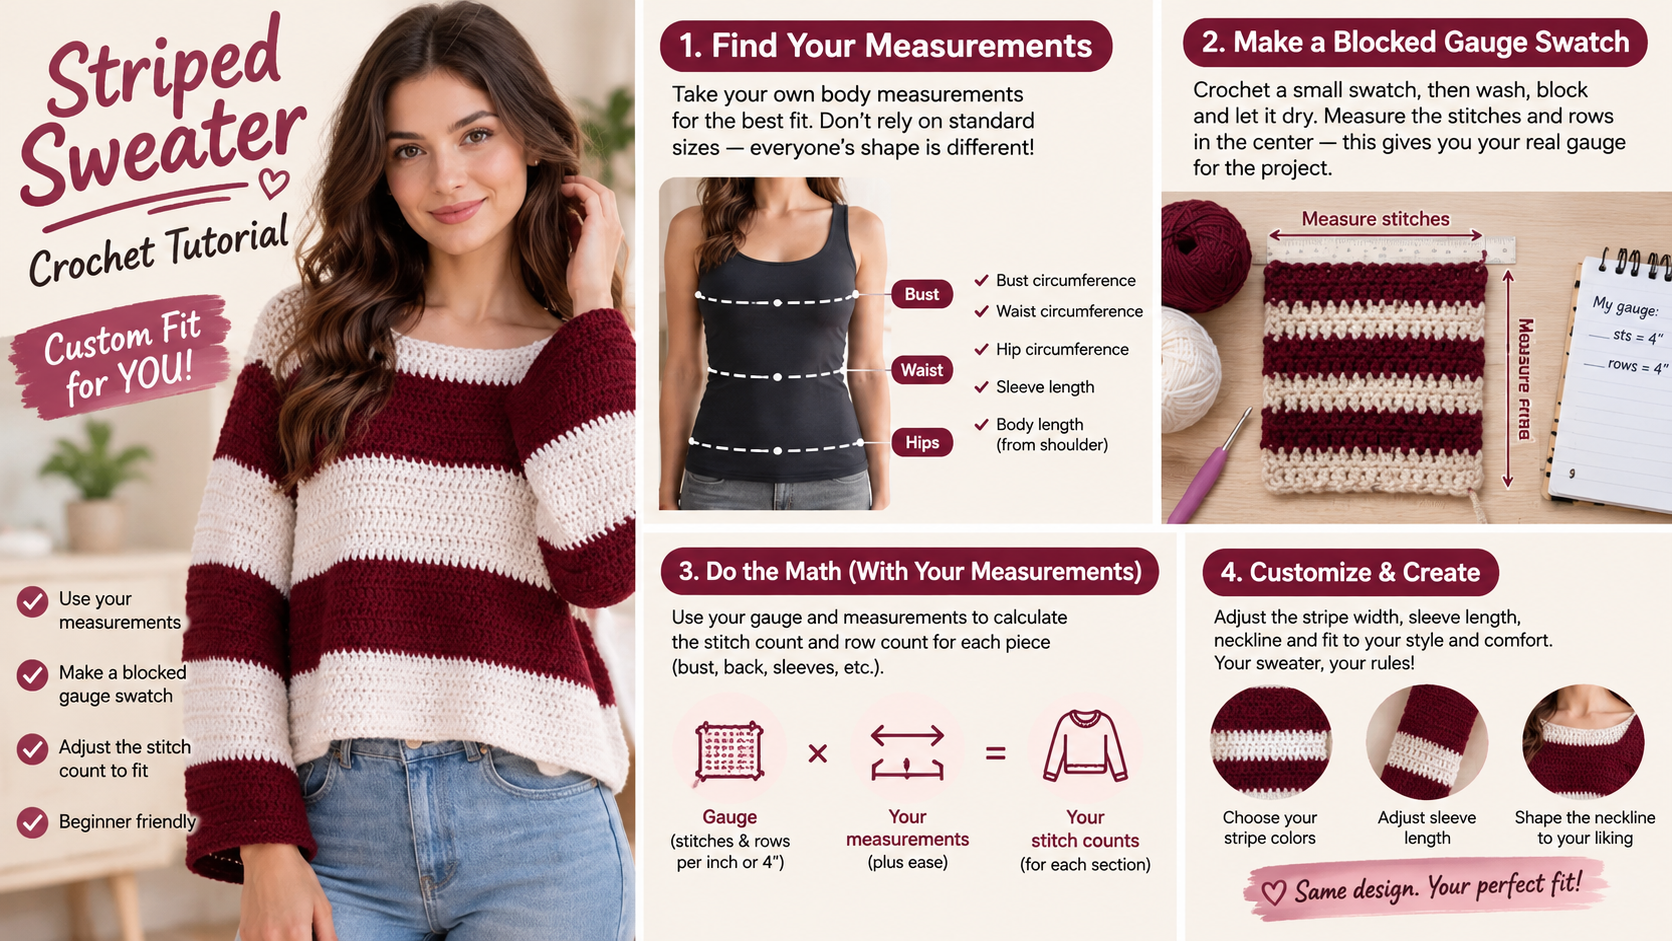
Crochet Sweater Tutorial lovers can make this easy striped drop shoulder sweater from four flat double crochet panels, then seam the pieces together and finish the neckline with single crochet. This beginner friendly project is for crocheters who know how to chain, work double crochet, change colors, and sew seams with a tapestry needle. Its panel construction keeps shaping straightforward, while custom gauge calculations let you choose a fit and length that suit your measurements.
Table of Contents
Key Takeaways
- The sweater is built from two body panels and two sleeve panels worked flat, then seamed together.
- This is a beginner level pattern using chain, double crochet, color changes, and tapestry needle seaming.
- Custom sizing is based on your blocked gauge and measurements, rather than a tested numeric size grading.
Introduction
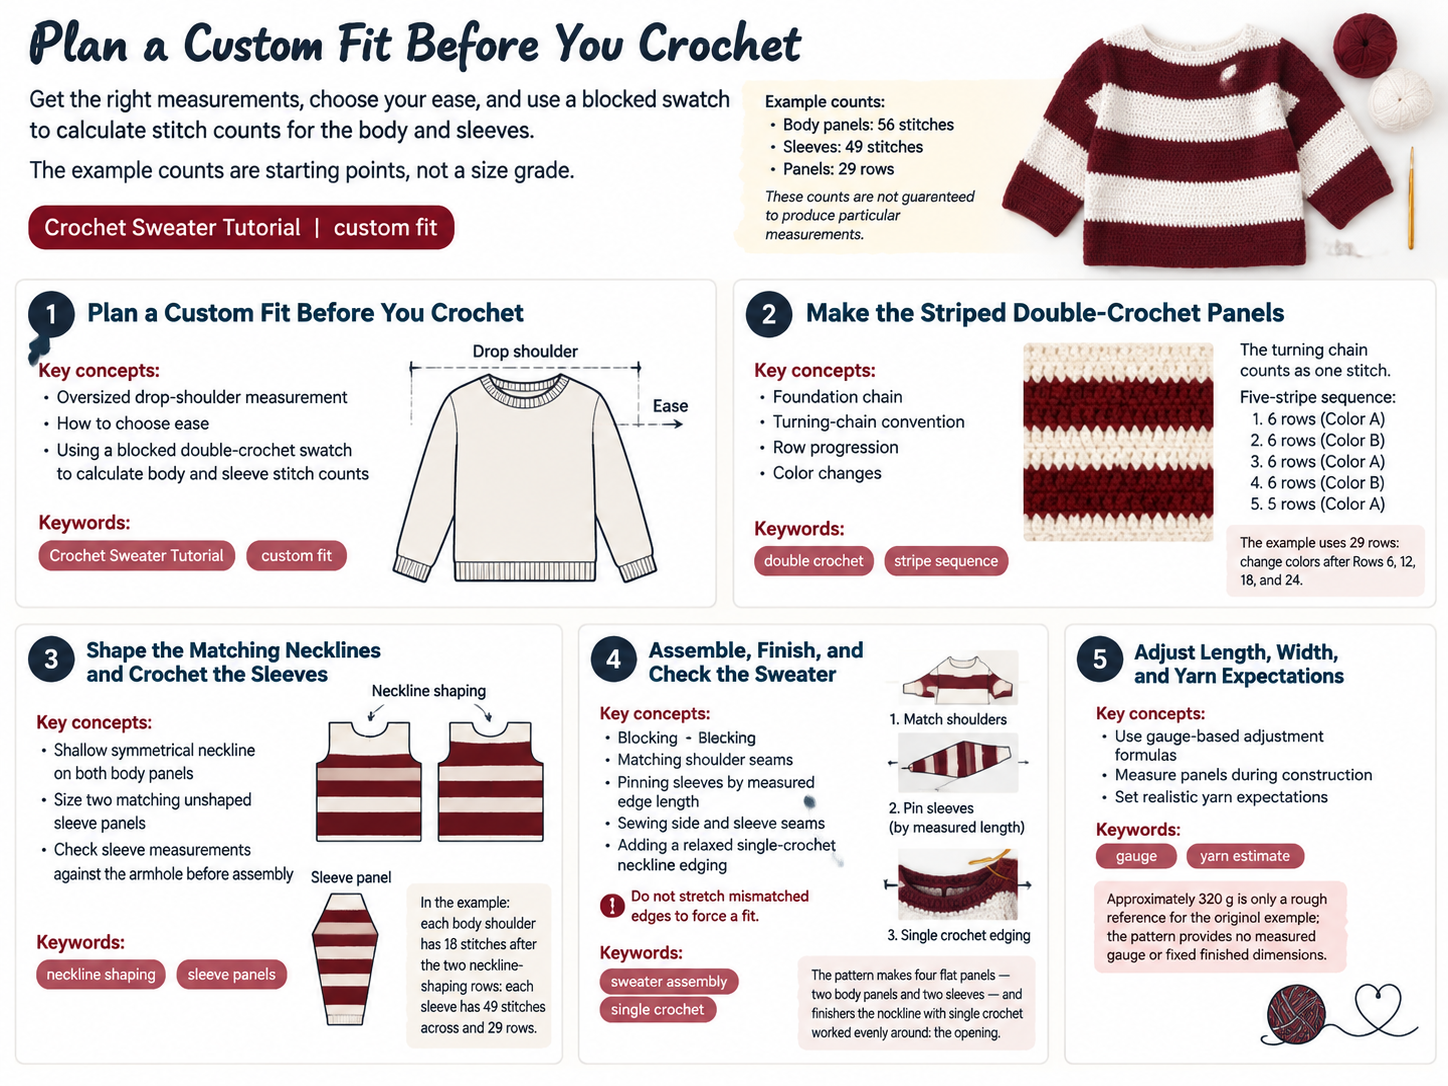
This striped sweater is made with simple double crochet fabric and an oversized drop shoulder shape. The four flat panels make it easier to check the width and length as you work, and you can adjust the stitch counts using your blocked swatch before beginning. The instructions include a 56 stitch body example, a 49 stitch sleeve example, and a 29 row example, but these are not guaranteed standard sizes.
If you are learning garment construction, explore more crochet sweater tutorials and the guide to common crochet sweater mistakes. The pattern below retains the supplied stitch counts, measurements, and customization guidance.
Pattern Overview
- Description: A beginner friendly sweater made from four striped, double crochet panels and finished with a simple single crochet neckline.
- Style: Oversized, drop shoulder fit.
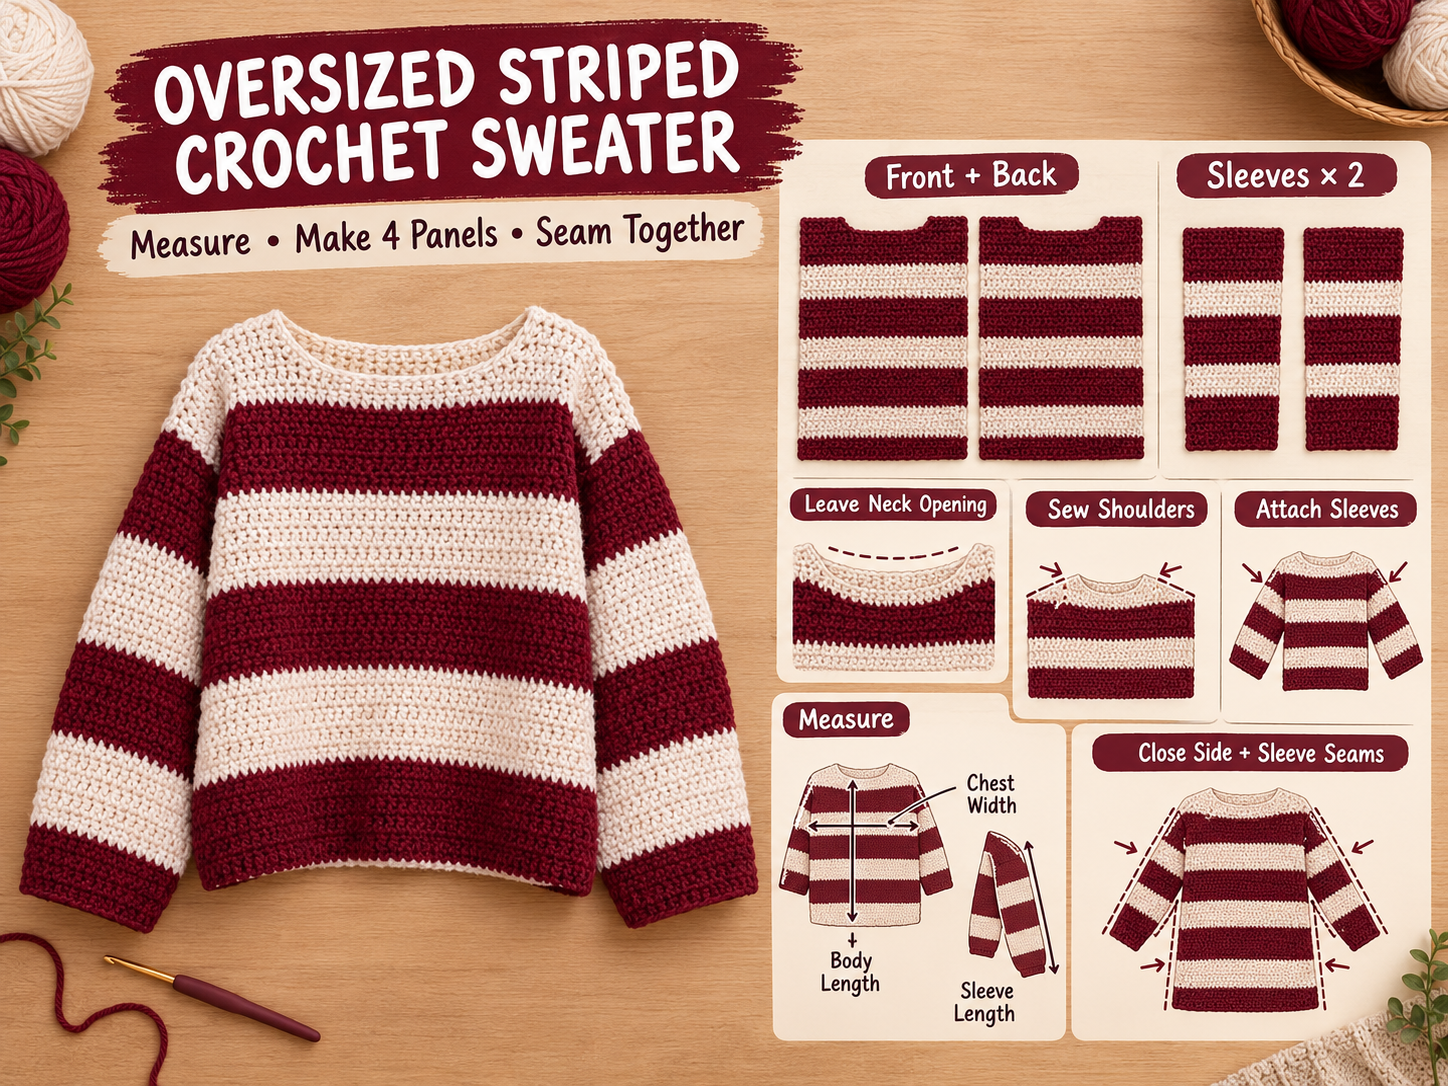
- Construction method: Two body panels and two sleeve panels are crocheted flat, then seamed together.
- Skill level: Beginner. You should know how to chain, double crochet, change colors, and sew seams with a tapestry needle.
- Finished measurements: This is a custom fit pattern, not a tested numeric XS to 5XL grading. Choose your measurements and calculate stitch counts using your blocked gauge. A supplied example uses 56 stitch body panels, 49 stitch sleeves, and 29 rows per panel; those counts are a starting example, not guaranteed sizes.
- Time: The original project was reported to take five days; your time will vary with experience, yarn, and fit adjustments.
Important sizing note: The notes do not include yarn weight, gauge, or finished panel measurements. It would be misleading to assign exact inch or centimeter sizes or promise that 320 g makes every size. Use the gauge swatch and formulas below to calculate a custom fit. The 320 g estimate applies only as a rough reference for the original example.
Materials
- Yarn: Approximately 320 g for the original example, divided among your chosen stripe colors. This amount is not a reliable estimate for larger or longer custom sizes. Choose a yarn suitable for a 5 mm hook; the notes do not specify fiber or yarn weight.
- Hook: 5 mm crochet hook, or a different size if needed to meet your chosen gauge.
- Notions: Tapestry needle, stitch markers, scissors, and measuring tape.
- Optional tools: Blocking mats and pins, a row counter, and a kitchen scale to track yarn use.
For more maker essentials, browse the crochet tools collection.
Gauge and Terms
No measured gauge was provided, so this pattern does not claim a fixed stitch or row gauge. Make and block a swatch in double crochet with your intended yarn and hook before calculating your garment. Use US crochet terminology throughout.
- Chain a loose foundation with at least 18 chains.
- Work double crochet rows until the swatch is about 15 cm or 6 in tall.
- Fasten off and block the swatch as you plan to block the finished sweater.
- Measure across the center of the swatch, avoiding the edges.
Record the stitch gauge (S), the number of double crochet stitches per 10 cm or 4 in, and the row gauge (R), the number of rows per 10 cm or 4 in. Use the same stitch count convention throughout: the turning chain counts as one stitch in this pattern.
Check gauge: Your fabric should be comfortable to wear and not overly stiff or loose. If you have too many stitches across 10 cm or 4 in, try a larger hook; if you have too few, try a smaller hook. Re swatch and recalculate after changing hooks.
Abbreviations
- ch = chain
- dc = double crochet
- sc = single crochet
- sl st = slip stitch
- st(s) = stitch(es)
- dc2tog = double crochet two stitches together; yarn over, insert hook in next stitch and pull up a loop, yarn over and pull through 2 loops; yarn over, insert hook in next stitch and pull up a loop, yarn over and pull through 2 loops; yarn over and pull through all 3 loops on hook.
Notes Before Starting
- Measuring for the fit: For an oversized drop shoulder sweater, measure across the upper body from one arm area to the other, including a few centimeters or inches of upper sleeve on both sides. Do not use shoulder to shoulder width alone. Decide how much extra room you want before calculating the panels.
- Panel orientation: The body panel’s foundation chain determines its width. Its rows determine its length. A sleeve panel’s foundation chain determines the sleeve’s upper arm width; its rows determine sleeve length.
- Turning chain: Ch 3 counts as one dc. Skip the first stitch at the base of the turning chain and work the first dc into the next stitch. At the end of the row, work the last dc into the top of the previous row’s turning chain. Count the turning chain as a stitch.
- Stripe plan: The example has five stripes per panel: four stripes of 6 rows each and a top stripe of 5 rows, for 29 rows total. Choose stripe colors and order before starting. Use the same row plan for each panel unless you intentionally want a different layout.
- Color changes: For a clean change at a row end, work the final dc until two loops remain on the hook, then draw the new color through those two loops. Ch 3 with the new color and turn. Secure ends later. Carry a color up the side only if the carried strand can lie flat; otherwise cut it and weave in the ends.
- Neck shaping assumption: The notes mention decreases but do not fully specify their placement. The example below uses a shallow, symmetrical opening: both body panels are shaped identically over the final two rows. This keeps the shoulder edges matching. If you prefer an unshaped, wider neckline, work all 29 rows across the full panel and finish with the neckline edging.
- Joining and fit: Measure the panels and pin them together before sewing. The sleeve to armhole seam must be matched by measured edge length; stitch counts alone do not guarantee a fit.
Size Chart
This pattern is custom sized. “Bust/Width” means the finished circumference around the body. Use your body measurement plus your chosen ease to determine it. The notes do not provide standard size measurements or a verified gauge, so numeric finished measurements would be invented.
| Size | Bust/Width | Length | Sleeve Length | Yarn Required |
|---|---|---|---|---|
| XS | Custom: body measurement + chosen ease | Custom; calculate from row gauge | Custom; measure arm | Estimate from swatch and panel area |
| S | Custom: body measurement + chosen ease | Custom; calculate from row gauge | Custom; measure arm | Estimate from swatch and panel area |
| M | Custom: body measurement + chosen ease | Custom; calculate from row gauge | Custom; measure arm | Estimate from swatch and panel area |
| L | Custom: body measurement + chosen ease | Custom; calculate from row gauge | Custom; measure arm | Estimate from swatch and panel area |
| XL | Custom: body measurement + chosen ease | Custom; calculate from row gauge | Custom; measure arm | Estimate from swatch and panel area |
| 2XL–5XL | Custom: body measurement + chosen ease | Custom; calculate from row gauge | Custom; measure arm | Estimate from swatch and panel area |
Calculate the body panel width: Divide your desired finished sweater circumference by 2 to get the width of one front or back panel. Multiply that panel width by your stitch gauge per centimeter or inch to find the approximate number of stitches.
Example panel counts from the notes: Front and back each begin with ch 58 for 56 dc; each sleeve begins with ch 51 for 49 dc. Use these counts only if they produce the measurements you want at your gauge. For more fit guidance, see the crochet sweater pattern sizing guide.
Complete Crochet Pattern
Before starting, use your blocked gauge and target measurements to calculate custom stitch counts. The sample counts below are examples, not guaranteed finished sizes. Keep the front and back panels alike and compare the measured pieces before joining.
Body Panels
Make 2 panels: one front and one back.
Calculate Your Foundation
- For the example, each body panel has 56 stitches.
- Foundation chain = desired stitch count + 2.
- Example: 56 + 2 = ch 58.
- The first dc is made in the fourth chain from the hook. The first 3 chains count as the first dc, so the row has 56 stitches total.
For your own size, calculate the stitch count from your blocked gauge and target panel width, then add 2 chains.
Stripe Sequence
Work 29 rows total. Change colors at the stripe boundaries using the color change method in Notes Before Starting.
- Stripe 1: Rows 1 to 6, 6 rows
- Stripe 2: Rows 7 to 12, 6 rows
- Stripe 3: Rows 13 to 18, 6 rows
- Stripe 4: Rows 19 to 24, 6 rows
- Stripe 5: Rows 25 to 29, 5 rows
Make Each Body Panel
- Foundation: Ch 58 for the 56 stitch example, or chain the number calculated for your size.
- Row 1 (RS): Dc in 4th ch from hook and in each ch across. The first 3 chains count as a dc. 56 dc.
- Row 2: Ch 3, turn. Skip the first stitch at the base of the ch 3; dc in the next stitch and each stitch across, working the last dc into the top of the previous row’s turning chain. 56 sts, counting the turning chain.
- Rows 3 to 27: Repeat Row 2, changing colors after Rows 6, 12, 18, and 24 according to the stripe sequence. Keep the stitch count even.
- Row 28, begin shallow neckline shaping: Ch 3, turn. Work across the first 20 sts, counting the turning chain. Dc2tog over the next 2 sts. Fasten off this shoulder section, leaving the center stitches unworked. Rejoin yarn at the opposite outer edge; dc2tog over the first 2 sts at the neckline edge, then work across the remaining 18 sts. Count: 19 sts on each shoulder; 16 center sts remain unworked.
- Row 29: Work each shoulder separately. Ch 3, turn. Dc across to the last 2 sts at the neckline edge; dc2tog. Fasten off. Repeat for the other shoulder, decreasing at its neckline edge. Count: 18 sts on each shoulder.
Repeat the complete panel instructions for the second body panel, including the same neckline shaping. The identical shaping is an explicit pattern assumption to keep the shoulder seams aligned; it gives both front and back a shallow neck opening.
Sleeve Panels
Make 2 sleeve panels. Measure from the body’s shoulder or armhole area along your arm to choose sleeve length. The example sleeve panel has 49 stitches across and 29 rows long. Check your measured sleeve width and length before making both sleeves.
- Foundation: For the example, ch 51 to make 49 stitches. For a custom size, calculate the stitch count from the desired upper sleeve width and your stitch gauge, then add 2 chains.
- Row 1: Dc in 4th ch from hook and in each ch across. The first 3 chains count as a dc. 49 sts.
- Row 2: Ch 3, turn. Skip the first stitch at the base of the ch 3; dc in the next stitch and each stitch across, working the final dc into the top of the previous row’s turning chain. 49 sts, counting the turning chain.
- Rows 3 to 29: Repeat Row 2, following the same 6, 6, 6, 6, 5 row stripe sequence as the body. Make the top stripe 5 rows. Do not shape the sleeve in this example.
Make the second sleeve to match. Before assembly, compare the two sleeves for width, length, stripe placement, and row count.
Assembly
- Block the panels first if you plan to block the finished garment. Lay them to your calculated measurements, smooth the edges, and let them dry completely.
- Sew the shoulder seams: Place the front and back with right sides facing inward. Align the outer shoulder edges and sew each pair of matching shoulder stitches together with yarn and a tapestry needle. The shaped example has 18 shoulder stitches on each side.
- Lay the body flat: Align the shoulder seams. Mark the midpoint of each sleeve’s top edge and pin it to the corresponding shoulder seam.
- Attach the sleeves: Pin outward from the midpoint toward each side. Match the sleeve edge to the body armhole opening by measured length, distributing any small difference evenly. If the edges differ substantially, adjust the sleeve or armhole before sewing rather than forcing the fabric.
- Sew the side and sleeve seams: With right sides together, sew from the lower body hem up to the underarm, then continue along the underside of the sleeve to its cuff. Repeat on the other side. Keep the seam allowance consistent.
- Finish the neckline: With the right side facing, attach yarn at a shoulder seam. Work sc evenly around the neck opening: place approximately 1 sc in each stitch across the flat neckline edges and 1 to 2 sc along each row edge as needed to keep the edging flat. Do not put multiple sc into the top of a single stitch. Join with sl st to the first sc. If the edge ripples, use fewer sc; if it pulls in, use more.
- Optional edge finishing: The pattern does not specify cuffs or a hem border. You may leave the edges plain or add a simple round of sc, checking that it does not draw the fabric inward.
Custom Adjustments
All calculations depend on your blocked gauge. Measure the actual panel after several rows and re check that it is on track.
- To increase width: Desired panel width (cm or in) × stitch gauge per cm or in = target stitches. Round to a whole stitch. Foundation chain = target stitches + 2. To widen an existing panel, add the required number of stitches to its foundation chain. For example, if you need 4 more dc, add 4 chains to the foundation chain. Keep front and back panels the same width.
- To increase length: Desired added length (cm or in) × row gauge per cm or in = rows to add. Add that many rows to both body panels. For stripes, add complete 6 row stripes where possible, or distribute extra rows among stripes while keeping the front and back identical. The example length is 29 rows. At a different row gauge, 29 rows will not necessarily produce the same finished length.
- To adjust sleeves: To widen a sleeve, calculate the additional stitches from the desired upper sleeve width and stitch gauge; add that number to the sleeve foundation chain. To lengthen or shorten a sleeve, multiply the desired length change by row gauge to find rows to add or remove. Make both sleeves identical. Re check that the sleeve’s top edge and the body armhole opening are compatible before sewing.
- To adjust neckline: The worked example makes a shallow, symmetrical opening by decreasing each shoulder twice over Rows 28 to 29 on both body panels. For a different neckline width or depth, change the center stitches and shaping rows on both panels together, then verify that the shoulder seam stitch counts still match. Do not change the shaping without rechecking the seam alignment.
Customization
Use only your blocked gauge for the calculations. The instructions are custom fit rather than a tested numeric XS to 5XL grade. For more beginner project ideas and garment options, see crochet sweater for beginners and crochet sweater patterns.
- Width adjustment: Desired panel width (cm or in) × stitch gauge per cm or in = target stitches. Round to a whole stitch. Foundation chain = target stitches + 2. Keep front and back panels the same width.
- Length adjustment: Desired added length (cm or in) × row gauge per cm or in = rows to add. Add that many rows to both body panels. Add complete 6 row stripes where possible, or distribute extra rows among stripes while keeping the front and back identical.
- Sleeve adjustment: Calculate additional stitches from the desired upper sleeve width and stitch gauge, then add that number to the sleeve foundation chain. Multiply the desired length change by row gauge to find rows to add or remove. Make both sleeves identical and check that the sleeve top edge and body armhole opening are compatible.
- Neckline adjustment: The worked example makes a shallow, symmetrical opening by decreasing each shoulder twice over Rows 28 to 29 on both body panels. For a different neckline width or depth, change the center stitches and shaping rows on both panels together, then verify matching shoulder seam stitch counts.
Finishing
- Weave in yarn ends securely with a tapestry needle, following the path of the stitches. Do not pull the fabric tight.
- If you carried yarn up a side edge, make sure it is not tighter than the panel and is not visible from the right side.
- Block gently according to the yarn label. Pin panels to the calculated dimensions and let them dry fully. Avoid heat or aggressive stretching unless the fiber permits it.
- After assembly and blocking, measure the sweater flat. Record body width, total length, sleeve length, and upper sleeve width. If the measurements differ from your target, note the difference for future adjustments.
Before washing, follow the care guidance for your yarn on its label. The supplied pattern does not specify a fiber or washing method. For related styling inspiration, visit crochet fashion ideas.
Troubleshooting
| Problem | Solution |
|---|---|
| The panel edges are uneven. | Count stitches at the end of every row. Remember that ch 3 counts as one stitch: skip the stitch at its base and work the final dc into the top of the previous turning chain. |
| The foundation edge is tighter than the rest of the panel. | Make the foundation chain more loosely, or use a larger hook just for the foundation chain. Check that the number of chains is correct. |
| The panel is too wide or too narrow. | Compare your blocked swatch gauge with your calculations. Recalculate the foundation stitch count using the actual gauge; do not rely on the example’s 56 stitches for a different yarn or tension. |
| The sweater is too short or too long. | Use row gauge and finished measurements to calculate how many rows to add or remove. Make the front and back the same length. |
| The sleeves do not fit the armhole opening. | Measure both edges before sewing. Adjust sleeve width or length or the armhole seam placement; do not stretch one edge to force a poor match. |
| The neckline edging ripples or puckers. | If it ripples, work fewer sc along the row edges. If it puckers, work more. Keep the edging relaxed and evenly distributed. |
| You are running short of yarn. | Weigh the yarn before starting and track how much each panel uses. The 320 g figure is only a reference for the original example. Larger dimensions, longer panels, heavier yarn, and different tension require more yarn. Buy extra yarn in the same dye lot when possible. |
Pattern Summary
- Final size range: Custom fit; suitable for XS to 5XL only when stitch counts are calculated from individual measurements and gauge. Numeric standard grading was not supplied.
- Yarn amount: Approximately 320 g for the original example; custom sizes require an estimate based on swatch and panel area.
- Hook size: 5 mm, adjusted as needed to meet gauge.
- Main stitch: Double crochet.
- Construction method: Four flat panels, front, back, and two sleeves, seamed together with a single crochet neckline finish.
Conclusion
This beginner friendly striped sweater uses four flat double crochet panels, a five stripe sequence, seamed construction, and a simple single crochet neckline. Its custom fit approach lets you use your blocked gauge to calculate body width, body length, and sleeve dimensions, while keeping the sample counts as examples rather than promised sizes. Save your measurements, check the panel edges, and compare sleeve and armhole lengths before sewing.
Use this Crochet Sweater Tutorial as a step by step guide, then choose your own stripe colors and custom measurements. Gather your yarn and hook, make the gauge swatch, and begin your panels. You can also browse the crochet sweater guide for more construction ideas.
Watch the Step by Step Crochet Tutorial
Watch the Step by Step Crochet Tutorial
Follow the video tutorial to see the construction, crochet techniques, and assembly process explained visually.
Watch the complete crochet tutorial below and follow along with the written pattern.
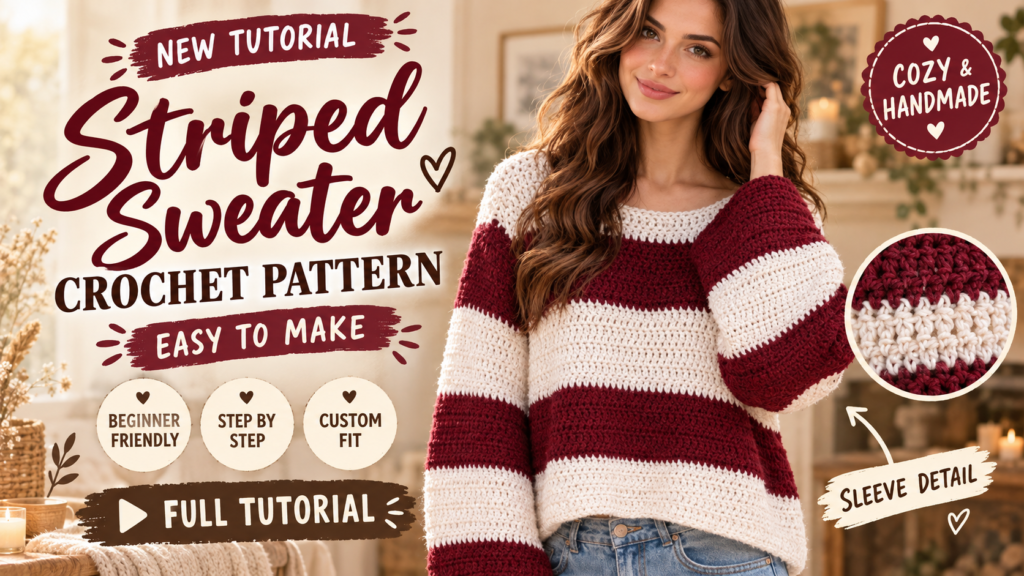
Use the play button to watch the tutorial without leaving this page. The supplied crochet sweater video tutorial source is also available.
Frequently Asked Questions
Is this striped sweater pattern suitable for beginners?
Yes. It is labeled beginner level for crocheters who know how to chain, double crochet, change colors, and sew seams with a tapestry needle.
Does this pattern include standard XS to 5XL measurements?
No. It is a custom fit pattern, not a tested numeric XS to 5XL grading. Calculate stitch counts from your individual measurements and blocked gauge.
What gauge should I use for the sweater?
No measured gauge was provided. Make and block a double crochet swatch with your intended yarn and hook, then record stitches and rows per 10 cm or 4 in.
How much yarn does the example use?
Approximately 320 g for the original example. This is only a rough reference and is not a reliable estimate for larger or longer custom sizes.
How many panels make up the sweater?
The sweater uses four flat panels: one front body panel, one back body panel, and two sleeve panels. The pieces are seamed together and the neckline is finished with single crochet.
Free Pattern Delivery
Get Your FREE Crochet Pattern PDF
Love this pattern? Enter your name and email below to get your free printable crochet pattern PDF delivered straight to your inbox!