Every stitch tells a story · Free PDF Pattern with Weekly Newsletter Claim Free Guide →

Every stitch tells a story · Free PDF Pattern with Weekly Newsletter Claim Free Guide →
Crochet Sweater for Beginners: 5 Amazing Ways to Crochet Step by Step
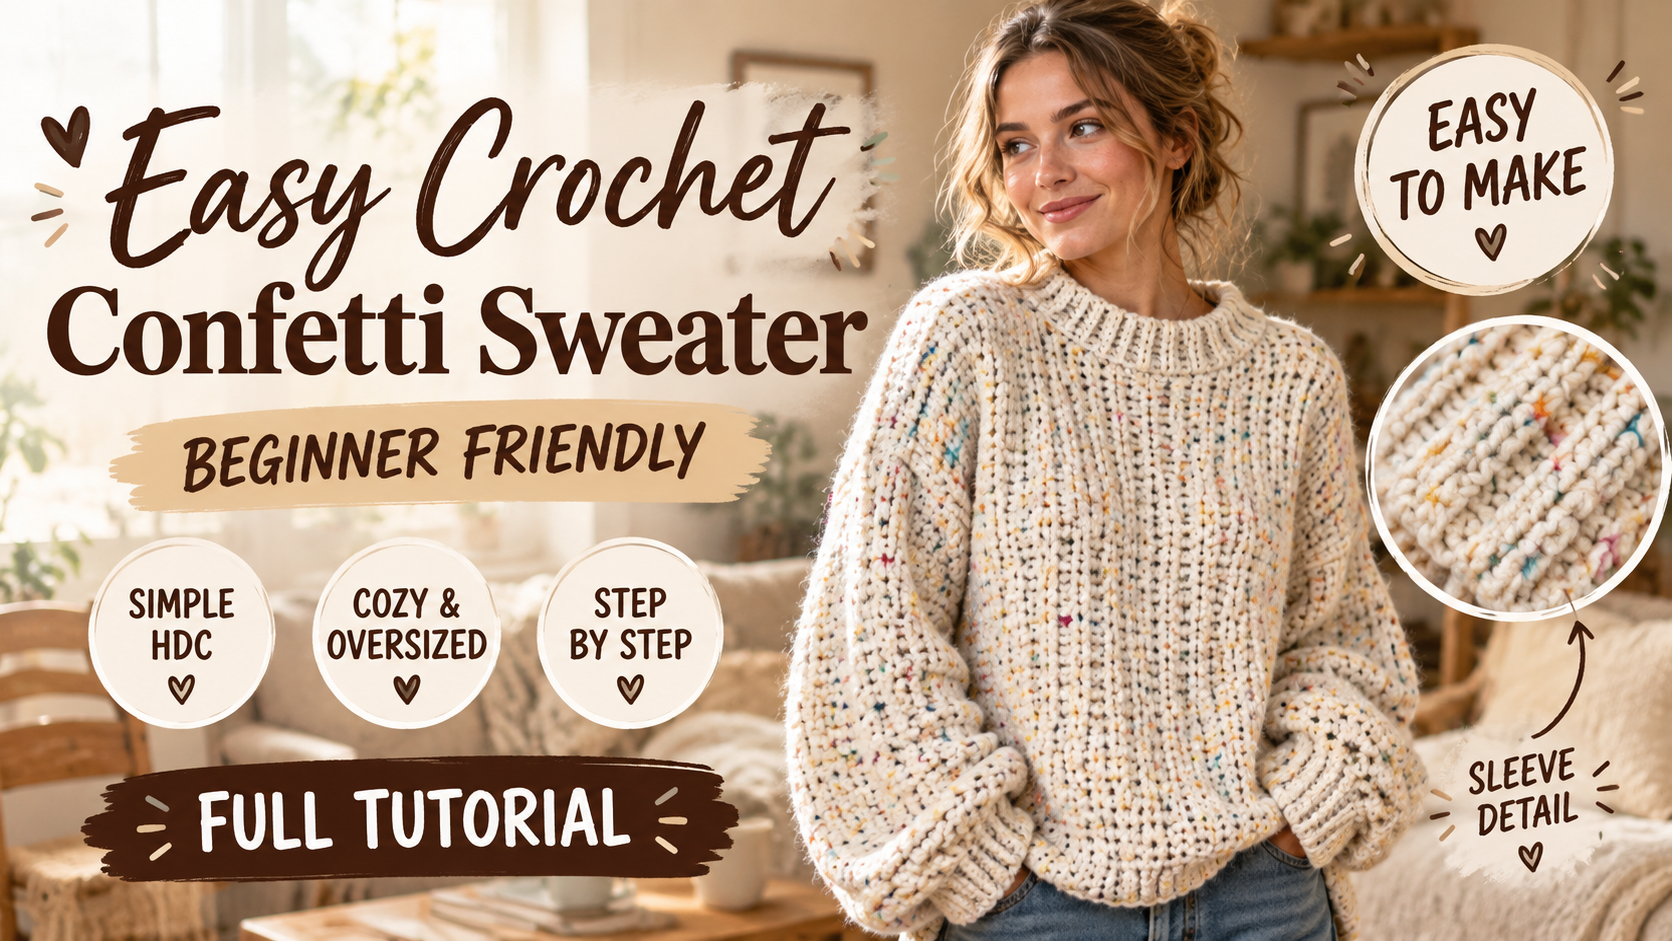
This Crochet sweater for beginners pattern makes a warm, relaxed pullover from simple half double crochet rectangles. It is designed for crocheters who know how to chain, work half double crochet and single crochet, slip stitch, and crochet through the back loop. The separate panels and straightforward seaming make the construction approachable, while the back loop stitches create a softly ribbed texture.
Table of Contents
- Crochet Sweater for Beginners: Confetti Comfort Oversized Sweater
- Pattern Overview
- Materials
- Gauge and Terms
- Size Chart
- Complete Crochet Pattern
- Customization
- Finishing
- Troubleshooting
- Pattern Summary
- Make Your Confetti Comfort Sweater
- Watch the Step by Step Crochet Tutorial
- Frequently Asked Questions
Crochet Sweater for Beginners: Confetti Comfort Oversized Sweater
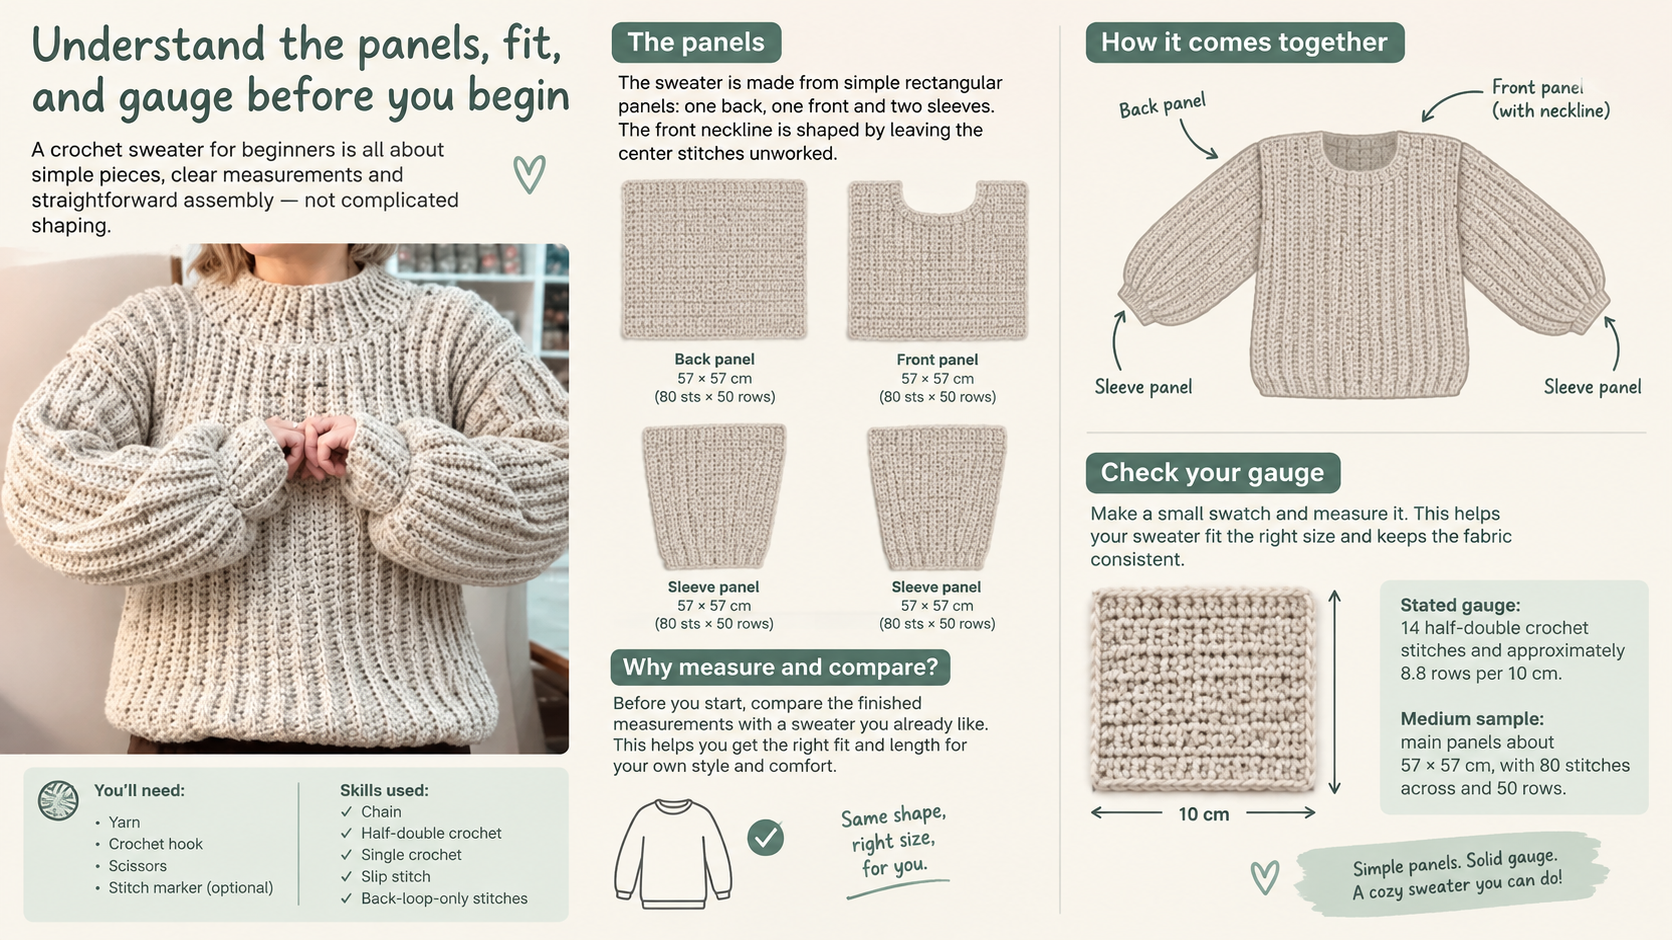
The roomy sweatshirt inspired fit is adjustable using the provided gauge and width and length calculations. Choose a size by comparing the finished garment measurements with a sweater you already like. The grading is proportional and made to measure, based on a supplied medium sample of about 57 × 57 cm for each main panel. The other size measurements and yarn quantities are estimates.
Key Takeaways
- The sweater is worked flat as separate front, back, and sleeve panels, then seamed together with separately worked ribbing.
- It is a beginner pattern using half double crochet and half double crochet back loop only after the first row.
- Use the supplied stitch and row calculations to customize the width and length, and measure the pieces as you work.
Pattern Overview
- Description: A warm, relaxed pullover made from simple rectangles in half double crochet. Back loop stitches create a softly ribbed texture that works well with flecked or multicolored yarn.
- Style: Oversized, sweatshirt inspired fit with ribbed cuffs, hem, and neckline.
- Construction method: Work separate back, front, and sleeve panels flat. Seam the panels together, then crochet the ribbing separately and sew it on.
- Skill level: Beginner. You should know how to chain, half double crochet, single crochet, slip stitch, and work through the back loop.
- Finished measurements: The chart gives the approximate sweater circumference around the chest, measured flat across the front and doubled. Body length is measured from shoulder to hem, including the bottom ribbing. Measurements may change slightly after washing and blocking.
The sweater is intentionally roomy, but the chart is an approximate fit guide rather than a guarantee of a particular amount of ease for every body. Compare the finished measurements with a comfortable sweater before choosing a size. For more sweater construction and fit guidance, see this step by step crochet sweater guide and the crochet sweater pattern sizing guide.
Materials
- Yarn: Círculo Confete, 95% acrylic and 5% viscose, 210 m per 100 g skein, or a similar yarn that meets gauge. The medium sample uses approximately 550 g, about 1,155 m, or six 100 g skeins.
- Hooks: 6 mm hook for foundation chains; 5 mm hook for the main fabric; 5 mm or a hook that gives a relaxed fabric for ribbing and neckline edging.
- Notions: Tapestry needle, stitch markers, scissors, and tape measure.
- Optional tools: Row counter, removable markers, blocking mat, and pins.
Yarn quantities are estimates scaled from the supplied medium size quantity. Textured yarn, personal tension, and longer sleeves or body panels may increase consumption. Buy extra if matching dye lots matters. Browse more crochet tools and maker essentials if you need hooks or blocking supplies.
Gauge and Terms
This pattern uses US crochet terminology. Turning chains do not count as stitches. For a panel requiring N stitches, chain N + 1 with the 6 mm hook. Change to the 5 mm hook and work the first half double crochet into the second chain from the hook. You will have N half double crochet stitches.
- BLO: Back loop only.
- ch: Chain.
- hdc: Half double crochet.
- sc: Single crochet.
- sl st: Slip stitch.
- st(s): Stitch or stitches.
Special stitch, hdc BLO: Work a half double crochet into the back loop only of the stitch. The back loop is the loop farthest from you when the top of the stitch is facing you.
Gauge: 14 hdc = 10 cm (4 in); approximately 8.8 rows = 10 cm (4 in). These figures are calculated from the supplied medium panel: 80 stitches across approximately 57 cm gives about 14 stitches per 10 cm; 50 rows over approximately 57 cm gives about 8.8 rows per 10 cm.
Check your gauge: With the 5 mm hook, make a swatch at least 15 × 15 cm in hdc, working back loop only after the first row. Wash or treat the swatch as you plan to treat the finished sweater, let it dry, then measure the center 10 cm. If you have too many stitches or rows, use a larger hook. If you have too few, use a smaller hook. Match gauge before making the panels, since a difference will change the finished size.
Place a marker in the first and last stitch of each row if it helps you identify the edges. Work the first and last stitch of every row; do not add extra stitches at the edges. The first row of each main panel is hdc. All following rows are hdc BLO. Find more crochet sweater tutorials for technique support.
Size Chart
These are approximate finished garment measurements. Choose by the finished sweater dimensions, not by body measurement alone. Body length includes approximately 5 cm bottom ribbing. The sweater circumference is measured flat across the front and doubled.
| Size | Bust/Width | Length | Sleeve Length | Yarn Required |
|---|---|---|---|---|
| XS | 104 cm circumference (52 cm flat front) | 62 cm | 42 cm | 500 g / about 1,050 m |
| S | 110 cm circumference (55 cm flat front) | 62 cm | 42 cm | 525 g / about 1,103 m |
| M | 114 cm circumference (57 cm flat front) | 62 cm | 42 cm | 550 g / about 1,155 m |
| L | 124 cm circumference (62 cm flat front) | 62 cm | 42 cm | 600 g / about 1,260 m |
| XL | 134 cm circumference (67 cm flat front) | 62 cm | 42 cm | 650 g / about 1,365 m |
| 2X | 144 cm circumference (72 cm flat front) | 62 cm | 42 cm | 700 g / about 1,470 m |
| 3X | 154 cm circumference (77 cm flat front) | 62 cm | 42 cm | 750 g / about 1,575 m |
| 4X | 164 cm circumference (82 cm flat front) | 62 cm | 42 cm | 800 g / about 1,680 m |
| 5X | 174 cm circumference (87 cm flat front) | 62 cm | 42 cm | 850 g / about 1,785 m |
The chart uses approximate panel stitch counts at 14 sts per 10 cm. The supplied sample provides only one size’s dimensions and yarn use, so the other sizes are calculated estimates and should be checked against your own gauge and preferred fit.
| Size | Main panel stitches, one back and one front | Sleeve panel stitches, make two | Neck opening stitches |
|---|---|---|---|
| XS | 73 | 50 | 13 |
| S | 77 | 52 | 13 |
| M | 80 | 55 | 13 |
| L | 87 | 58 | 15 |
| XL | 94 | 61 | 17 |
| 2X | 101 | 64 | 19 |
| 3X | 108 | 67 | 19 |
| 4X | 115 | 70 | 21 |
| 5X | 122 | 73 | 23 |
Complete Crochet Pattern
Use the stitch counts for your selected size. Turning chains do not count as stitches. The back panel is a rectangle. The front panel is the same height, with a centered neckline formed by leaving stitches unworked for the final 12 rows.
Body Panels
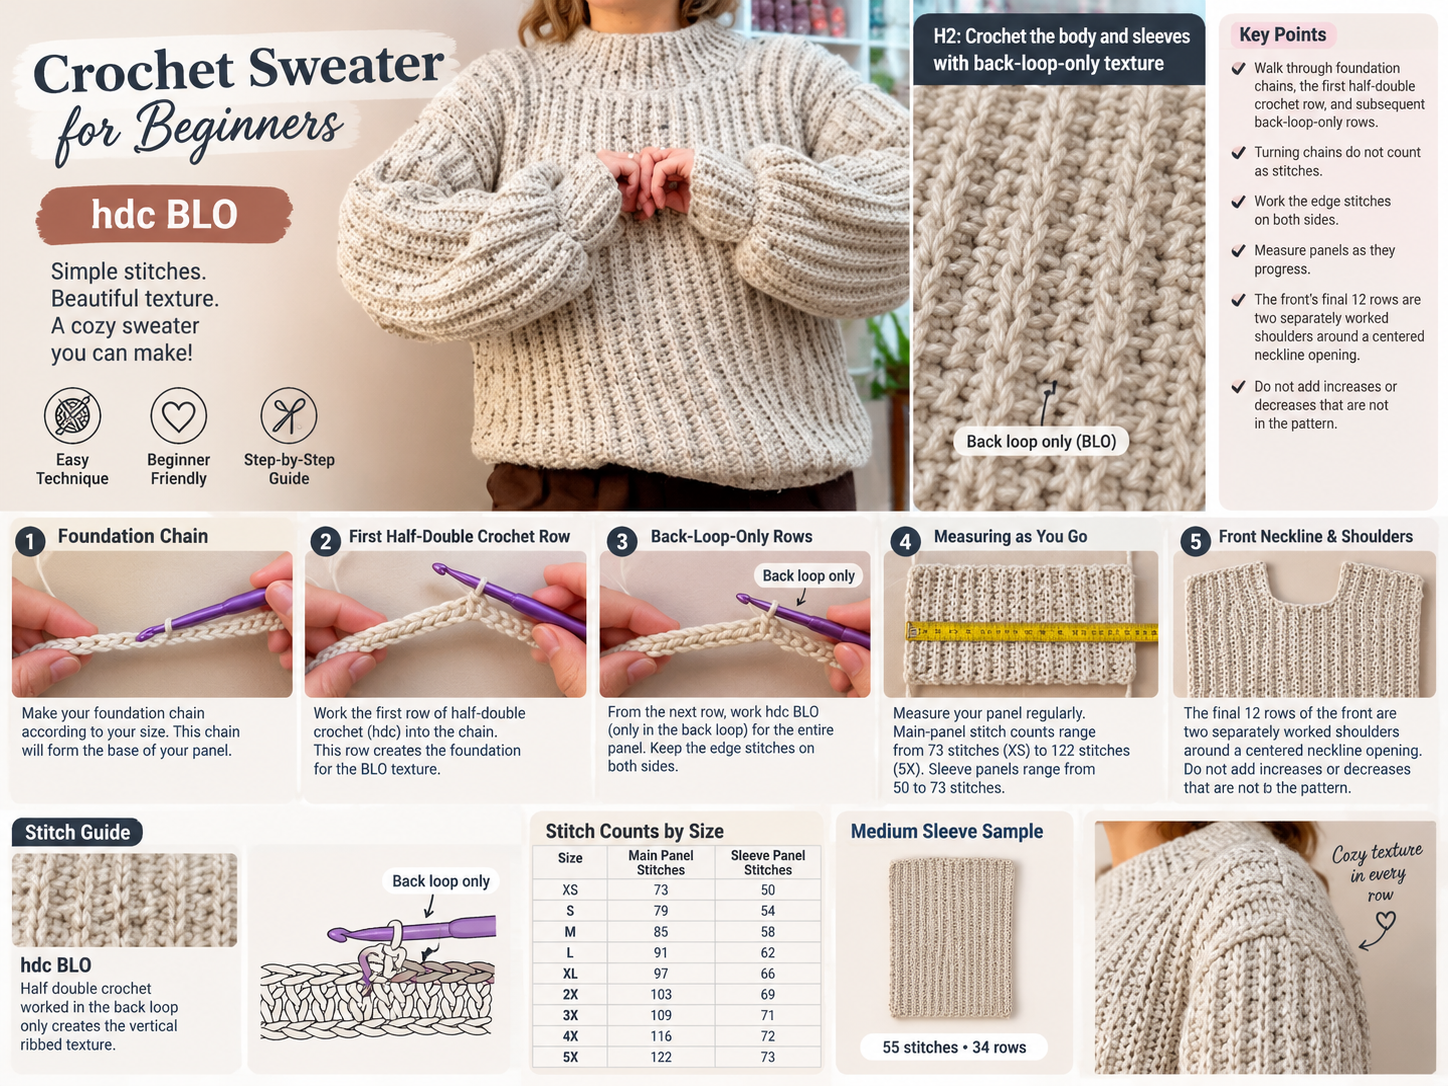
Back panel: Make one. With the 6 mm hook, chain one more than your stitch count. Switch to the 5 mm hook.
- Row 1: Hdc in the second chain from the hook and in each chain across. Turn. Stitch count: your selected size’s panel stitch count.
- Row 2: Ch 2, which does not count as a stitch. Hdc BLO in each stitch across, including the last stitch. Turn.
- Repeat: Repeat Row 2 until you have 50 rows total, counting Row 1. Fasten off.
The supplied medium sample is about 57 cm wide and 57 cm high before ribbing. Use the row count and measured length together. If your row gauge differs, work until the panel reaches the target length rather than relying only on 50 rows.
Front panel and neckline: Work Rows 1 to 38 exactly as for the back panel. For the final 12 rows, leave a centered neckline opening and work the two shoulders separately. To find the stitches for each shoulder, subtract the neckline stitches from the panel stitch count, then divide the remainder by two. If the result is not an even number, divide as evenly as possible, putting the extra stitch on either shoulder.
- Shoulder A, Row 39: With the right side facing, join yarn at the outer edge of the first shoulder section. Ch 2; hdc BLO across that shoulder section only. Turn.
- Shoulder A, Rows 40 to 50: Ch 2; hdc BLO across the shoulder stitches. Turn after each row. Fasten off at the end of Row 50.
- Shoulder B: Join yarn at the outer edge of the other shoulder section, leaving the center neckline stitches unworked.
- Shoulder B, Row 39: Ch 2; hdc BLO across the shoulder stitches. Turn.
- Shoulder B, Rows 40 to 50: Ch 2; hdc BLO across the shoulder stitches. Turn after each row. Fasten off at the end of Row 50.
Both shoulders should be the same height and have the same number of stitches, or differ by just one stitch where needed for an odd count.
Sleeve Panels
Make two identical sleeve panels. Choose the sleeve stitch count for your size from the size chart. With the 6 mm hook, chain one more than your sleeve stitch count. Switch to the 5 mm hook.
- Row 1: Hdc in the second chain from the hook and in each chain across. Turn.
- Row 2: Ch 2, which does not count as a stitch. Hdc BLO in each stitch across, including the last stitch. Turn.
- Repeat: Repeat Row 2 until you have 34 rows total, counting Row 1, or until the sleeve panel measures approximately 37 cm long before the cuff. Fasten off.
The supplied medium sample specifies 55 stitches across and 34 rows, with a sleeve length of about 42 cm. At the gauge in this pattern, 34 rows measure about 39 cm; the difference may come from yarn, tension, or measurement method. Measure your sleeve as you work. Allow about 5 cm for the cuff when planning the finished sleeve length.
Assembly
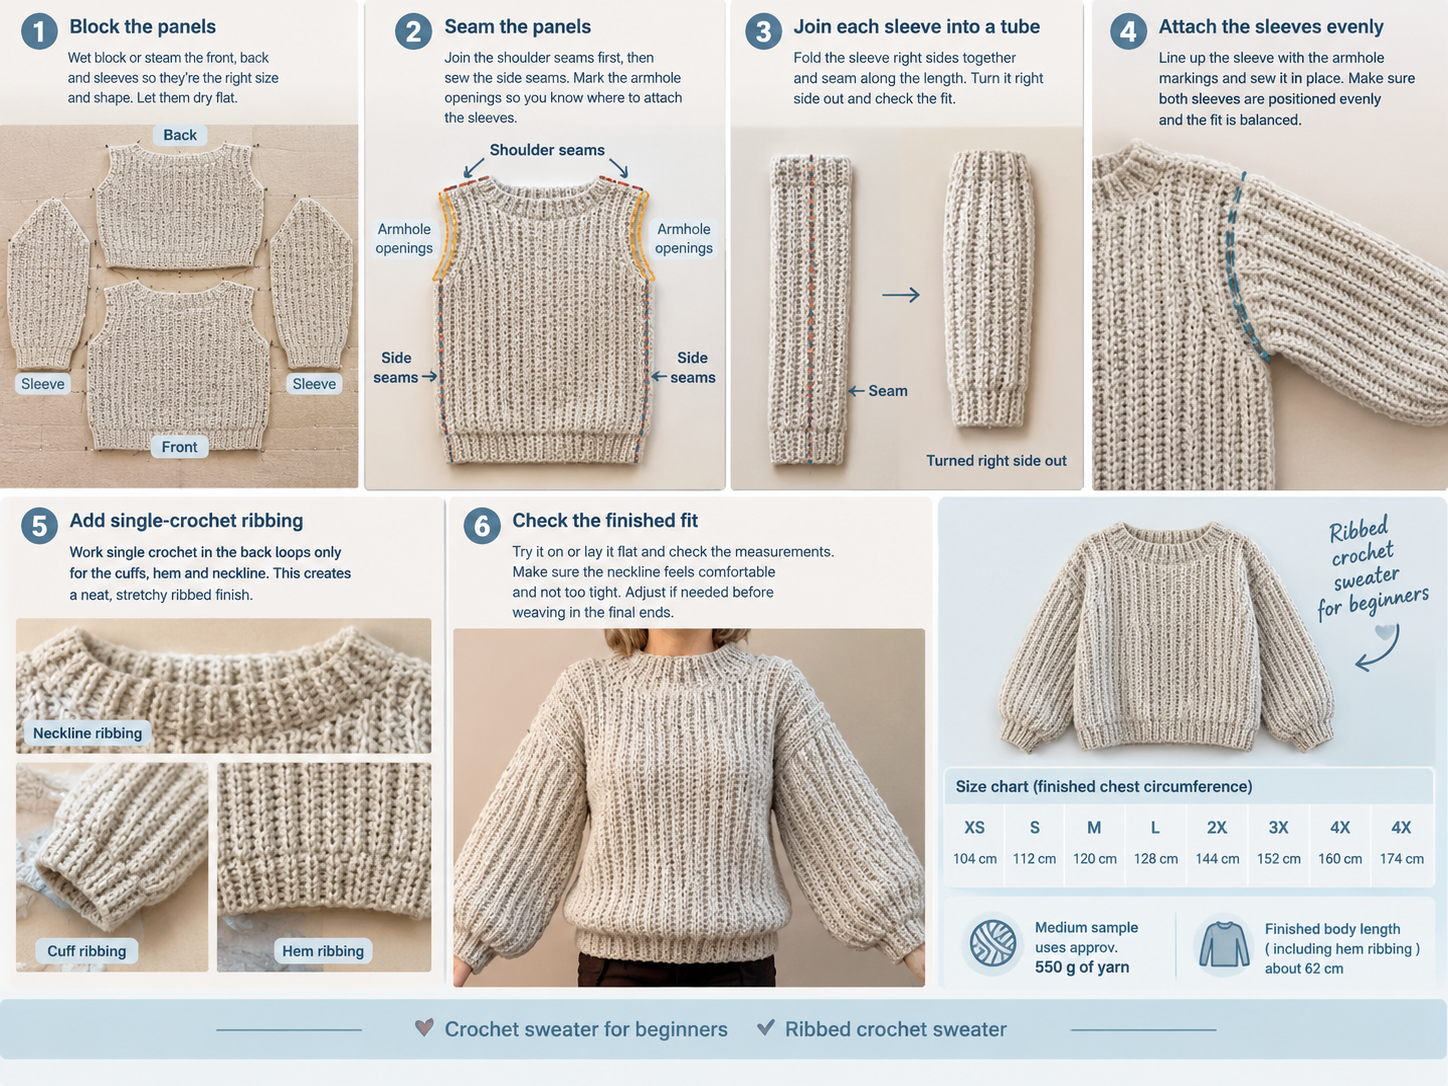
- Block the panels before seaming. Lay the back and front flat and shape them to matching measurements. Make the sleeve panels the same size.
- Sew the shoulders. Place the front and back with right sides facing. Using a tapestry needle and yarn, sew across the shoulder edges. Pick up one strand from each panel with each sewing stitch. Keep the seam relaxed so it does not pucker.
- Mark the armholes. Align the front and back side edges. From the shoulder seam, measure down approximately 21 to 22 cm and mark on both sides. This is the open armhole section.
- Sew the side seams. Starting at the bottom edge, sew each side upward, stopping at the armhole marker. Repeat on the other side. Keep the armhole openings the same length.
- Join each sleeve into a tube. Fold a sleeve panel in half lengthwise, right sides together. Join the long edges with slip stitches or a tapestry needle seam. Do not pull the joining seam tight. Repeat for the second sleeve.
- Attach the sleeves. Match the sleeve seam to the sweater’s side seam. Pin or mark the sleeve evenly around the armhole opening, easing the sleeve edge gently if needed. Sew in place without stretching either edge.
- Make ribbing for the cuffs, hem, and neckline. Ribbing is worked in rows, with the rows forming the ribbing’s length. The short edge is sewn to the sweater. For each ribbing strip, ch 11.
- Row 1: Sc in the second chain from the hook and in each chain across. Turn. (10 sc)
- Row 2: Ch 1; sc BLO in each stitch across. Turn.
- Repeat: Repeat Row 2 until the ribbing, when gently stretched, fits the edge it will be sewn to. Do not stretch it excessively. Fasten off with a long sewing tail.
Sew the cuff strips into rings and attach one to each sleeve opening. Sew the hem strip into a ring and attach it around the bottom of the sweater. For the neckline, work a strip to the measured neckline circumference, sew its short ends together, and attach it evenly around the neck opening. Leave the neckline yarn attached until you have checked the fit.
- Finish the neckline edge. If desired, join yarn at the neckline and work a loose round of slip stitches around the upper edge. Skip a stitch only where necessary to keep the edge from flaring. Do not draw the neckline tight.
Custom Adjustments
Use your blocked gauge for the most reliable adjustments. The formulas below use the pattern gauge of 14 stitches and 8.8 rows per 10 cm.
- To increase width: For a panel, add approximately 1.4 stitches per 1 cm of extra panel width. Since the front and back both contribute to circumference, adding x stitches to each panel adds about 2 × x ÷ 1.4 cm to the sweater circumference. Example: Add 7 stitches to both front and back panels. That adds about 10 cm to the finished sweater circumference.
- To increase length: Add approximately 0.88 rows per 1 cm of extra length. In practice, add 1 row for roughly each 1.1 cm you want to add. Add the same number of rows to the front and back, and keep the front’s neckline shaping in the final 12 rows unless you also want a deeper neckline.
- To adjust sleeves: For more sleeve width, add approximately 1.4 stitches per 1 cm of extra flat sleeve panel width. For more sleeve length, add approximately 0.88 rows per 1 cm of extra length before the cuff. Measure from the shoulder to the desired cuff position and subtract the cuff depth from your target finished length.
Customization
Use the provided adjustment calculations with your blocked gauge. For width, add approximately 1.4 stitches per 1 cm of extra panel width. Adding x stitches to each front and back panel adds about 2 × x ÷ 1.4 cm to the sweater circumference. Adding 7 stitches to both panels adds about 10 cm to the finished circumference.
For length, add approximately 0.88 rows per 1 cm, or 1 row for roughly each 1.1 cm you want to add. Add the same number of rows to front and back. Keep the front neckline shaping in the final 12 rows unless you also want a deeper neckline. For sleeve width, add approximately 1.4 stitches per 1 cm of extra flat sleeve panel width. For sleeve length, add approximately 0.88 rows per 1 cm before the cuff, measuring from the shoulder to the desired cuff position and subtracting the cuff depth from your target finished length.
For neckline fit, the pattern provides neckline stitch counts by size and a measured neckline ribbing strip. Work the strip to the measured neckline circumference and attach it evenly. Do not draw the neckline tight. The pattern does not provide a separate neckline adjustment formula.
For more pattern options, browse crochet sweater patterns with inclusive grading or explore the beginner friendly crochet chunky sweater pattern.
Finishing
- Weave in ends on the inside of the sweater, changing direction a few times so they are secure.
- Wash and dry the sweater according to the yarn label. Acrylic blends should not be exposed to high heat.
- If wet blocking, gently shape the sweater to the measurements you want and let it dry flat. Avoid pulling the neckline or sleeves out of shape.
- Measure the finished sweater after it is dry. Confirm that the front and back match, the sleeves are equal, and the neckline is comfortable before trimming or hiding any final adjustment tails.
Expected measurements are approximate: medium main panels are about 57 × 57 cm before ribbing; finished body length is approximately 62 cm including hem ribbing. Sleeve length is approximately 42 cm including cuff ribbing.
Troubleshooting
| Problem | Solution |
|---|---|
| The panel edges look uneven or have gaps. | Check that the first and last stitch of every row is worked. Mark the edge stitches and count each row. Turning chains do not count as stitches in this pattern. |
| The panel is too wide or too narrow. | Measure your stitch gauge across the center of a washed swatch. Adjust hook size and remake the swatch before continuing. If the panel is already underway, compare its stitch count and measured width with the chart before adding more rows. |
| The panel is too long or too short. | Measure the piece rather than relying only on row count. Add or remove rows to reach your desired length, and make the front and back match. |
| The sweater does not fit as expected. | Compare the finished circumference in the chart with a sweater that fits comfortably. The chart is based on panel measurements and a relaxed silhouette; your preferred amount of ease may differ. |
| The shoulder or side seam puckers. | Undo the seam and sew again with a looser hand, matching one stitch or row at a time. Avoid pulling the yarn tight as you sew. |
| The neckline feels tight or stretched out. | Check that the neckline ribbing is not shorter than the opening. Re-sew with the ribbing distributed evenly. For a firmer edge, use a smaller hook for the edging, but do not cinch the neckline closed. |
| You may run short of yarn. | The quantities for sizes other than the supplied medium are estimates. Check your yarn remaining before making long ribbing strips, and purchase extra skeins in the same dye lot when possible. |
Pattern Summary
- Size range: XS to 5X, with approximate finished chest circumferences of 104 to 174 cm.
- Yarn amount: Approximately 500 to 850 g, depending on size; medium uses about 550 g.
- Hook size: 6 mm for foundation chains; 5 mm for main fabric.
- Main stitch: Hdc, followed by hdc BLO.
- Construction method: Separate flat front, back, and sleeve panels, seamed together with separately worked ribbing.
Make Your Confetti Comfort Sweater
This oversized sweater pattern combines beginner friendly half double crochet panels, a simple back loop texture, separate ribbing, and a seamed construction. The size chart runs from XS to 5X, and the supplied calculations help you adjust width and length while preserving the pattern’s stitch and row guidance. Measure your gauge and panels as you work, compare the finished dimensions with a sweater you enjoy wearing, and check the neckline and seams before finishing. Gather your materials and start your Crochet sweater for beginners today, then share your finished Confetti Comfort pullover.
Watch the Step by Step Crochet Tutorial
Watch the complete crochet tutorial below and follow along with the written pattern.
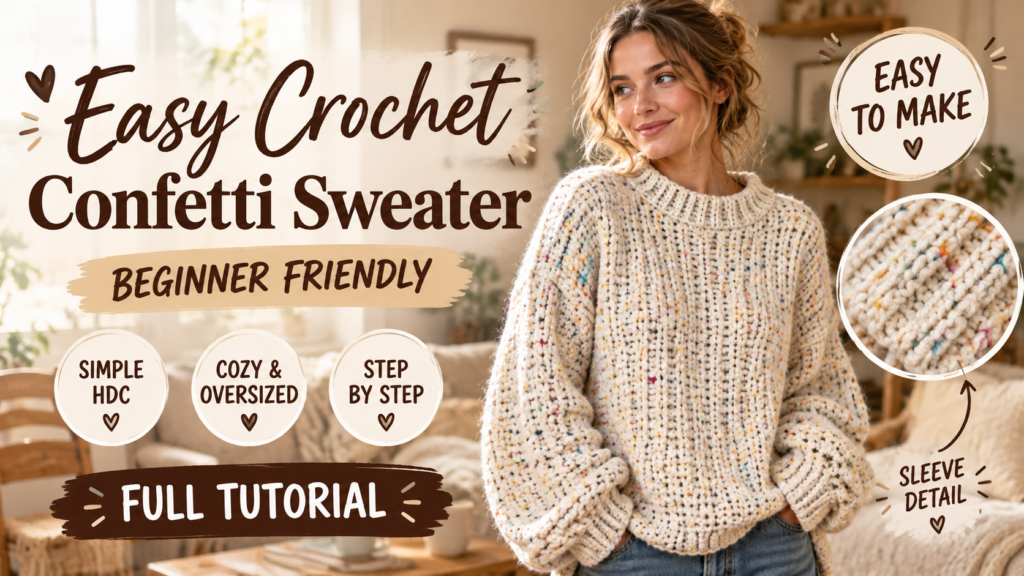
Use the play button to watch the tutorial without leaving this page.
Frequently Asked Questions
Is this crochet sweater suitable for beginners?
Yes. It is listed as a beginner pattern. You should know how to chain, half double crochet, single crochet, slip stitch, and work through the back loop.
What yarn and hooks does the pattern use?
The pattern specifies Círculo Confete, 95% acrylic and 5% viscose, 210 m per 100 g skein, or similar yarn that meets gauge. Use a 6 mm hook for foundation chains and a 5 mm hook for the main fabric. A 5 mm hook or a hook that gives a relaxed fabric is used for ribbing and neckline edging.
How do I choose a sweater size?
Choose by the approximate finished garment measurements, not by body measurement alone. Compare the chart’s finished circumference with a comfortable sweater. The grading is an approximate fit guide and may not provide the same ease for every body.
How many rows do I crochet for the body and sleeves?
The back panel has 50 rows total, counting Row 1. The front works Rows 1 to 38 as the back, then the two shoulders separately for the final 12 rows. Each sleeve panel has 34 rows total or is worked until it measures approximately 37 cm before the cuff. Measure the pieces because row gauge can vary.
Can I adjust the width or length?
Yes. Use your blocked gauge. Add approximately 1.4 stitches per 1 cm of extra panel width, or approximately 0.88 rows per 1 cm of extra length. For sleeves, the same width and length calculations are provided. Keep the front neckline shaping in the final 12 rows unless you also want a deeper neckline.
Free Pattern Delivery
Get Your FREE Crochet Pattern PDF
Love this pattern? Enter your name and email below to get your free printable crochet pattern PDF delivered straight to your inbox!