Every stitch tells a story · Free PDF Pattern with Weekly Newsletter Claim Free Guide →

Every stitch tells a story · Free PDF Pattern with Weekly Newsletter Claim Free Guide →
Crochet SWEATER Tutorial: 5 Amazing Fit Tips Guide
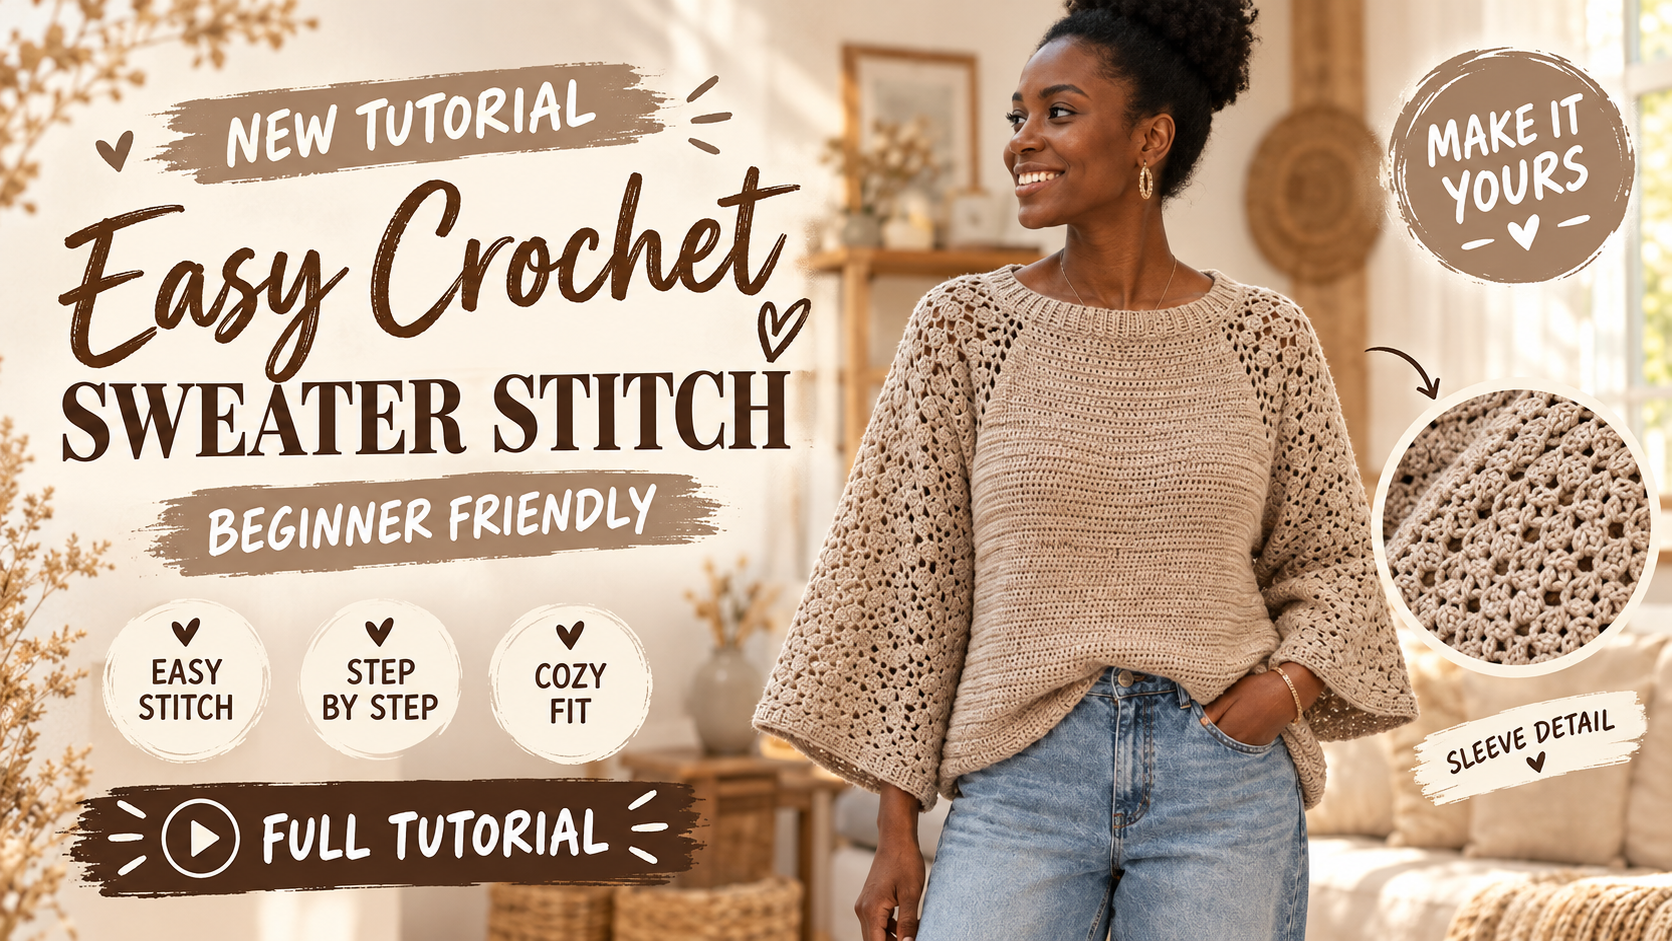
Crochet SWEATER Tutorial readers can follow this measurement driven pattern draft to make the Naomie Sweater, an oversized cotton pullover with a relaxed, kimono inspired shape, textured sleeves, and ribbed edges. It is intended for crocheters who know chains, single crochet, double crochet, and working in the round, and who are ready to learn the petal cluster and spiral shaping.
Table of Contents
Introduction
The sweater is worked from the neckline down in the round. Four raglan corners shape the yoke, then the body and sleeves are separated at the underarm and continued in a spiral without joining each round. This construction avoids shoulder and side seams and makes it possible to check the yoke against the wearer before continuing. The supplied size and yarn figures are planning estimates, not verified test results. Make and wash a gauge swatch, and check the fit as you work.
Key Takeaways
- The Naomie Sweater is worked top down with a four corner raglan yoke, then the body and sleeves are worked separately in a spiral.
- The skill level is beginner, for crocheters already familiar with chains, single crochet, double crochet, and working in the round.
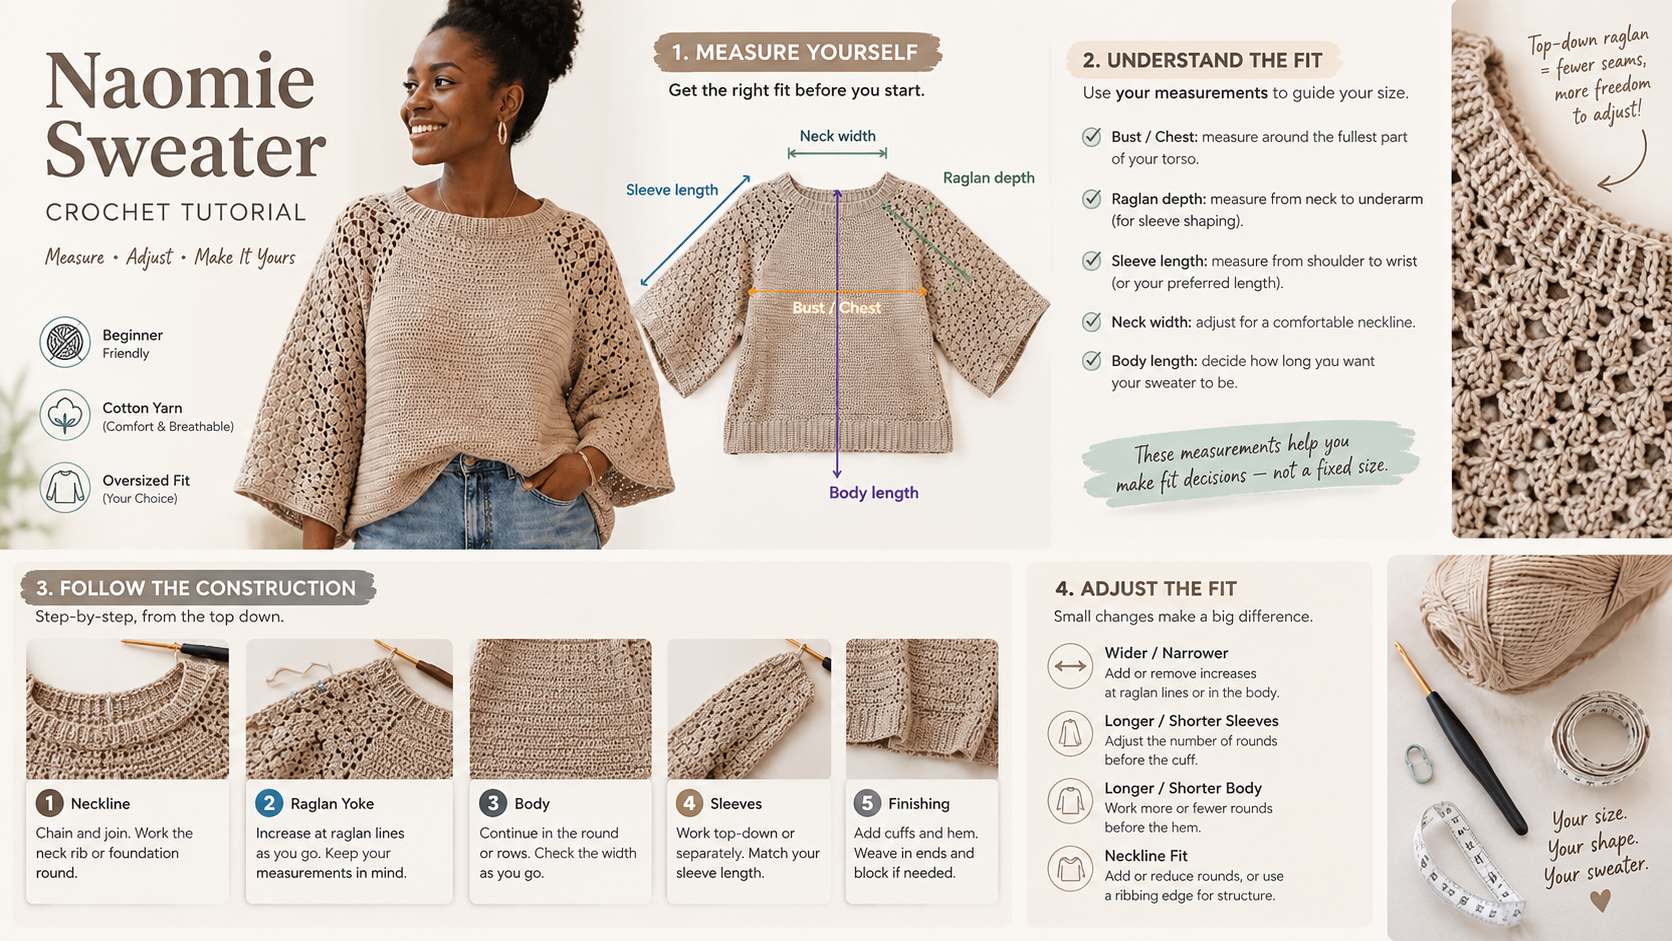
- Customize the finished circumference, body length, sleeve length, and neckline ribbing by measuring the garment and wearer as you work.
Pattern Overview
- Description: An oversized cotton pullover with a relaxed, kimono inspired shape, textured sleeves, and ribbed edges.
- Style: Transitional season sweater with wide 7/8 length sleeves.
- Construction method: Worked top down in the round. The yoke is increased at four raglan corners; body and sleeves are separated at the underarm. Body and sleeves are then worked in a spiral, without joining each round.
- Skill level: Beginner familiar with chains, single crochet, double crochet, and working in the round. The petal cluster and spiral shaping are explained in the pattern.
- Finished measurements: Use the size chart as a starting point, then check the sweater against your own body and desired ease. Bust figures are finished garment circumference, not body measurements. Body length is measured from the shoulder and neckline join to the hem. Sleeve length is measured from the underarm to the cuff.
For additional garment guidance, browse crochet sweater tutorials, crochet sweater patterns, and the crochet sweater pattern sizing guide. The top down sweater guide and crochet sweater for beginners are also available for related construction and beginner help.
Materials
- Yarn: 100% cotton, approximately 300 m per 100 g skein. The sample notes specify ecological cotton. Yardage below is an estimate; buy an extra skein if you are between sizes or lengthening the garment.
- Hook: 3 mm crochet hook, or the size needed to meet gauge.
- Notions: Scissors, yarn needle, measuring tape, and at least 4 stitch markers.
- Optional supplies: Blocking mat and rustproof pins; extra markers for tracking sleeve repeats.
Explore more crochet tools and maker essentials if you need to prepare your workspace.
Gauge and Terms
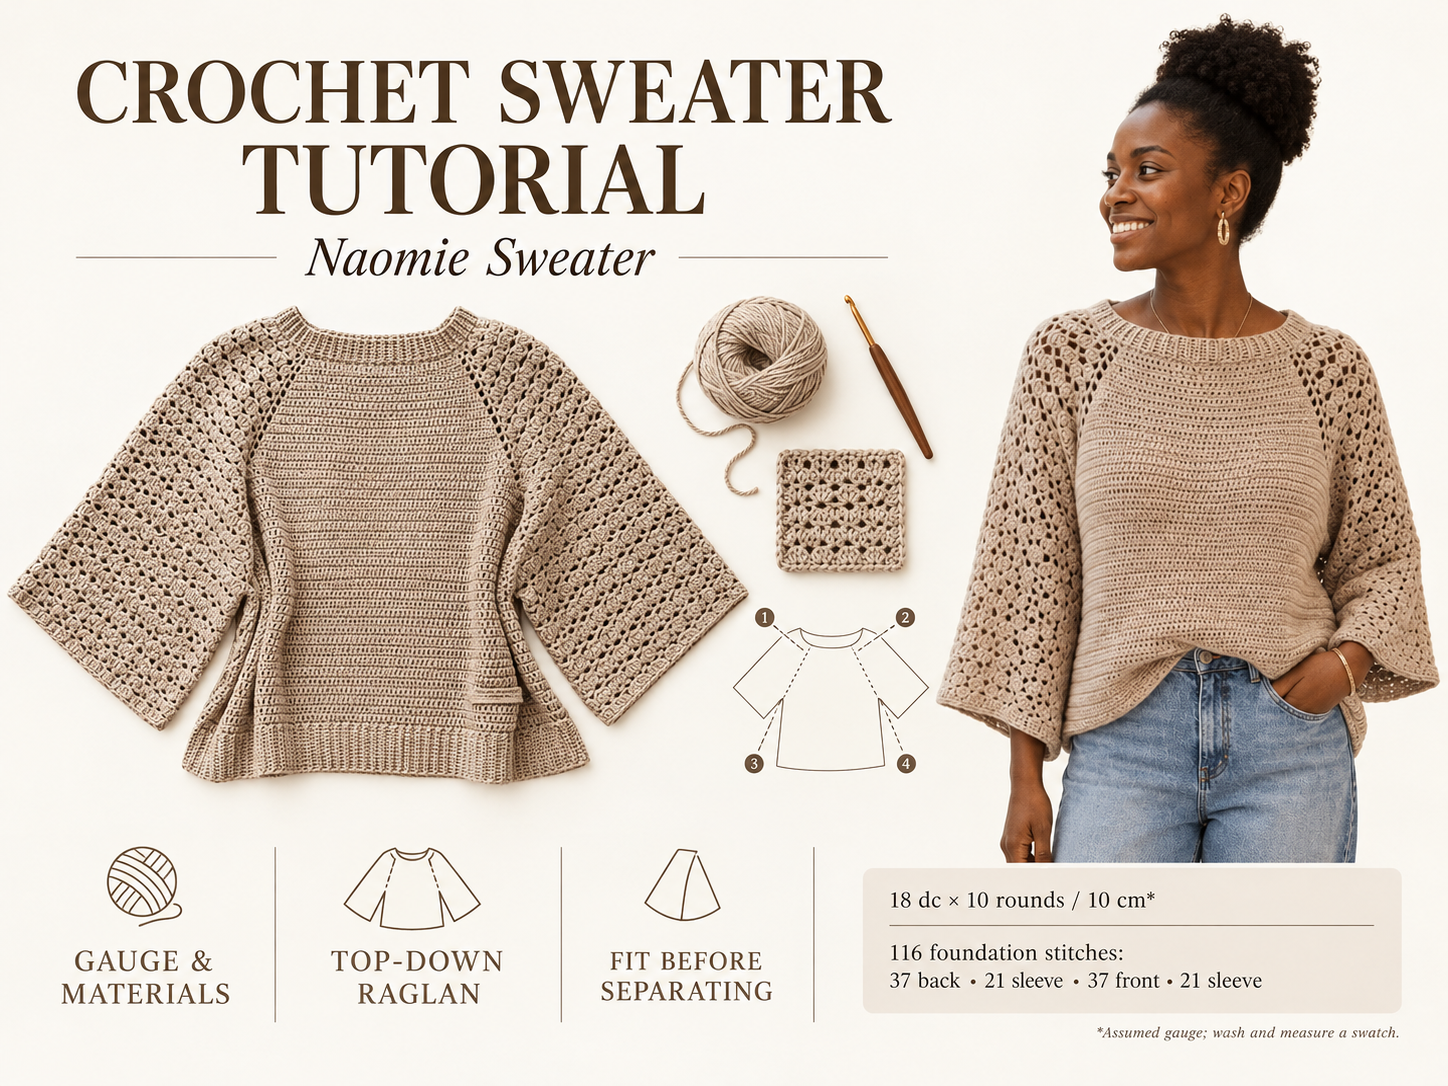
The pattern uses US crochet terminology. The gauge below is an assumed target used for calculations in this draft, not a gauge supplied with the original notes. Cotton can grow or drape after washing, so measure a washed swatch before choosing a size.
- Stitch gauge: 18 dc = 10 cm.
- Round gauge: 10 rounds = 10 cm.
- Gauge fabric: Main double crochet fabric, measured after washing and drying the swatch as you plan to treat the finished sweater.
Make a swatch at least 15 cm wide and high in dc. Wash and dry it as you intend to care for the sweater. Lay it flat without stretching and count stitches and rounds over the central 10 cm. If you have more than 18 stitches over 10 cm, your stitches are too small; try a larger hook. If you have fewer than 18 stitches, your stitches are too large; try a smaller hook. Recheck after changing hooks. Do not rely on hook size alone to determine fit.
Abbreviations
- ch = chain
- sc = single crochet
- hdc = half double crochet
- dc = double crochet
- sl st = slip stitch
- st(s) = stitch(es)
- sp = space
- rep = repeat
- rnd = round
- yo = yarn over
- PM = place marker
- RS = right side
- WS = wrong side
Petal Cluster
Work 4 unfinished dc in the same stitch or space: for each dc, yo, insert hook, draw up a loop, yo and pull through 2 loops, leaving the last loop on the hook. After all 4 unfinished dc are made, yo and pull through all 5 loops on the hook. The cluster counts as one stitch.
Notes Before Starting
- A spiral means continuing into the next round without joining with a sl st. Move a marker into the first stitch of each round.
- For the yoke, the four marked stitches are raglan corners. On an increase round, work (dc, ch 2, dc) into each marked corner stitch or corner space. Move the marker to the ch 2 space made at that corner. This adds 4 dc to the yoke on each increase round.
- Foundation section counts in the supplied notes are 37 back, 21 sleeve, 37 front, 21 sleeve = 116 stitches total. Use those counts for the reference foundation. If changing the foundation count, keep the four sections balanced and mark the four corner stitches clearly.
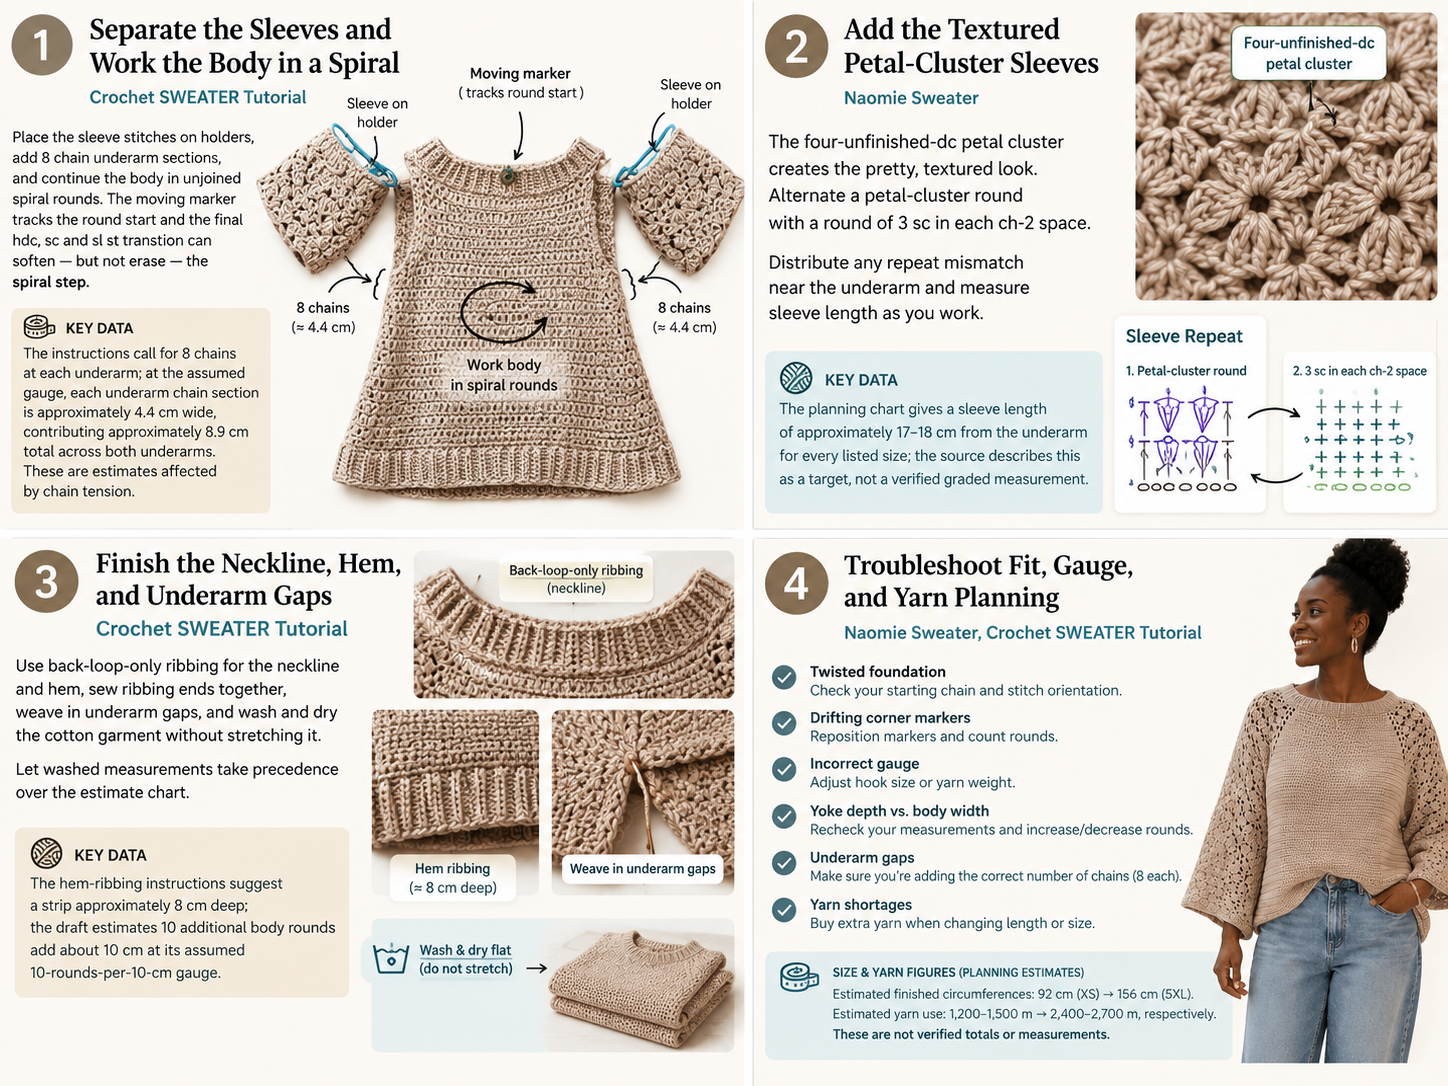
- The sample notes specify eight underarm chains beneath each arm. At the assumed gauge, 8 chains are approximately 4.4 cm across at each underarm; the two underarm additions contribute approximately 8.9 cm total to the body circumference. Chain tension affects this measurement.
- Work the petal stitch over the sleeve sections. If a sleeve section does not divide evenly into the petal repeat, place any extra stitches evenly at the edges.
- The pattern has no verified grade for every size. Choose a size by finished circumference, not by label alone. Check both the chest width and raglan depth before separating sleeves.
- The 116 stitch neckline is the reference foundation, not a universal neckline count. To alter it, use your measured neckline circumference and your actual foundation round gauge. Keep the four sections balanced.
Size Chart
These are planning targets, not measurements supplied by the original notes. Width means the finished circumference around the body. Choose a target that gives the desired oversized ease over your body bust measurement. Sleeve length is measured from the underarm.
| Size | Bust/Width | Length | Sleeve Length | Yarn Required |
|---|---|---|---|---|
| XS | 92 cm / 36 in | 54 cm / 21¼ in | 17–18 cm / 6¾–7 in | 1,200–1,500 m; 4–5 skeins |
| S | 100 cm / 39¼ in | 56 cm / 22 in | 17–18 cm / 6¾–7 in | 1,350–1,650 m; 5–6 skeins |
| M | 108 cm / 42½ in | 58 cm / 22¾ in | 17–18 cm / 6¾–7 in | 1,500–1,800 m; 5–6 skeins |
| L | 116 cm / 45¾ in | 60 cm / 23½ in | 17–18 cm / 6¾–7 in | 1,650–1,950 m; 6–7 skeins |
| XL | 124 cm / 48¾ in | 62 cm / 24½ in | 17–18 cm / 6¾–7 in | 1,800–2,100 m; 6–7 skeins |
| 2XL | 132 cm / 52 in | 64 cm / 25¼ in | 17–18 cm / 6¾–7 in | 1,950–2,250 m; 7–8 skeins |
| 3XL | 140 cm / 55 in | 66 cm / 26 in | 17–18 cm / 6¾–7 in | 2,100–2,400 m; 7–8 skeins |
| 4XL | 148 cm / 58¼ in | 68 cm / 26¾ in | 17–18 cm / 6¾–7 in | 2,250–2,550 m; 8–9 skeins |
| 5XL | 156 cm / 61½ in | 70 cm / 27½ in | 17–18 cm / 6¾–7 in | 2,400–2,700 m; 8–9 skeins |
Skein counts are rounded up to whole 100 g skeins at approximately 300 m each. Actual use depends on gauge, sleeve width, garment length, and how much ribbing you add.
Complete Crochet Pattern
This is a measurement driven pattern draft rather than a verified transcription of a tested pattern. The sample notes do not give a fixed number of yoke increase rounds or a fixed body round count. Use the fit checks and measurements below instead of treating the size chart as a fully graded set of instructions.
Body Panels
Yoke
- Foundation round: Ch 116 without twisting the chain. Join with a sl st to the first ch to form a ring. Check again that the chain is not twisted.
- Sc in each ch around. Before joining the round, place markers to divide the 116 sc into sections: 37 back, 21 first sleeve, 37 front, and 21 second sleeve. Place the four corner markers at the boundaries between the sections. Do not include extra stitches in the foundation count.
- Begin working the yoke in dc. At each marked corner, work (dc, ch 2, dc) into the marked stitch. Work dc across the section to the next marker.
- Increase round: Work dc to the first marked corner. Work (dc, ch 2, dc) in the marked stitch. Move the marker to the ch 2 space. Repeat at the other 3 corners, working dc across each section between corners. The round has 4 more dc than the previous round.
- Next round: Work dc in each dc to each marked ch 2 space. Work (dc, ch 2, dc) in each marked space. Move each marker to its new ch 2 space.
- Repeat the increase round and next round, checking the yoke as it grows. The sample notes give no fixed number of increase rounds; stop when the yoke has enough width to fit around the body and enough depth to reach the underarm comfortably.
Sizing calculation at the assumed gauge: At 18 dc per 10 cm, the target stitch count for a finished body circumference is: target circumference in cm × 1.8 = approximate body stitches. For example, a 108 cm target circumference gives 108 × 1.8 = about 194 stitches around the body. This calculation is a planning guide only: the final body also includes the underarm chains, and the yoke’s front and back distribution and sleeve depth must fit the wearer. Check the garment itself rather than relying on this estimate alone.
Fit check before separation: Try the yoke on, or lay it flat and measure it. Confirm that the front and back reach the underarm and that the circumference gives the intended ease. If the chest is still too narrow, continue the increase rounds; if the yoke is too deep, do not keep increasing blindly. Adjust the corner increases and recheck the fit.
Body
- At the first sleeve section, place the sleeve stitches on a holder or spare yarn; do not work across them.
- Ch 8 for the underarm. Work dc across the front section to the next sleeve.
- Place the second sleeve section on a holder. Ch 8 for the second underarm.
- Work dc across the back section to the beginning of the round. Place a marker in the first body stitch.
- Continue in a spiral, working dc in each body stitch and in each underarm chain. Move the marker up at the start of every round.
- Work even until the body measures the desired length from the shoulder and neckline join, allowing for the ribbed hem. The chart’s body lengths are estimates. Measure the wearer or compare with a well fitting sweater.
- To soften the spiral transition, near the marker on the final body round work one hdc, one sc, then one sl st. This eases the height change but will not make the transition completely invisible.
Repeat: Continue the body rounds until the desired length is reached. No fixed round count is given because the supplied notes do not provide row gauge or a verified length by size.
Sleeve Panels
Work each sleeve separately.
- Join yarn at the center of the underarm. Sc in the underarm chains and across the held sleeve stitches. Pick up any gaps at the underarm with sc. Place a marker at the beginning of the round.
- Petal round: Work a petal cluster in the next stitch or space. Ch 2. Repeat around, placing clusters evenly. If the sleeve stitches do not fit the repeat exactly, adjust the spacing at the underarm rather than leaving a large gap.
- Single crochet round: In each ch 2 space between clusters, work 3 sc. Ch 2 between groups. Continue around.
- Repeat the petal round and single crochet round alternately, working in a spiral and moving the marker each round.
- Continue until the sleeve measures approximately 17–18 cm from the underarm, or to your preferred length. Check that the sleeve opening remains comfortable; the wide sleeve can feel cumbersome if made much longer.
- Repeat for the second sleeve, matching the first sleeve’s length and pattern placement.
Pattern repeat: One petal round, followed by one single crochet round. Repeat these 2 rounds for the sleeve length.
Assembly
- Seams: The body and sleeves are worked continuously from the yoke, so no shoulder or side seams are required. Weave in the small underarm gaps with the yarn needle.
- Joining pieces: Sleeves are resumed from the held stitches and joined to the underarm chains; there are no separate sleeve pieces to sew on.
- Neckline finishing: Join yarn at the neckline edge. Work the ribbing as a short back loop only strip: ch 7, sc in the second ch from the hook and in each remaining ch (6 sc). Attach the strip to the neckline edge with a sl st, then turn and work 6 sc in the back loops only. Repeat, attaching each strip row to the next section of neckline edge. Join the two ends neatly with a yarn needle. Adjust the ribbing height by changing the starting chain.
- Hem ribbing: Ch a length approximately 8 cm long. Sc in the second ch from the hook and in each remaining ch. Attach the strip to the hem edge with a sl st, turn, and work sc in the back loops only across the ribbing. Attach the next ribbing row to the sweater edge. Repeat around the hem and sew the two short ends together with a yarn needle.
- Finishing transition: The half double, single, and slip stitches near the spiral marker help reduce the visible height step. They do not create a joined round.
Custom Adjustments
The supplied formulas are planning estimates based on the assumed gauge. Measure the fabric as you work, especially because cotton and the textured sleeve fabric may behave differently from the main double crochet fabric.
- Width: At the assumed gauge, approximately 18 additional dc around the body add about 10 cm of circumference:
10 cm × 1.8 stitches per cm = 18 stitches. Increase at the four raglan corners and distribute shaping evenly. Each full raglan increase round adds 4 dc overall. Check the yoke depth and sleeve fit each time. Adding increase rounds also makes the yoke deeper and the sleeves wider. - Length: At the assumed row gauge, approximately 10 additional body rounds add 10 cm of length. Add body rounds before starting the hem ribbing. Measure the garment rather than relying only on round count.
- Sleeves: To lengthen or shorten a sleeve, add or remove petal and single crochet round pairs. At the assumed round gauge, about 10 rounds add 10 cm, but the textured sleeve may measure differently; measure while working. To make a sleeve wider, add stitches evenly at the underarm when picking up the sleeve. Keep the petal clusters spaced evenly around the round. To make the sleeve narrower, reduce stitches evenly on a single crochet round before continuing the pattern. Avoid decreasing directly into a petal cluster.
- Neckline: The 116 stitch neckline is the reference foundation, not a universal neckline count. To alter it, use your measured neckline circumference and your actual foundation round gauge. Keep the four sections balanced. Adjust neckline ribbing height by changing the starting chain.
Customization
Choose the size by finished circumference rather than by label alone. At the assumed gauge, multiply the target circumference in cm by 1.8 for an approximate body stitch count. For example, a 108 cm target gives about 194 stitches around the body, but the final body also includes underarm chains and must be checked on the wearer. Keep the four raglan sections balanced if changing the neckline foundation.
For width, approximately 18 additional dc around the body add about 10 cm of circumference, and each complete raglan increase round adds 4 dc overall. For length, approximately 10 additional body rounds add 10 cm at the assumed row gauge. For sleeve length, add or remove pairs of petal and single crochet rounds, measuring the textured fabric as you go. Added raglan increase rounds also affect yoke depth and sleeve width, so check both at each fit check.
Finishing
- Cut yarn, leaving a tail long enough to secure each ending. Weave in ends on the WS with a yarn needle.
- Wash and dry the sweater according to the yarn label. Cotton may relax or grow; support the wet garment and avoid stretching it while handling.
- Lay flat to dry and shape gently to the intended measurements. Do not pin it larger than the desired fit.
- Check the final bust circumference, body length, sleeve length, and neckline. If the measured garment differs from the chart, the washed fabric’s measurements take precedence.
Troubleshooting
| Problem | Solution |
|---|---|
| The foundation chain twists when joined. | Before joining, lay the chain flat and trace along its full length. If it is twisted, undo the join and straighten it before beginning the first round. |
| The yoke’s corner markers drift or the increases look uneven. | Place each marker in the new ch 2 corner space after every increase round. Count the four corner spaces before continuing. |
| The sweater is too tight or too loose. | Check the washed gauge swatch and the finished circumference. A gauge mismatch changes the size. Adjust the hook to correct gauge, or choose a different finished circumference. |
| The yoke reaches the underarm before the body has enough width, or becomes too deep before it is wide enough. | Stop and compare both width and depth with the wearer. The notes do not supply a verified grade for every size; the increase rate may need adjustment for the wearer’s proportions. |
| Gaps appear under the arms. | Pick up an extra sc at each gap when beginning the sleeve, then close the opening with the yarn tail during finishing. |
| Petal clusters do not line up neatly. | Check that each petal round places a cluster between the 3 sc groups and that the following round has 3 sc in each ch 2 space. Use the underarm area to absorb a small pattern mismatch. |
| The spiral creates a visible step. | Move the marker consistently and use the hdc, sc, and sl st transition near the marker. A small change in height may still be visible in spiral crochet. |
| You may run short of yarn. | Compare your remaining yarn with the planned garment length before starting the hem or second sleeve. The listed yardage is an estimate; buy an extra skein when lengthening the sweater or working a larger size. |
Pattern Summary
- Size range: XS to 5XL planning targets, customizable by measurement; the supplied notes specifically mention S to 2XL.
- Yarn amount: Approximately 1,200–2,700 m, or 4–9 skeins of 100 g at approximately 300 m each, estimated; actual use depends on size, gauge, and length.
- Hook size: 3 mm, subject to gauge.
- Main stitch: Double crochet; sleeves use petal clusters and single crochet.
- Construction method: Top down raglan yoke, worked in the round; body and sleeves separated at the underarm; spiral rounds used to reduce a visible joining seam.
Conclusion
The Naomie Sweater is an oversized cotton pullover built from a top down raglan yoke, a spiral worked body, petal cluster sleeves, and ribbed neckline and hem edges. The chart offers XS to 5XL planning targets, while the pattern remains measurement driven because verified gauge, complete size counts, finished measurements, and tested yarn totals were not supplied.
Customize the finished circumference, body length, sleeve length, and neckline using the provided calculations, then check the yoke depth and garment fit as you work. Make and wash your swatch before choosing a hook and size. Use this Crochet SWEATER Tutorial as a step by step reference, and explore the related crochet sweater guide for more sweater making guidance. Gather your materials, check your gauge, and begin the yoke when you are ready.
Watch the Step by Step Crochet Tutorial
Watch the Step by Step Crochet Tutorial
Follow the video tutorial to see the construction, crochet techniques, and assembly process explained visually.
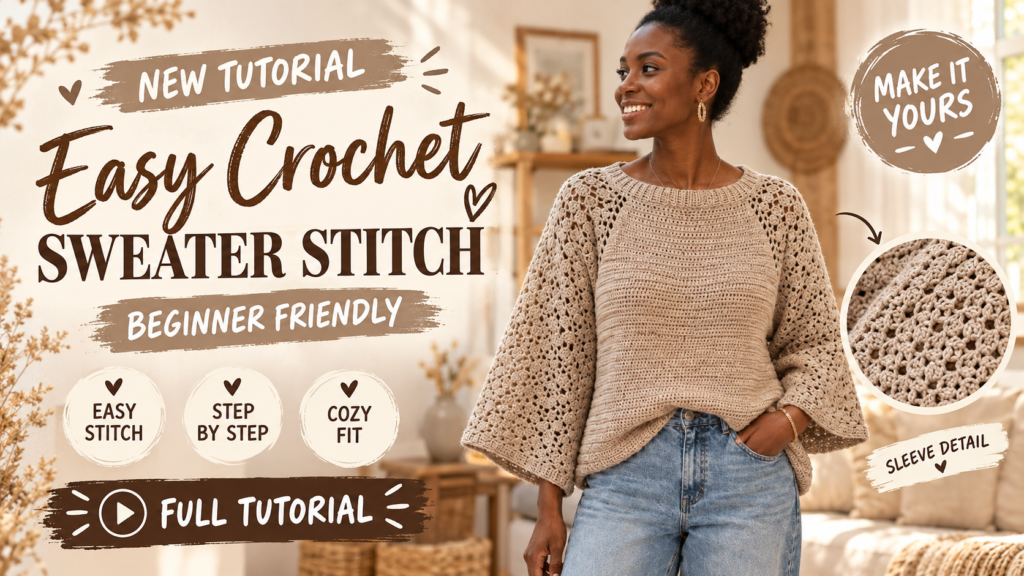
Use the play button to watch the tutorial without leaving this page.
Frequently Asked Questions
Is the Naomie Sweater suitable for beginners?
It is suitable for beginners familiar with chains, single crochet, double crochet, and working in the round. The petal cluster and spiral shaping are explained in the pattern.
What is the gauge for this crochet sweater pattern?
The assumed target gauge for this draft is 18 dc and 10 rounds = 10 cm in the main double crochet fabric after washing and drying the swatch. This is an engineering assumption, not a verified gauge from the original notes.
How do I choose a size?
Use the size chart as a planning guide and choose by finished garment circumference, not by label alone. Bust figures are finished circumferences, and the yoke width and depth should be checked on the wearer before the sleeves are separated.
How much yarn do I need for the Naomie Sweater?
The planning estimates range from 1,200–1,500 m for XS to 2,400–2,700 m for 5XL. Skein counts assume 100 g skeins at approximately 300 m each. Actual use depends on gauge, sleeve width, garment length, and ribbing.
Can I adjust the sweater length and sleeves?
Yes. Add body rounds before starting the hem ribbing to increase body length. Add or remove petal and single crochet round pairs to adjust sleeve length, and measure the fabric as you work because the textured sleeve may measure differently from the assumed round gauge.
Free Pattern Delivery
Get Your FREE Crochet Pattern PDF
Love this pattern? Enter your name and email below to get your free printable crochet pattern PDF delivered straight to your inbox!