Every stitch tells a story · Free PDF Pattern with Weekly Newsletter Claim Free Guide →

Every stitch tells a story · Free PDF Pattern with Weekly Newsletter Claim Free Guide →
Tapestry Crochet Sweater: 5 Amazing Step-By-Step Tips
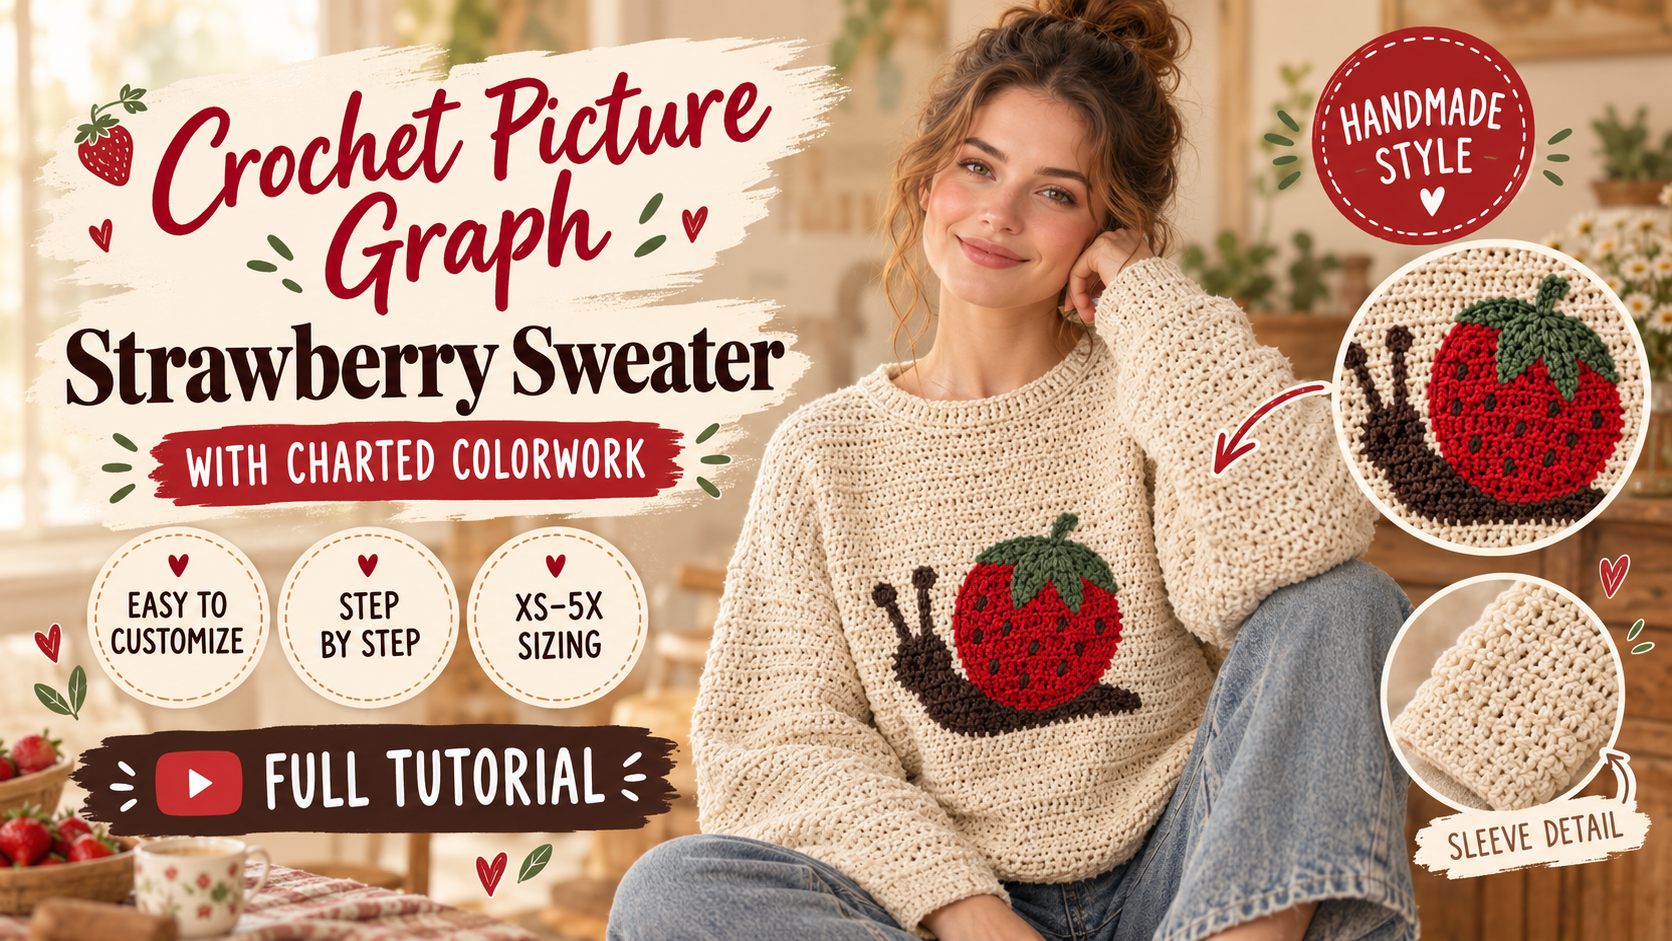
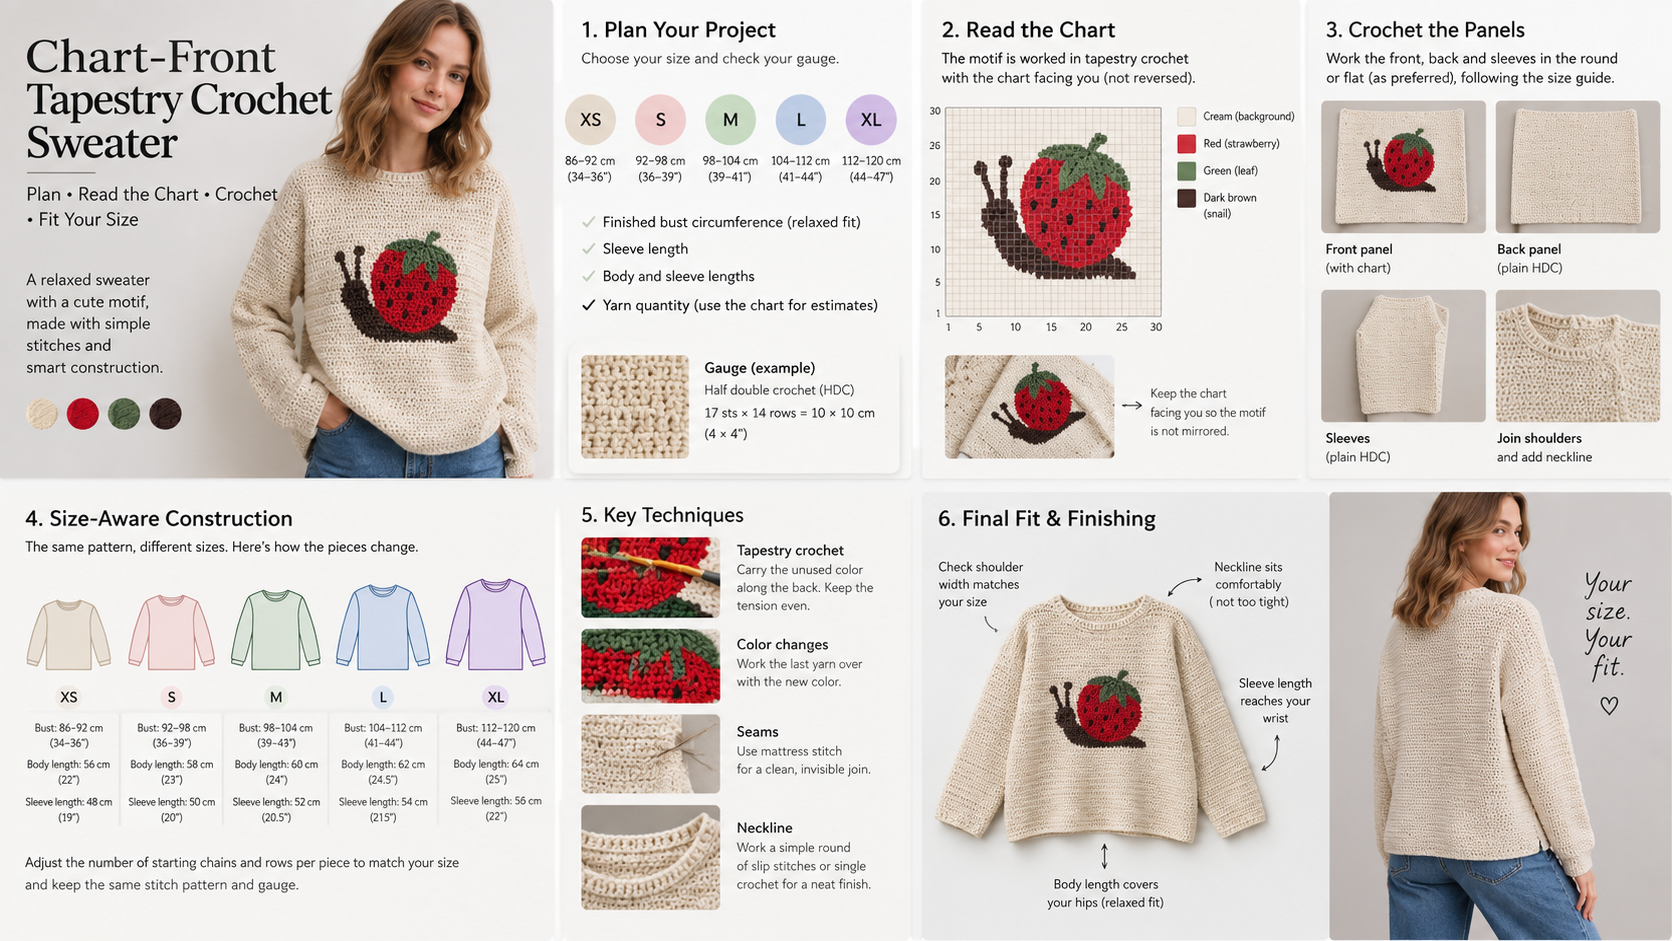
This tapestry crochet sweater is a relaxed, drop shoulder pullover with a charted colorwork motif on both the front and back. It is designed for intermediate crocheters who are comfortable with half double crochet, counting stitches and rows, changing colors, reading a chart, and working into row ends. The front and back are worked as one continuous panel over the shoulders, then the side seams are sewn and the sleeves are worked into the armhole edges. This construction creates a boxy fit while allowing you to adjust the length, sleeve length, and chart placement using the directions below.
Table of Contents
Strawberry Chart Front Sweater Pattern Introduction
Key Takeaways
- The front and back form one continuous panel worked over the shoulders, with sleeves added into the armhole edges.
- This is an intermediate crochet pattern using half double crochet and charted colorwork.
- Choose among sizes XS to 5X and adjust width, length, sleeve length, and chart placement as described.
Pattern Overview
- Description: A relaxed pullover with a charted colorwork motif on both front and back. The front and back are worked as one continuous panel over the shoulders; sleeves are added afterward.
- Style: Boxy, relaxed fit with straight sleeves. The sample sleeve length is about 10 in and is adjustable.
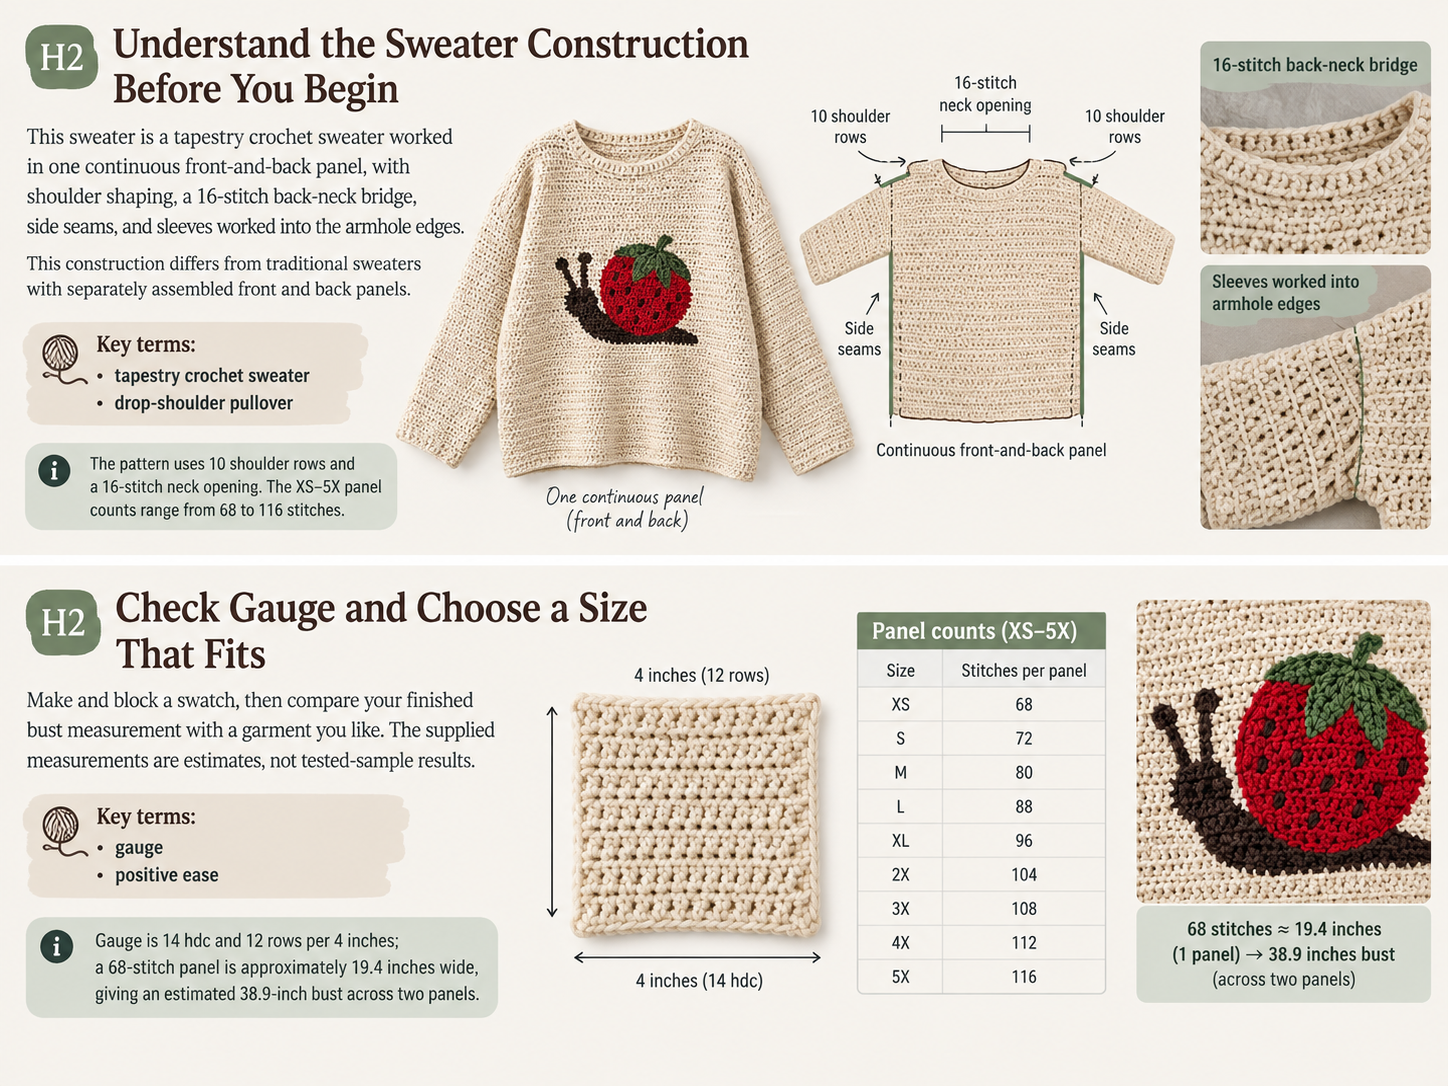
- Construction method: Work the front panel from hem to neckline, shape the shoulders, chain across the back neck, then work the back panel downward. Seam the sides, leaving armholes, and work the sleeves into the armhole edges.
- Skill level: Intermediate. You should be comfortable with half double crochet, counting rows and stitches, changing colors, reading a chart, and working into row ends.
- Finished measurements: See the size chart. Widths are finished bust circumferences intended to be worn with positive ease. Measurements are estimates calculated from the stated gauge, not measurements from a tested sample.
The original 68 stitch width is treated as the smallest size. The suggested gauge is 14 hdc and 12 rows = 4 in. Panel stitch counts increase by 6 stitches per size, and lengths increase by adding plain rows. Chart placement and yarn amounts are estimates because no image, yarn brand, or sample gauge was supplied. Make and block a gauge swatch before starting. For more sweater construction and fit guidance, see crochet sweater tutorials, the crochet sweater pattern sizing guide, and how to crochet a sweater.
Materials
- Yarn: Medium or Weight 4 yarn. Use a main color plus the colors needed for your chart. Yardage estimates by size are in the size chart.
- Hook: 5.5 mm crochet hook, or the size needed to meet gauge.
- Notions: Yarn needle, scissors, stitch markers, and measuring tape.
- Optional supplies: Stitch Fiddle or another chart making tool, yarn bobbins for separate color sections, blocking mats, rust proof pins, and a steamer.
Browse crochet tools and maker essentials if you need help choosing hooks or blocking supplies. For other garment ideas, visit the crochet sweater patterns collection.
Gauge and Terms
Instructions use US crochet terminology. The turning ch 1 does not count as a stitch. Work the first hdc into the first stitch.
- ch: chain
- hdc: half double crochet
- st(s): stitch(es)
- RS: right side, the outside of the garment
- WS: wrong side, the inside of the garment
Half double crochet (hdc): Yarn over, insert hook in the indicated stitch, yarn over and pull up a loop, yarn over and pull through all three loops on the hook.
- Stitch gauge: 14 hdc = 4 in.
- Row gauge: 12 rows = 4 in.
Make a swatch at least 6 in square in hdc, using the yarn and hook planned for the sweater. Block it as you plan to block the finished garment, let it dry, then measure the center 4 in. If you have more than 14 stitches in 4 in, try a larger hook; if you have fewer, try a smaller hook. Row gauge matters too because it determines sweater length and chart height. At this gauge, a panel of 68 stitches measures about 19.4 in wide; two panels make a finished bust of about 38.9 in. Each row measures about ⅓ in tall.
Stitch counts below are the number of hdc across each full width row. To make the foundation, chain one more than the stitch count; for example, ch 69 for 68 hdc. Blocking can change the measurements, especially with a drapey yarn.
Size Chart
The approximate finished bust width uses this calculation: panel stitches × 2 ÷ 3.5 stitches per inch. Length is calculated using 12 rows per 4 in. Yarn quantities are planning estimates for Weight 4 yarn and vary with the image, yarn, and individual tension.
| Size | Bust/Width | Length | Sleeve Length | Yarn Required | Panel Stitch Count | Total Body Rows |
|---|---|---|---|---|---|---|
| XS | 38.9 in | 22.7 in | 10 in | 900 yd | 68 | 68 |
| S | 42.3 in | 24 in | 10 in | 1,000 yd | 74 | 72 |
| M | 45.7 in | 25 in | 10 in | 1,100 yd | 80 | 75 |
| L | 49.1 in | 26 in | 10 in | 1,200 yd | 86 | 78 |
| XL | 52.6 in | 27 in | 10 in | 1,300 yd | 92 | 81 |
| 2X | 56 in | 28 in | 10 in | 1,400 yd | 98 | 84 |
| 3X | 59.4 in | 29 in | 10 in | 1,550 yd | 104 | 87 |
| 4X | 62.9 in | 30 in | 10 in | 1,700 yd | 110 | 90 |
| 5X | 66.3 in | 31 in | 10 in | 1,850 yd | 116 | 93 |
Complete Crochet Pattern
Body Panels
Make one continuous front and back panel. The front is worked upward, shoulder sections are worked separately, and a chain bridge across the neck begins the back, which is worked downward.
Prepare the chart
The chart represents one hdc per square. Select a simple image with a plain background. In Stitch Fiddle, import the image with the colorwork chart from picture tool, simplify the colors, and adjust the chart to about 68 stitches wide and 50 rows tall. Each square becomes one stitch. If your chosen image is wider than 68 squares, resize or crop it in the chart tool. For a narrower design, center it on a 68 stitch chart and fill the remaining squares with the background color. Add plain rows above or below the motif as needed to center it vertically, keeping the chart row numbers clear so you can track the correct starting row on the back. The smallest size uses the chart across the full panel. For larger sizes, center the 68 stitch chart and work extra stitches in the main color on either side.
Change color by working the final yarn over and pull through of the hdc before the color change with the new color. This places the new color at the top of the stitch. Use separate yarn bobbins for color sections that should not be carried across the back. Carrying long strands can snag or pull the fabric in. Crochet over short ends only when that will not make the fabric bulky, and secure longer ends neatly on the WS. Work the front chart from chart row 1 upward. Work the back downward, starting with chart row 50 and moving toward row 1, so both images are upright when the sweater is worn.
Front panel
- Foundation: Chain the number needed for your size panel stitch count plus 1: XS ch 69, S ch 75, M ch 81, L ch 87, XL ch 93, 2X ch 99, 3X ch 105, 4X ch 111, or 5X ch 117.
- Row 1 (WS): Hdc in the 2nd ch from hook and in each ch across. Turn. Stitch count: 68 (74, 80, 86, 92, 98, 104, 110, 116) hdc.
- Row 2: Ch 1, hdc in each st across. Turn.
- Rows 3 to 8: Repeat Row 2 six times. At the end of Row 8, you will have worked 8 rows total.
- Chart Rows 1 to 50: Work the 50 row chart in hdc, changing colors as shown. Keep the same full panel stitch count. On sizes larger than XS, center the 68 stitch chart and work extra stitches in the background color. Work one hdc for each chart square. Turn at the end of each row. Follow the chart’s alternating row direction, reading odd numbered rows in one direction and even numbered rows in the opposite direction as indicated by the chart.
- Plain upper body: Work the remaining plain rows in the main color, keeping the same stitch count. Work XS 10 rows, S 14 rows, M 17 rows, L 20 rows, XL 23 rows, 2X 26 rows, 3X 29 rows, 4X 32 rows, or 5X 35 rows. At the end, the front panel has the total body row count shown in the size chart.
Shape the front neckline and shoulders
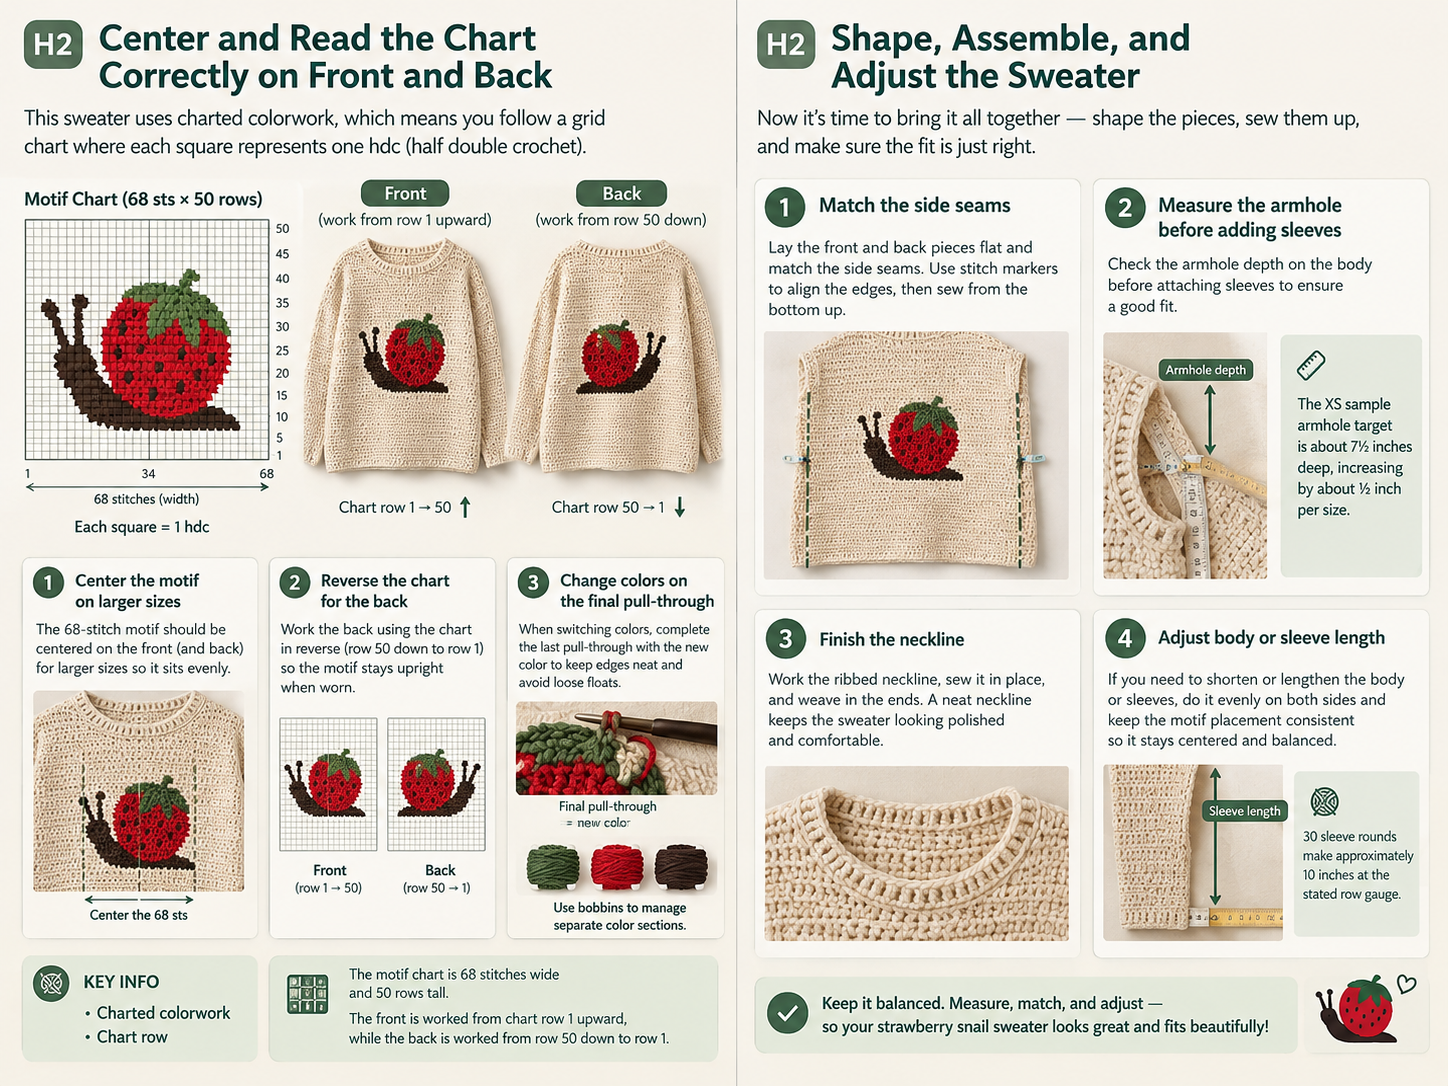
Leave the center 16 stitches unworked. Divide the remaining stitches evenly between the two shoulders.
| Size | Stitches per shoulder |
|---|---|
| XS | 26 |
| S | 29 |
| M | 32 |
| L | 35 |
| XL | 38 |
| 2X | 41 |
| 3X | 44 |
| 4X | 47 |
| 5X | 50 |
- Fasten off. Join yarn at one shoulder edge and work across that shoulder’s stitches only.
- Shoulder Rows 1 to 10: Ch 1, hdc across the shoulder stitches. Turn after each row. Fasten off after Row 10.
- Join yarn at the other shoulder edge and repeat Shoulder Rows 1 to 10. Fasten off.
Back neck bridge and back panel
- Back Row 1: With RS facing, begin at the outer edge of one shoulder. Ch 1, hdc across the first shoulder’s 26 (29, 32, 35, 38, 41, 44, 47, 50) stitches; ch 16 for the neck bridge; hdc across the other shoulder’s stitches. Turn. Stitch count: 68 (74, 80, 86, 92, 98, 104, 110, 116) stitches, including the 16 chain stitches. This bridge row is the first row of the back panel.
- Back Rows 2 to 10: Ch 1, hdc in each st across. Turn. You will have 10 plain rows total, including Back Row 1.
- Back Chart Rows 50 to 1: Work the chart from row 50 down to row 1, one hdc per square. Center the 68 stitch chart for sizes larger than XS and work any extra stitches in the background color.
- Lower plain section: Work 8 rows in the main color, hdc in each st across. Turn after each row.
The smallest size has 10 plain rows above the front chart, 50 chart rows, and 8 plain rows below: 68 rows total. For the other sizes, the total rows listed in the size chart are achieved by adding the specified extra plain rows above the front chart and below the back chart. Keep the front and back plain sections balanced so both halves are the same length.
Sleeve Panels
Sleeve lengths in the size chart are approximate. The original 54 stitch sleeve note is treated as a sample starting point, not a universal count. Sleeve openings and upper arm needs vary by size, so measure the armhole edge before beginning.
- Fold the panel at the back neck bridge, with RS facing out. Match the front and back side edges.
- Pin or clip each side seam. Starting at the lower edge, sew the side seam upward. Leave the top section open for the armhole.
- For a relaxed drop shoulder fit, aim for an armhole depth of about 7½ in for XS, increasing by about ½ in per size. Check this against your body or a well fitting sweater before sewing. The front and back open row end edges together form the sleeve opening.
- Join yarn at the underarm. Work hdc evenly around the armhole edge, distributing stitches so the sleeve edge lies flat and does not pucker. For the XS sample, aim for about 54 hdc around the opening; adjust the count for your size and the actual opening.
- Join the round without twisting. Ch 1; this does not count as a stitch.
- Sleeve Round 1: Hdc in each st around; join and turn.
- Sleeve Rounds 2 to 30: Ch 1, hdc in each st around; join and turn. Thirty rounds at the stated row gauge make a sleeve about 10 in long.
- For a longer sleeve, add rounds evenly to both sleeves. For a closer fit, decrease a stitch at each underarm side at regular intervals, taking care to keep both sleeves identical. Repeat for the second sleeve.
Assembly
- Side seams: Sew the front and back side edges together from the lower edge upward, stopping at the measured armhole depth. Use a yarn needle and a flexible mattress or whip stitch. Keep the seam even and avoid pulling it tight.
- Sleeves: Work the sleeves directly into the armhole edges as described above. Check that the sleeve opening is not twisted before joining the first round.
- Neckline finishing: Join yarn at the back neck. Work 2 rounds of hdc evenly around the neckline, placing stitches evenly along chain edges and row ends. Do not overcrowd the edge; too many stitches can make it flare. Join each round and fasten off.
- Edge finishing: The neckline has a simple hdc border. If you prefer a wider border, add rounds evenly, checking that the edge still lies flat.
Custom Adjustments
Use the adjustment formulas in the customization section below. The sweater is relaxed and straight sided, not fitted. Compare the finished bust with a sweater that fits you well. Blocking can change measurements, especially with drapey yarn.
Customization
- Width: Add stitches equally to both panel edges. At the stated gauge, each additional stitch on each panel adds about 0.29 in to the finished bust circumference: 2 stitches ÷ 3.5 stitches per inch. Add an even number of stitches overall so the center 16 stitches can still be divided evenly between the shoulders.
- Length: Add plain rows outside the chart, above the front chart and below the back chart. At the stated row gauge, 3 rows add about 1 in. Add the same total number of rows to the front and back halves to keep them balanced.
- Sleeves: Add or remove rounds equally on both sleeves. At the stated row gauge, 3 rounds add about 1 in of sleeve length. For a wider upper arm, work additional stitches evenly around the armhole; for a narrower upper arm, work fewer. Check the sleeve circumference against your measurements before continuing.
- Chart placement: Keep the chart centered across the panel. Add or remove plain background rows before or after the chart to move the image vertically. Do not change the chart row order on the back: begin at row 50 and work down to row 1.
- Neckline: No neckline adjustment formula is supplied. The pattern specifies a 16 stitch neck opening, 10 shoulder rows, and 2 rounds of hdc around the neckline. A wider border may be made by adding rounds evenly and checking that the edge lies flat.
For more ideas about fit and garment styling, explore crochet flower cardigan patterns and tapestry crochet sweater tips.
Finishing
- Fasten off, leaving a tail long enough to weave in securely.
- Use a yarn needle to weave in ends on the WS. Secure colorwork ends without drawing the fabric tight.
- Pin the sweater to the measurements for your size. Steam block gently, keeping the steamer at a safe distance and avoiding direct contact with the yarn. Follow the yarn label; some fibers should not be steamed.
- Allow the garment to dry completely before unpinning. Blocking can relax the fabric and make it larger or drapier, so measure again after blocking.
Use the bust and length measurements in the size chart as targets. Sleeve length is about 10 in before adjustment. Actual results depend on yarn, stitch tension, and blocking. Compare the blocked garment with the size chart and check that the seams, neckline, armholes, and sleeves lie flat. Follow the yarn label for washing and care; no specific washing method is stated for this pattern.
Troubleshooting
| Problem | Solution |
|---|---|
| Uneven panel edges | Count stitches at the end of every row. Make sure the turning chain is not being counted as a stitch, and work the first hdc into the first stitch. |
| The chart does not fit the panel | Check that the chart is no wider than 68 stitches. For larger sizes, center it and work the additional panel stitches in the background color. |
| Color changes look messy or the fabric puckers | Change color on the final pull through of the stitch before the new color section. Keep carried strands and crocheted over ends loose enough that the fabric can lie flat. Use separate bobbins for isolated color sections. |
| The gauge is wrong | Block your swatch before measuring it. Change hook size and make another swatch; do not rely on changing tension alone to compensate. |
| The sweater is too tight or too loose | Compare the blocked panel width with the size chart before continuing. Change the stitch count using the width formula, and remember that positive ease is needed for a comfortable pullover. |
| The armhole or sleeve feels tight | Check the opening depth and sleeve circumference before working the full sleeve. Redistribute stitches around the armhole or adjust the opening to fit your upper arm. |
| You are running short of yarn | Compare the yarn remaining with the estimate for your size before starting sleeves. Colorwork uses extra yarn; buy additional yarn from the same dye lot when possible. |
Pattern Summary
- Final size range: XS to 5X.
- Finished bust: Approximately 38.9 to 66.3 in, calculated at stated gauge.
- Yarn amount: Approximately 900 to 1,850 yd of Weight 4 yarn, depending on size and colorwork.
- Hook size: 5.5 mm, or size needed to meet gauge.
- Main stitch: Half double crochet.
- Construction method: Continuous front and back panel worked over the shoulders, with charted colorwork and sleeves worked into the armhole edges.
Conclusion
This Strawberry Chart Front Sweater pattern combines a continuous shoulder construction, half double crochet fabric, and a charted motif on both sides. The size range runs from XS to 5X, and the written options let you adjust width, length, sleeve length, and chart placement while keeping the specified stitch and row guidance. Make and block a gauge swatch before beginning, then compare your finished measurements with the size chart. Gather your yarn and hook and begin your own tapestry crochet sweater.
Watch the Step by Step Crochet Tutorial
Watch the Step by Step Crochet Tutorial
Follow the video tutorial to see the construction, crochet techniques, and assembly process explained visually.
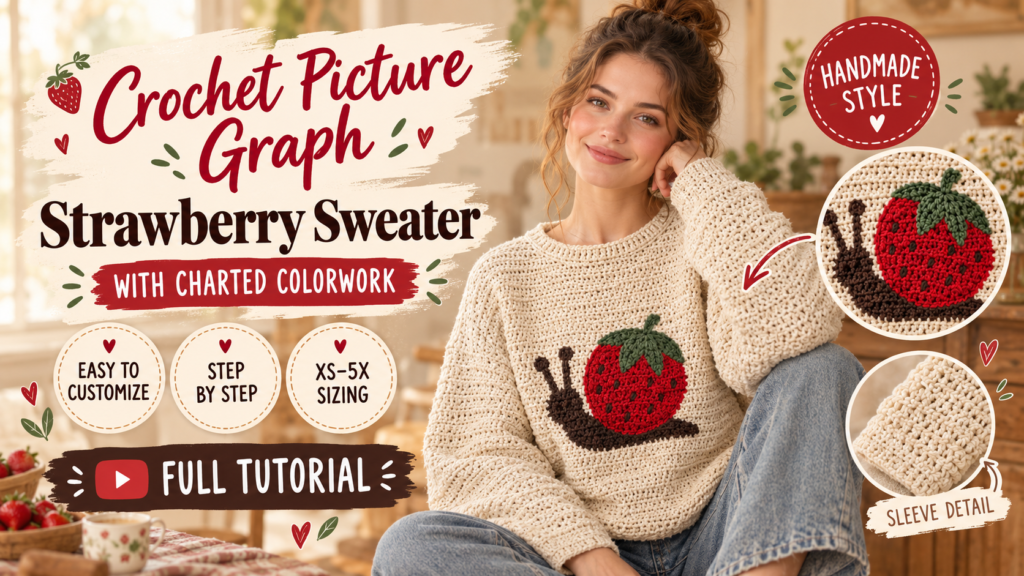
Use the play button to watch the tutorial without leaving this page.
Frequently Asked Questions
What skill level is this crochet sweater pattern?
It is an intermediate pattern. You should be comfortable with half double crochet, counting rows and stitches, changing colors, reading a chart, and working into row ends.
What sizes does the Strawberry Chart Front Sweater include?
The pattern includes sizes XS, S, M, L, XL, 2X, 3X, 4X, and 5X. Finished bust measurements range from approximately 38.9 in to 66.3 in, calculated at the stated gauge.
What yarn and hook do I need?
Use medium or Weight 4 yarn in a main color plus the colors needed for your chart. The suggested hook is 5.5 mm, or the size needed to meet gauge.
How do I keep the chart upright on the back?
Work the front chart from row 1 upward. Work the back chart downward, starting at row 50 and moving toward row 1. This keeps both images upright when the sweater is worn.
Can I change the sweater or sleeve length?
Yes. Add plain rows outside the chart to adjust body length and add or remove sleeve rounds equally on both sleeves. At the stated row gauge, 3 rows or rounds add about 1 in. Keep the front and back plain sections balanced.
Free Pattern Delivery
Get Your FREE Crochet Pattern PDF
Love this pattern? Enter your name and email below to get your free printable crochet pattern PDF delivered straight to your inbox!