Every stitch tells a story · Free PDF Pattern with Weekly Newsletter Claim Free Guide →

Every stitch tells a story · Free PDF Pattern with Weekly Newsletter Claim Free Guide →
Crochet Flower Cardigan: 5 Amazing Ways to Crochet (Free)
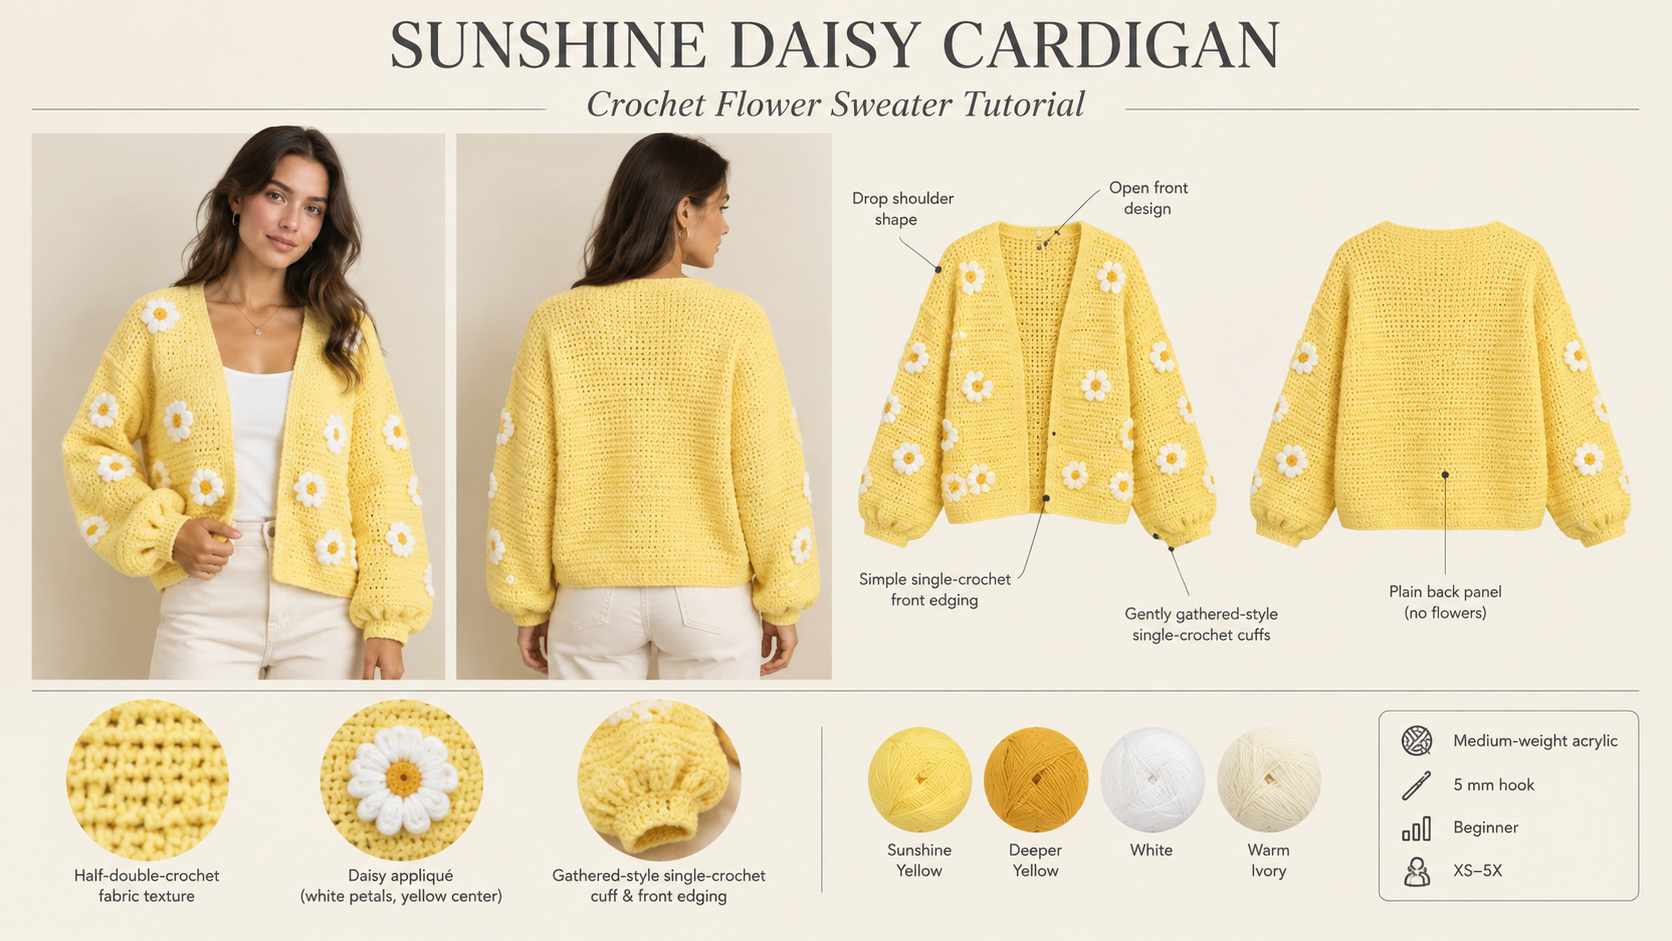
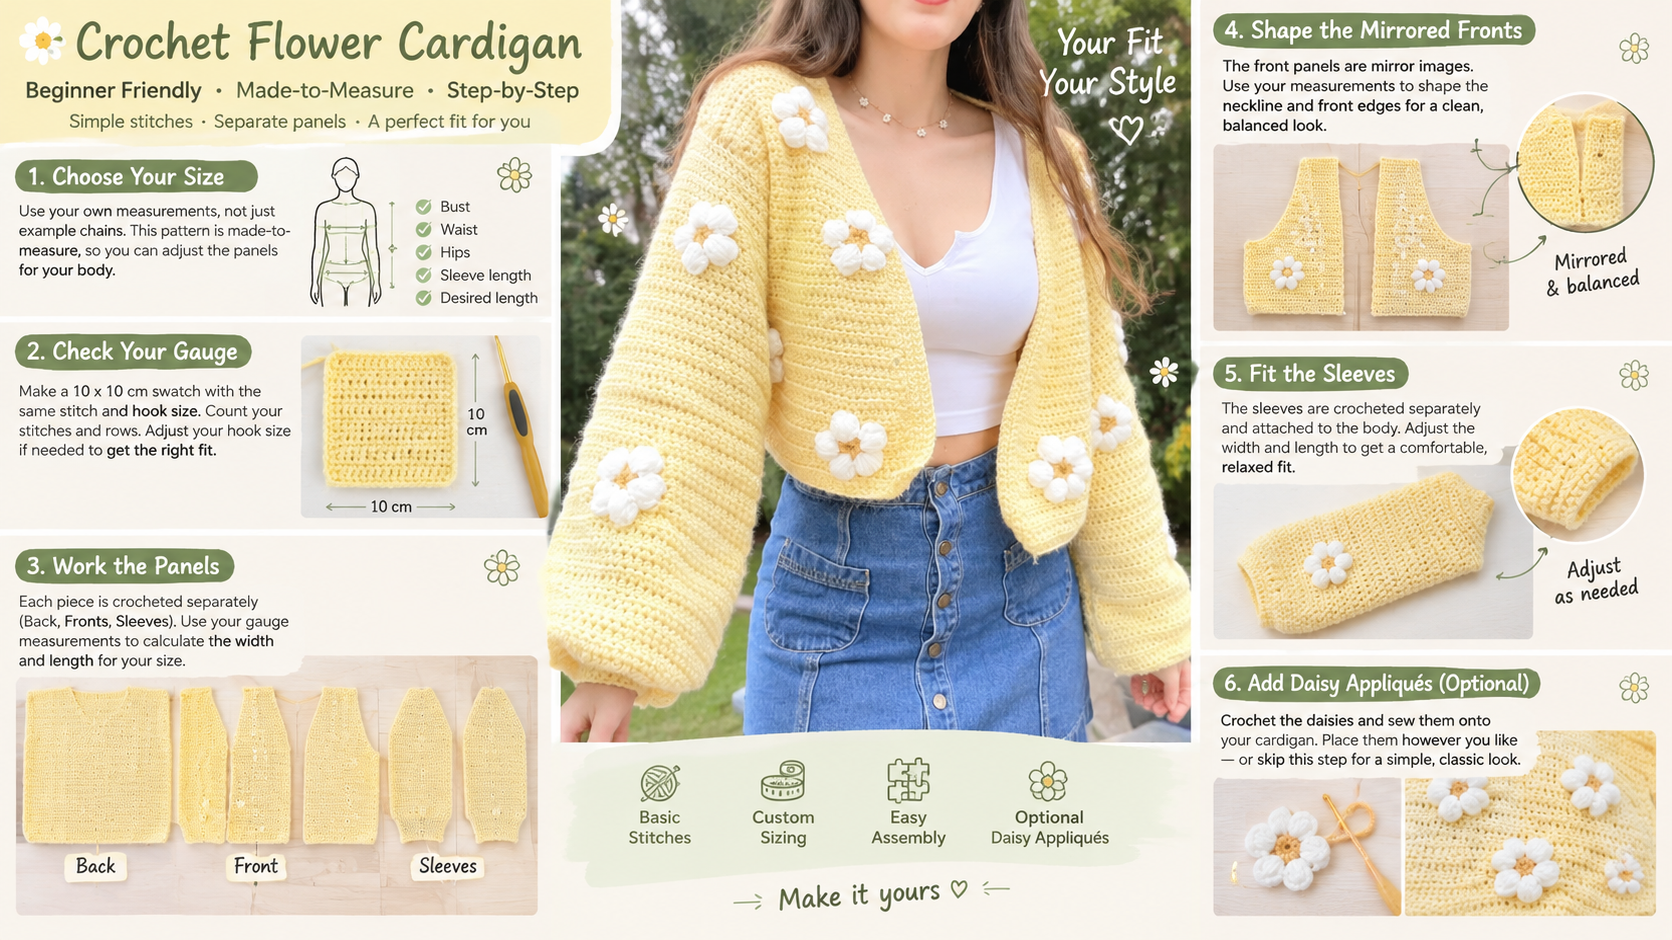
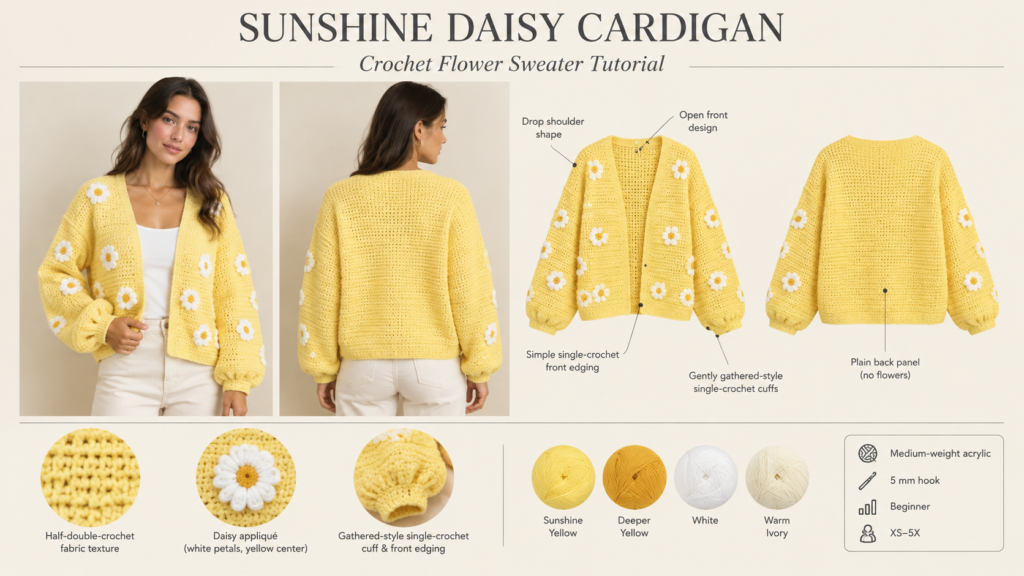
Crochet Flower Cardigan fans can make the Sunshine Daisy Cardigan, a beginner friendly, open front layer worked in simple panels with optional daisy appliqués. Its separate back, mirrored fronts, and rectangular sleeves make the fit easier to compare with a favorite cardigan before seaming. The pattern includes nine sizes from XS to 5X, plus measurement based options for adjusting width, length, and sleeves.
Table of Contents
Introduction
Key Takeaways
- The drop shoulder cardigan is made from separate back, front, and sleeve panels that are seamed together.
- This is a beginner pattern for crocheters who know chain, turning, single crochet, half double crochet, double crochet, and slip stitch.
- Use blocked gauge and a cardigan you like as guides when customizing measurements and checking fit.
Pattern Overview
- Description: An open front cardigan with a relaxed fit, straight body panels, long sleeves with gathered style single crochet cuffs, and optional white and yellow daisy appliqués.
- Style: Loose, drop shoulder cardigan.
- Construction method: Crochet a back panel, two mirrored front panels, and two rectangular sleeve panels. Seam the body and sleeves, then add cuffs and front edging.
- Skill level: Beginner. You should know how to chain, turn, and work single crochet, half double crochet, double crochet, and slip stitch. The optional daisies use a puff stitch.
- Finished measurements: See the size chart. The listed bust is the garment’s full circumference when laid flat and measured around; it does not include buttons or front overlap. Choose a finished bust measurement about 6 to 10 in (15 to 25.5 cm) larger than your actual bust for a relaxed fit.
Important sizing note: The original notes give example starting chains but do not provide gauge or body measurements. This pattern therefore uses a stated gauge and a graded measurement plan. The stitch counts work only if your blocked swatch matches the gauge below. Use a cardigan you like to check body length, sleeve length, and armhole depth before joining. For more garment guidance, browse crochet sweater patterns and crochet sweater tutorials.
Materials
- Yarn: Medium weight (size 4) 100% acrylic yarn. Sample color plan: main color, Caron Simply Soft in Baby Sunshine yellow; small amounts of darker yellow for flower centers; and a small amount of white for petals.
- Approximate main color yarn: About 1,050 to 2,250 yd (960 to 2,060 m), depending on size and length. This estimate includes a modest amount of edging and is not a substitute for checking your gauge and garment measurements.
- Hook: 5 mm crochet hook, or the size needed to meet gauge.
- Notions: Yarn needle, stitch markers, scissors, tape measure, and pins or locking markers for assembly.
- Optional supplies: Blocking mats and rustproof pins.
Yarn amounts are estimates. Skeins vary by brand and yardage; check the yardage on your ball band and buy enough yarn from the same dye lot. Add yarn for extra long sleeves, additional length, or many appliqués. Find more crochet tools and maker essentials for swatching and finishing.
Gauge and Terms
US crochet terminology is used.
- ch = chain
- sc = single crochet
- hdc = half double crochet
- dc = double crochet
- sl st = slip stitch
- hdc2tog = half double crochet two stitches together; a decrease
- st(s) = stitch(es)
- sp = space
- RS = right side, the side intended to show
- WS = wrong side, the inside of the garment
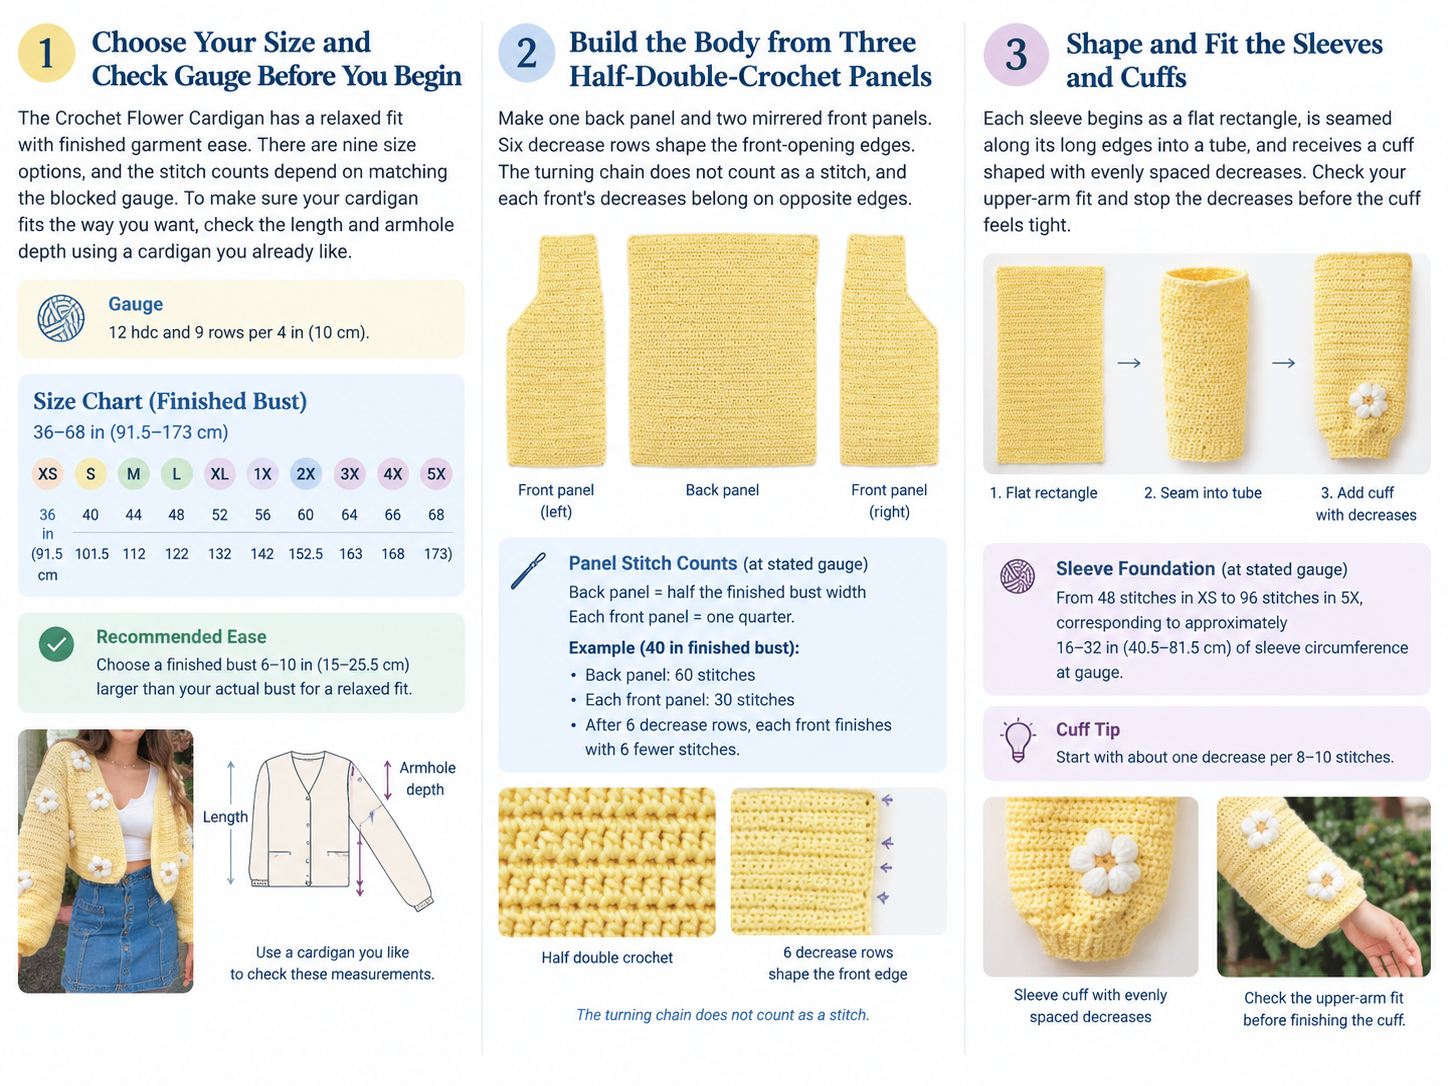
Gauge: 12 hdc = 4 in (10 cm); 9 rows hdc = 4 in (10 cm).
How to check gauge: Make a swatch at least 6 in (15 cm) square in hdc, using the same yarn and hook planned for the cardigan. Wash and dry it as you intend to care for the finished garment, then lay it flat without stretching. Count stitches and rows across the central 4 in (10 cm).
If you have more stitches than the gauge, your stitches are too small: try a larger hook. If you have fewer stitches, try a smaller hook. Recheck after changing hooks. Acrylic may relax with washing and wear, so use the washed swatch for your measurements.
Size Chart
The finished bust measurements are garment measurements, not body bust measurements. Choose a size with the amount of ease you prefer. The chart uses nine finished bust options, increasing by 4 in (10 cm). At the stated stitch gauge, there are 3 hdc per inch.
| Size | Bust/Width | Length | Sleeve Length | Yarn Required |
|---|---|---|---|---|
| XS | 36 in (91.5 cm) | 22 in (56 cm) | 17 in (43 cm) | 1,050 yd (960 m) |
| S | 40 in (101.5 cm) | 23 in (58.5 cm) | 17.5 in (44.5 cm) | 1,200 yd (1,100 m) |
| M | 44 in (112 cm) | 24 in (61 cm) | 18 in (45.5 cm) | 1,350 yd (1,235 m) |
| L | 48 in (122 cm) | 25 in (63.5 cm) | 18.5 in (47 cm) | 1,500 yd (1,370 m) |
| XL | 52 in (132 cm) | 26 in (66 cm) | 19 in (48.5 cm) | 1,650 yd (1,510 m) |
| 2X | 56 in (142 cm) | 27 in (68.5 cm) | 19 in (48.5 cm) | 1,800 yd (1,645 m) |
| 3X | 60 in (152.5 cm) | 28 in (71 cm) | 19.5 in (49.5 cm) | 1,950 yd (1,785 m) |
| 4X | 64 in (162.5 cm) | 29 in (73.5 cm) | 20 in (51 cm) | 2,100 yd (1,920 m) |
| 5X | 68 in (173 cm) | 30 in (76 cm) | 20 in (51 cm) | 2,250 yd (2,060 m) |
Panel Stitch Counts by Size
| Size | Back panel | Each front panel | Each sleeve foundation |
|---|---|---|---|
| XS | 54 sts | 27 sts | 48 sts |
| S | 60 sts | 30 sts | 54 sts |
| M | 66 sts | 33 sts | 60 sts |
| L | 72 sts | 36 sts | 66 sts |
| XL | 78 sts | 39 sts | 72 sts |
| 2X | 84 sts | 42 sts | 78 sts |
| 3X | 90 sts | 45 sts | 84 sts |
| 4X | 96 sts | 48 sts | 90 sts |
| 5X | 102 sts | 51 sts | 96 sts |
Sleeve foundation counts are a starting point, not a universal upper arm fit. At 3 stitches per inch, they make a sleeve circumference of about 16 to 32 in (40.5 to 81.5 cm). Check this against your upper arm and preferred ease before proceeding.
Size plan and calculations: For example, a 40 in finished bust uses a 60 stitch back panel (20 in) plus two 30 stitch front panels (10 in each): 20 in + 10 in + 10 in = 40 in. The back panel is half the finished bust; each front panel is one quarter. Back stitches = (finished bust ÷ 2) × 3. Front stitches = (finished bust ÷ 4) × 3. Because row gauge is 2.25 rows per inch, body and sleeve row counts are rounded to the nearest whole row. Measure the pieces as you work.
Complete Crochet Pattern
Notes before starting: The turning ch 1 does not count as a stitch. Unless a step says otherwise, work the first stitch of each row into the first stitch, not into the turning chain. To make a panel of N stitches, begin with ch N + 1 and work the first hdc into the second ch from the hook. Place a stitch marker in the first and last stitch of a row if you find it difficult to see the row edges. The body is made from separate pieces, then seamed, making it easier to adjust the cardigan using a favorite garment as a template. Compare your gauge swatch and panel measurements with a cardigan that fits; armhole depth and sleeve circumference are especially personal. The sleeve cuff decreases are worked around the sleeve opening and adjusted to your desired wrist measurement. The daisy decoration is optional.
Body Panels
The back and front panels are worked flat in hdc. Make one back panel and two front panels.
Back Panel
Choose the stitch count for your size from the chart.
- Row 1: Ch the listed back panel stitch count plus 1. Hdc in the second ch from the hook and in each ch across. The number of hdc equals the listed stitch count.
- Row 2: Ch 1, turn. Hdc in each st across.
- Repeat: Repeat Row 2 until the panel reaches the length for your size in the chart. At the stated row gauge, the approximate row counts are XS 50 rows; S 52 rows; M 54 rows; L 56 rows; XL 59 rows; 2X 61 rows; 3X 63 rows; 4X 65 rows; 5X 68 rows. The foundation row counts as Row 1. Fasten off.
Front Panels
Make two. The panels are mirrors of one another: the neckline decreases go at opposite edges.
- Row 1: Ch the listed front panel stitch count plus 1. Hdc in the second ch from the hook and in each ch across. The number of hdc equals the listed stitch count.
- Row 2: Ch 1, turn. Hdc in each st across.
- Repeat: Repeat Row 2 until the panel is 6 rows short of the back panel row count for your size.
- Neckline shaping: Work the next 6 rows, decreasing 1 st at the front opening edge of every row. For Front A, ch 1, turn. Hdc2tog over the first 2 sts, then hdc in each remaining st to the end. For Front B, ch 1, turn. Hdc in each st until 2 sts remain, then hdc2tog over the last 2 sts. Each panel now has 6 fewer stitches than its original count. Fasten off.
These decreases form a short diagonal at the top of each front panel. If you want a deeper or shallower diagonal, adjust the number of decrease rows and check that both panels have matching shaping.
Sleeve Panels
Make two sleeve panels. Each panel is worked flat, then seamed into a tube. The foundation chain sets the sleeve circumference; the rows set the sleeve length.
- Sleeve panel: Choose the sleeve foundation stitch count for your size from the chart. Before continuing, check that the foundation chain, once worked, will fit around the widest part of your upper arm with comfortable ease.
- Row 1: Ch the listed sleeve stitch count plus 1. Hdc in the second ch from the hook and in each ch across.
- Row 2: Ch 1, turn. Hdc in each st across.
- Repeat: Repeat Row 2 until the panel measures the sleeve length in the chart. The approximate row counts at gauge are XS 38; S 39; M 41; L 42; XL 43; 2X 43; 3X 44; 4X 45; 5X 45 rows, counting the foundation row as Row 1. Adjust to your desired wrist to shoulder length. Fasten off.
- Join each sleeve into a tube: Fold the sleeve panel in half so its two long edges meet. With the WS facing out, use sl sts through corresponding stitches along both edges to seam the sleeve. Do not seam the short ends; they remain the sleeve openings. Fasten off.
- Cuff Round 1: With the RS facing, join yarn at either sleeve opening. Work in joined rounds around the opening. Ch 1. Work sc evenly around. Join with a sl st to the first sc. Count the stitches and place a marker in the first stitch.
- Cuff decrease rounds: To taper the cuff, work one decrease round at a time. Space hdc2tog decreases evenly around the opening, working sc in the other stitches. As a starting point, make about one decrease for every 8 to 10 stitches around. Join each round with a sl st. Try the cuff on after each round. Stop decreasing when the opening fits comfortably over your hand and sits securely at your wrist. Do not continue decreasing if the cuff feels tight.
- Cuff even rounds: Ch 1 and work sc in each st around, joining with a sl st at the end of each round. Work 3 to 4 even rounds, or until the cuff is the length you like. Fasten off. Repeat for the second sleeve. Keep the number of decrease rounds and cuff rounds the same on both sleeves.
Assembly
Before seaming, lay the pieces out with the RS facing up and check that the fronts are mirror images, the sleeve lengths match, and the edges line up.
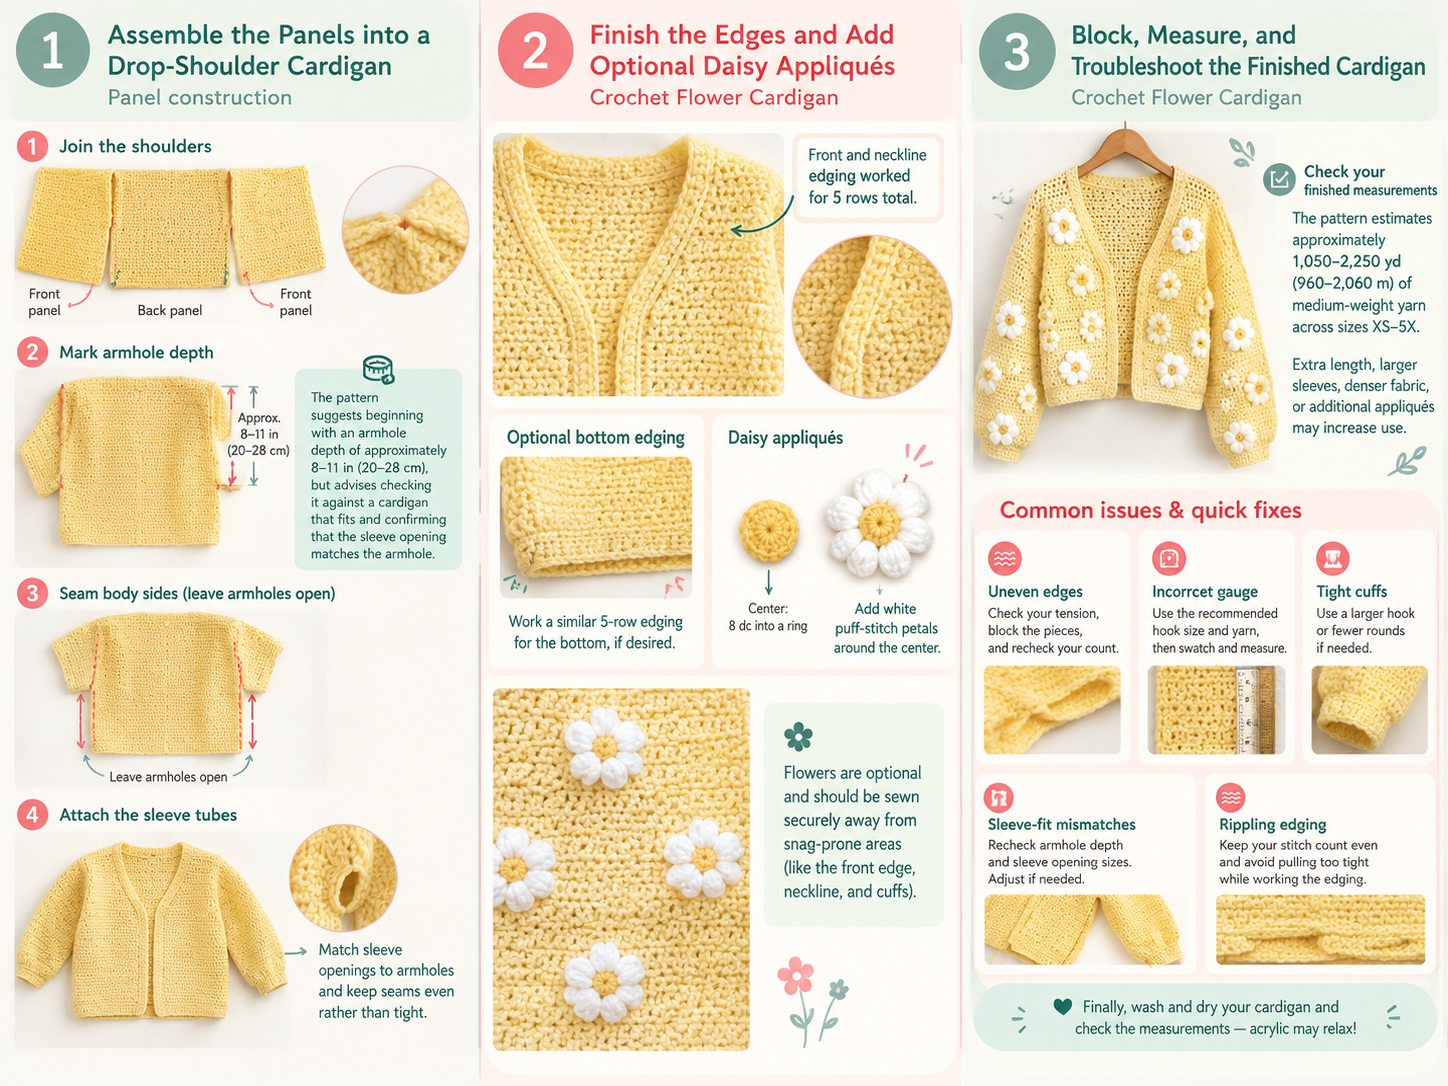
- Join the shoulders: Place the two front panels over the back panel, with the top edges aligned at the shoulders. The sloped edges should face the cardigan opening. Seam each shoulder from the outer edge inward. Leave the space between the front panels open for the neckline.
- Mark the armholes: Place the cardigan flat. Starting at each shoulder seam, mark an equal armhole depth down the side edges. Use the depth of a cardigan that fits you, or begin with approximately 8 to 11 in (20 to 28 cm). Check that the armhole opening will match the top opening of the sleeve before seaming.
- Join the side seams: Seam each side from the bottom hem up to the armhole marker. Leave the marked armhole opening unseamed.
- Attach the sleeves: Turn the sleeve tubes RS out. Match the sleeve seam to the underarm area and pin or clip the sleeve opening evenly around the armhole opening. Use sl sts or a yarn needle to join the sleeve opening to the body armhole. Keep the sleeve tube open while joining; do not accidentally seam across the sleeve opening.
- Neckline and front edging: With the RS facing, join the main color yarn at the lower front edge. Work sc evenly up one front edge, around the neckline, and down the other front edge. Turn or join as appropriate at the corners to keep the edging flat.
- Edging rows: Ch 1, turn if working back and forth, and work sc in each sc along the edging. Work 5 rows total, including the first edging row. Add or omit stitches at corners as needed so the edge lies flat without flaring or pulling. Fasten off.
- Optional bottom edging: Work sc evenly along the bottom edge if you would like a finished border there.
The rough source instructions suggest slip stitching edges together. A yarn needle or a crochet seam using sl sts can both work; whichever method you choose, keep your stitches even and avoid pulling the seams tight.
Optional Daisy Appliqués
- Center: With darker yellow yarn, ch 4 and join with a sl st to form a ring. Ch 2 (does not count as a stitch), then work 8 dc into the ring. Join with a sl st to the first dc. Fasten off.
- Petals: Join white yarn to any center stitch.
- Puff petal: Ch 5. In the same center stitch, work 3 partial dc stitches: for each one, yarn over, insert hook into the stitch, yarn over and pull up a loop, yarn over and pull through 2 loops, leaving the last loop on the hook. After all 3 partial stitches, yarn over and draw through all loops on the hook. Ch 1 to secure the puff. Sl st into the next center stitch.
- Repeat the petal instructions around the center. Adjust the number of petals to fit the center neatly. Fasten off, leaving a tail for sewing. Sew each daisy securely to the cardigan, or attach it with sl sts. Keep appliqués away from areas where they may catch or rub.
Customization
Width Adjustment
Use the measurements you want for the finished garment, then calculate counts using your blocked gauge. At 12 hdc per 4 in, add 3 stitches for each 1 in (2.5 cm) of panel width. Increase the back panel by twice the desired increase in back panel width. Increase each front panel by the desired increase in its width. Example: To add 2 in to the total finished bust while keeping the front openings unchanged, add 6 stitches to the back panel. To add 1 in to each front panel, add 3 stitches to each front panel; this adds 2 in to the total circumference.
Length and Sleeve Adjustment
At 9 rows per 4 in, add about 2¼ rows for each 1 in (2.5 cm) of length. Round to a whole row. Work the extra rows before shaping the top of the front panels, and keep both front panels the same length. To change sleeve circumference by 1 in, add or remove about 3 foundation chain stitches, then work 1 extra chain for the turning chain. To change sleeve length by 1 in, add or remove about 2¼ rows, rounded to a whole row. Measure the sleeve tube and check it against the armhole before attaching. If the sleeve opening does not match the armhole, adjust the armhole depth or sleeve measurement before seaming.
Neckline Adjustment
The neckline decreases form a short diagonal. To make it deeper or shallower, adjust the number of decrease rows and check that both front panels have matching shaping. Keep both front panels and both sleeves the same size unless you are deliberately making an asymmetrical design.
For additional sweater fit help, see the crochet sweater pattern sizing guide and the guide to common crochet sweater mistakes.
Finishing
- Weave in all ends securely, including the yarn tails at seams, cuffs, edging, and appliqués.
- Check that both sleeves and cuffs match and that the front edging lies flat.
- Wash and dry the cardigan according to the yarn label. Shape it to the finished measurements while damp and lay it flat to dry. Do not stretch the fabric excessively.
- Recheck the garment measurements after blocking. Acrylic may relax with washing and wear, so use the washed gauge swatch to guide any final adjustments.
Troubleshooting
| Problem | Solution |
|---|---|
| My panel edges are uneven. | Count stitches at the end of every row. The turning ch 1 does not count as a stitch. Place a marker in the first and last stitch, and work the first hdc into the first stitch of the row. |
| My gauge is wrong. | Wash and dry your swatch before measuring. If you have too many stitches per 4 in, use a larger hook; if you have too few, use a smaller hook. Make a new swatch after changing hooks. |
| The cardigan is too small or too large. | Check both your stitch gauge and your panel measurements. If the gauge is correct but the size is not what you want, use the width adjustment formula to change the panel stitch counts. Do not rely on the example foundation chains alone. |
| The sleeve will not fit the arm or armhole. | Measure the sleeve tube around and compare it with your upper arm and the armhole opening. Adjust the sleeve foundation count or the armhole depth before joining. |
| The cuff is too tight. | Remove one or more decrease rounds. The cuff should fit over your hand and sit comfortably at your wrist. |
| The edging ripples or pulls. | Rip back the edging and adjust how many sc you work along the edge. Too many stitches can cause rippling; too few can pull the fabric inward. |
| I am running short of yarn. | Check your yarn yardage and gauge before starting. Extra length, larger sleeves, denser stitches, and many daisies all use more yarn. If needed, make fewer appliqués or use a coordinating yarn for edging. |
Pattern Summary
- Size range: Nine options, XS to 5X, with finished bust measurements of 36 to 68 in (91.5 to 173 cm). Choose by finished measurement and desired ease.
- Yarn amount: Approximately 1,050 to 2,250 yd (960 to 2,060 m), depending on size and modifications.
- Hook size: 5 mm, or size needed to meet gauge.
- Main stitch: Half double crochet.
- Construction method: Separate back, front, and sleeve panels, seamed into a drop shoulder cardigan; optional daisy appliqués.
Conclusion
The Sunshine Daisy Cardigan combines straightforward hdc panels, seamed drop shoulder construction, and optional daisy appliqués in nine size options from XS to 5X. Check your washed gauge, compare the pieces with a cardigan that fits, and use the provided formulas to customize width, length, sleeve fit, or neckline shaping. Gather your yarn and hook, choose your size, and follow the steps to make your own Crochet Flower Cardigan.
Watch the Step by Step Crochet Tutorial
Watch the Step by Step Crochet Tutorial
Follow the video tutorial to see the construction, crochet techniques, and assembly process explained visually.
Use the play button to watch the tutorial without leaving this page.
Frequently Asked Questions
What skill level is the Sunshine Daisy Cardigan?
It is a beginner pattern. You should know how to chain, turn, and work sc, hdc, dc, and sl st. The optional daisies use a puff stitch.
How do I choose the right cardigan size?
Compare your actual bust with the finished garment measurements. For a relaxed fit, choose a finished bust measurement about 6 to 10 in (15 to 25.5 cm) larger than your actual bust. The chart measurements are garment measurements and do not include buttons or front overlap.
What gauge is needed for this crochet cardigan pattern?
The gauge is 12 hdc = 4 in (10 cm) and 9 rows hdc = 4 in (10 cm). Wash and dry a swatch at least 6 in (15 cm) square before measuring its central 4 in (10 cm).
Can I change the body or sleeve measurements?
Yes. Use your blocked gauge. At 12 hdc per 4 in, add 3 stitches for each 1 in (2.5 cm) of panel width. For length, use about 2¼ rows for each 1 in (2.5 cm). Sleeve circumference and length can also be adjusted using the supplied formulas.
Are the daisy appliqués required?
No. The white and yellow daisy appliqués are optional. Make as many flowers as desired, sew them securely to the cardigan, and keep them away from areas where they may catch or rub.
Free Pattern Delivery
Get Your FREE Crochet Pattern PDF
Love this pattern? Enter your name and email below to get your free printable crochet pattern PDF delivered straight to your inbox!