Every stitch tells a story · Free PDF Pattern with Weekly Newsletter Claim Free Guide →

Every stitch tells a story · Free PDF Pattern with Weekly Newsletter Claim Free Guide →
Tapestry Crochet Sweater: 5 Amazing Tips | Complete Guide
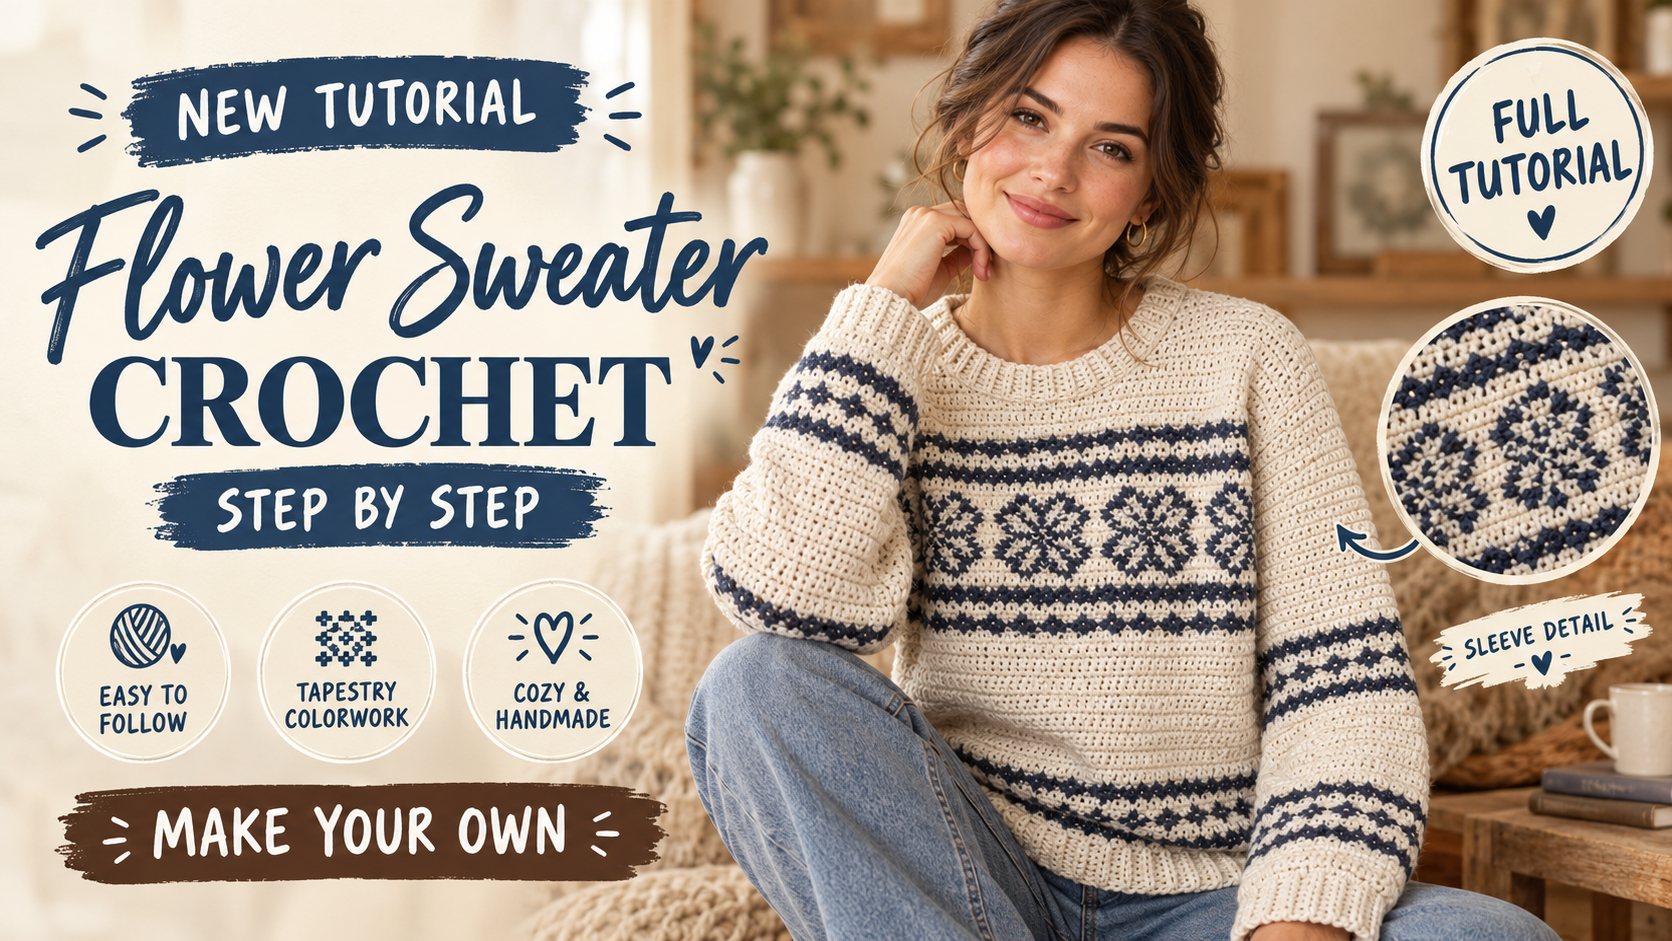
tapestry crochet sweater makers can use this made to measure flower panel design to create a relaxed pullover with geometric and floral colorwork. It is beginner friendly if you are comfortable with single crochet, changing colors, counting stitches, and basic seaming, though carrying yarn neatly takes care. The sweater is built from two flat panels, joined at the shoulders and sides, with sleeves worked in joined rounds from the arm openings. This construction makes it possible to set the width and length to your preferred measurements before finishing.
Table of Contents
Tapestry Flower Panel Sweater Pattern Introduction
Key Takeaways
- Make two single crochet panels, seam the shoulders and sides, then work sleeves in joined rounds.
- The pattern is beginner friendly for crocheters comfortable with single crochet, color changes, stitch counting, and basic seaming.
- Made to measure sizing lets you choose the finished bust, body length, sleeve length, and ease.
Pattern Overview
- Description: A pullover sweater made from two single crochet panels with geometric and flower colorwork. Sleeves are worked in rounds after the panels are joined.
- Style: Relaxed, straight bodied sweater with a crew style ribbed neckline, hem, and cuffs.
- Construction method: Work a front and back panel flat, join them at the shoulders and sides, then work the sleeves from the arm openings in joined rounds.
- Skill level: Beginner friendly, provided you are comfortable with single crochet, changing colors, counting stitches, and basic seaming. Tapestry crochet requires careful yarn management.
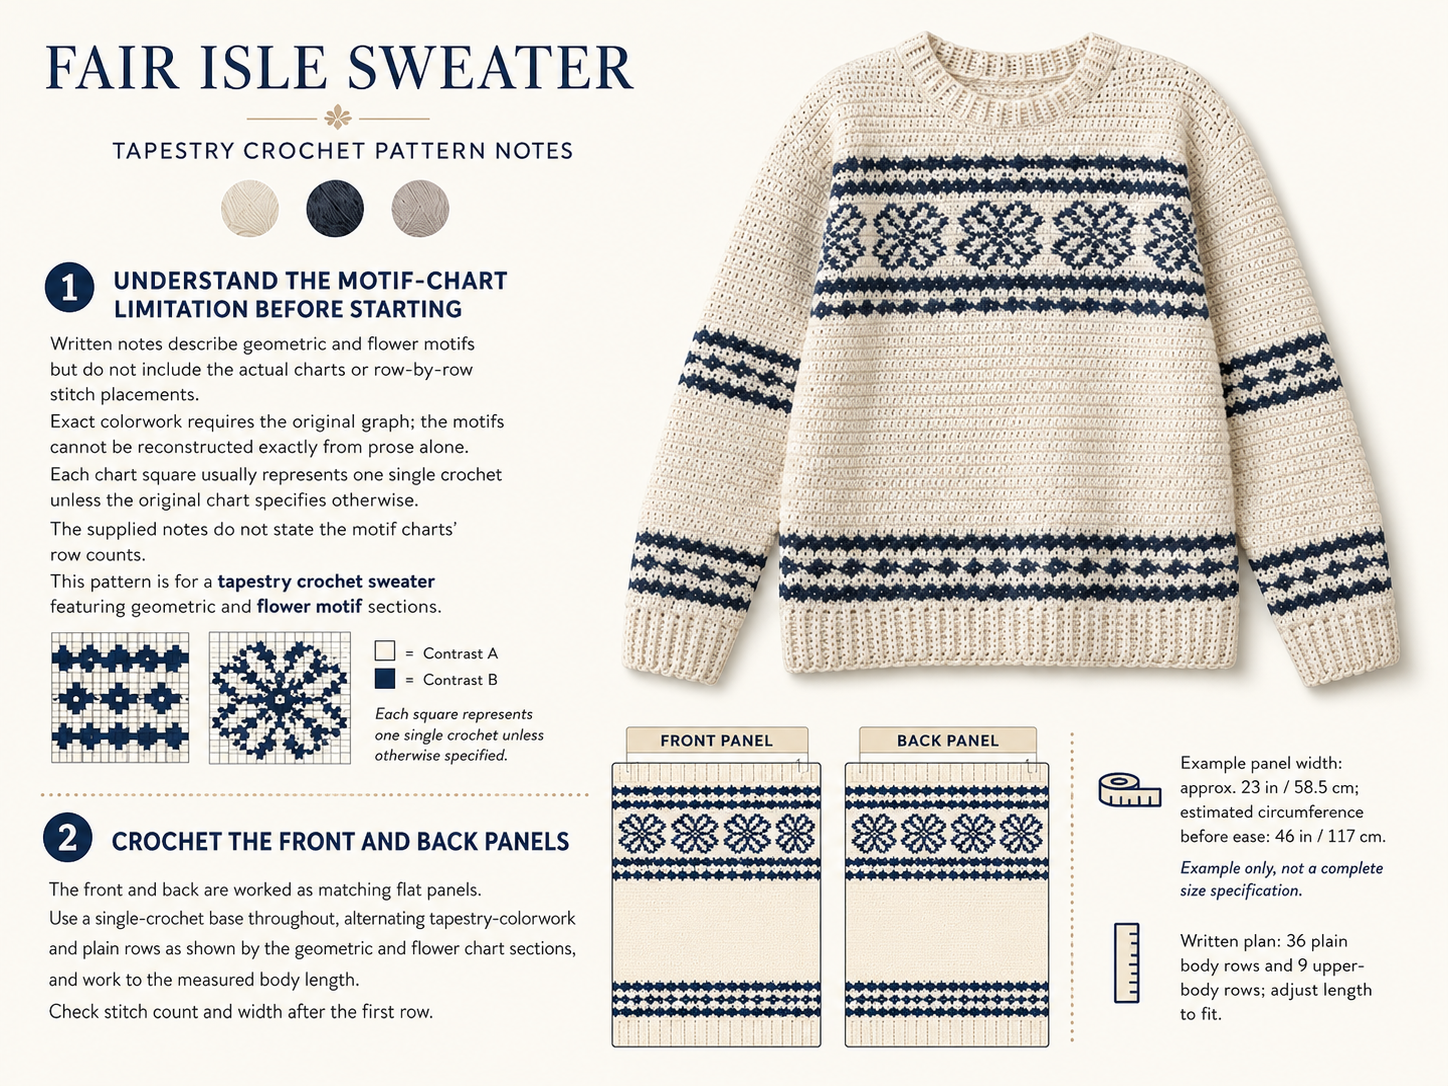
- Finished measurements: This is a made to measure pattern. Choose the finished bust circumference and length before beginning. The tutorial’s example panel was about 23 in / 58.5 cm wide, suggesting a sweater circumference of about 46 in / 117 cm before any ease is considered. That is an example, not a complete size specification.
Important pattern note: The notes refer to an on screen graph for the geometric and flower motifs, but do not include the graph or its row by row stitch counts. Those colorwork sections cannot be reproduced exactly from the notes alone. Follow the original graph for those sections; the rest of the instructions below provide a sizing and construction framework. For more sweater construction ideas, browse crochet sweater tutorials and crochet sweater patterns.
Materials
- Yarn: Medium weight, category 4 acrylic yarn.
- Antique White: approximately 1,194 g, about 6 skeins as described in the tutorial.
- Dark Country Blue: approximately 99 g, about half a skein as described in the tutorial.
- Hook: 5 mm crochet hook, or the size needed to match your blocked single crochet gauge.
- Notions: Stitch markers, yarn needle, scissors, and tape measure.
- Optional tools: Blocking mat and pins, row counter, and printed or digital motif graph.
The listed yarn amount is for the tutorial’s example. Yarn needs for other sizes cannot be calculated reliably from the supplied information because the example’s complete finished length, gauge, and motif dimensions are not specified. Find other useful crochet tools and maker essentials before beginning.
Gauge and Terms
This pattern uses US crochet terms. A single crochet (sc) is made by inserting the hook into the stitch, yarning over and pulling up a loop, then yarning over and pulling through both loops. At the end of a flat row, ch 1 and turn. The turning chain does not count as a stitch.
Abbreviations
- ch = chain
- sc = single crochet
- sl st = slip stitch
- st(s) = stitch(es)
- RS = right side, the public facing side of the fabric
- WS = wrong side, the inside of the fabric
- rep = repeat
- dec = decrease; for this pattern, work a single crochet decrease over the indicated stitches
Gauge information and checking
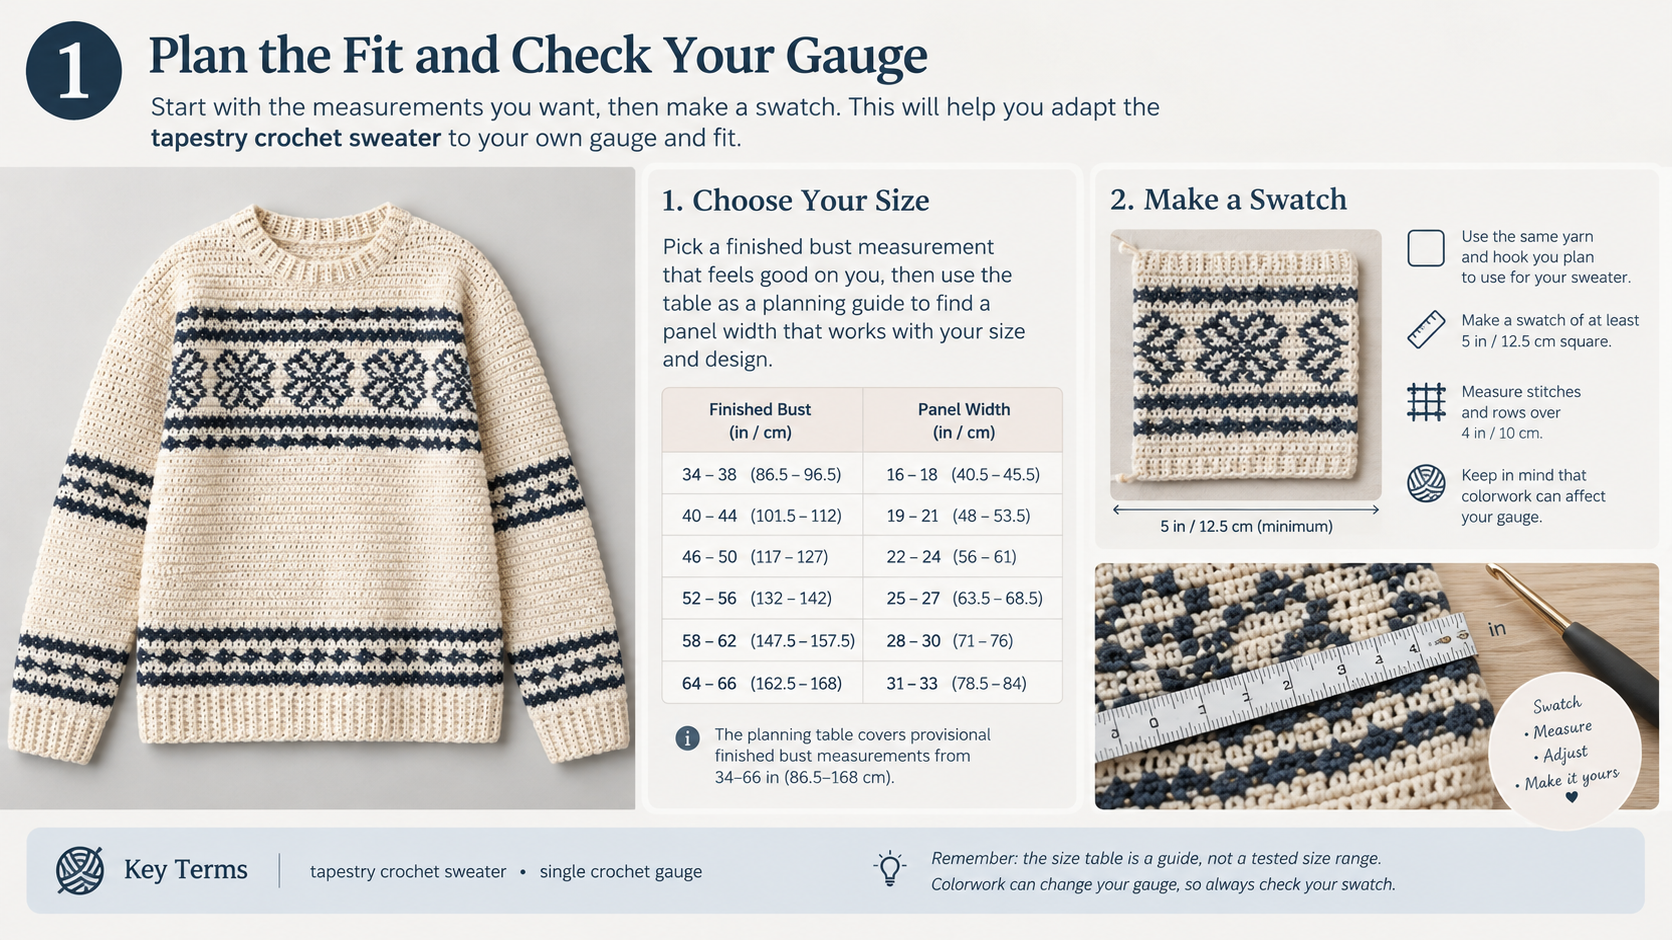
Stitch gauge and row gauge are not provided. The tutorial suggests chaining 10 and working 3–4 rows of single crochet to check the swatch width. This is a useful tension check, but it is too small to establish a dependable garment gauge. Measure the number of rows in a measured section of your swatch; you will need this to estimate panel and sleeve lengths.
Make a larger swatch, ideally at least 5 in / 12.5 cm square, in single crochet using the same yarn, hook, and tension planned for the sweater. Wash or steam it as you intend to finish the sweater, let it dry, then measure the center. Record stitches and rows per 4 in / 10 cm. Make a separate colorwork swatch if possible, since carried yarn can make the fabric thicker and alter gauge.
The example’s 95 chain starting point and 23 in panel width give a rough chain to width reference of 95 ÷ 23 ≈ 4.13 chains per inch. This is not a verified single crochet stitch gauge: chains and worked stitches do not necessarily have the same width. Use your swatch to determine the actual stitch count for your chosen width.
Color changes, chart, and fit notes
- Work the final pull through of the stitch before a color change with the new color. Carry the unused yarn inside the stitches, keeping it loose enough that the fabric does not pucker. Avoid carrying long, loose strands across the WS.
- Use the tutorial’s original graph for the exact geometric and flower patterns. Each chart square should correspond to one sc unless the chart says otherwise. Confirm the chart’s stitch count fits your panel before starting.
- Measure a sweater you like across the front, from side seam to side seam, and use that as a starting point. For a pullover, the finished circumference is approximately twice the width of one panel. Decide how much ease you want, the difference between your body measurement and the garment measurement, before choosing your panel width.
- A common foundation method is to make one more chain than the number of sc required: for example, ch 96 and sc in the second ch from the hook gives 95 sc. The tutorial’s “chain 95” may use a different counting convention. Check your stitch count and panel width after Row 1 rather than relying on the chain count alone.
- The notes do not provide the number of rows in either motif chart or a complete body length. Measure against the wearer as you work and use the chart for motif row counts.
- The notes do not specify the collar opening stitch count or decrease placement. Choose these to match the wearer’s measurements.
Size Chart
This table is a planning guide, not a tested size range. Finished bust is calculated as twice the selected panel width, assuming two equal panels joined at the sides. Stitch counts are provisional estimates using the example’s rough 4.13 stitches per inch; replace them with counts from your own measured gauge. Length, sleeve length, and yarn requirements were not supplied, so they must be measured or tested for your project.
| Size | Bust/Width | Length | Sleeve Length | Yarn Required |
|---|---|---|---|---|
| XS | 34 in / 86.5 cm bust; 17 in / 43 cm per panel (about 70 sc at provisional gauge) | Measure wearer | Measure wearer | Not established; estimate from a sample |
| S | 38 in / 96.5 cm bust; 19 in / 48 cm per panel (about 79 sc) | Measure wearer | Measure wearer | Not established; estimate from a sample |
| M | 42 in / 106.5 cm bust; 21 in / 53.5 cm per panel (about 87 sc) | Measure wearer | Measure wearer | Not established; estimate from a sample |
| L | 46 in / 117 cm bust; 23 in / 58.5 cm per panel (about 95 sc) | Measure wearer | Measure wearer | Tutorial example amount; confirm with a swatch and finished sample |
| XL | 50 in / 127 cm bust; 25 in / 63.5 cm per panel (about 103 sc) | Measure wearer | Measure wearer | Not established; estimate from a sample |
| 2XL | 54 in / 137 cm bust; 27 in / 68.5 cm per panel (about 112 sc) | Measure wearer | Measure wearer | Not established; estimate from a sample |
| 3XL | 58 in / 147.5 cm bust; 29 in / 73.5 cm per panel (about 120 sc) | Measure wearer | Measure wearer | Not established; estimate from a sample |
| 4XL | 62 in / 157.5 cm bust; 31 in / 79 cm per panel (about 128 sc) | Measure wearer | Measure wearer | Not established; estimate from a sample |
| 5XL | 66 in / 168 cm bust; 33 in / 84 cm per panel (about 136 sc) | Measure wearer | Measure wearer | Not established; estimate from a sample |
To use the chart, measure your actual single crochet gauge and calculate: Panel stitches = desired panel width × stitches per inch. Round to a whole stitch, then check that the chosen count works with the motif graph. Adjust the panel width if needed to preserve the chart’s symmetry. For more help adapting sweater measurements, see this crochet sweater pattern sizing guide.
Complete Crochet Pattern
Make two matching panels. The front and back are worked alike, including the colorwork, unless you prefer a plain back. The chart images and row by row motif stitch counts are not included in the supplied notes, so follow the original tutorial graph for exact motif placement.
Body Panels
- Foundation: Measure a preferred sweater across the front, or choose a target finished bust from the chart. Calculate the number of sc needed for half that circumference using your measured gauge. Make the required foundation chain for that stitch count. Work Row 1 and measure the panel width; adjust before continuing if it is not the desired width.
- Row 1: With Antique White, sc across. Ch 1 and turn. The tutorial’s example begins with a chain of 95, but the number of sc produced depends on how the foundation is worked.
- Row 2, first tapestry row: Following the tutorial’s color placement, work sc while changing between Antique White and Dark Country Blue at every stitch. Carry the unused strand inside the stitches. Ch 1 and turn.
- Row 3, solid blue row: With Dark Country Blue, sc across, carrying Antique White inside the stitches. Ch 1 and turn.
- Row 4, reversed color row: Work the color changing sc row opposite to Row 2, following the original tutorial’s color sequence. Ch 1 and turn.
- Row 5, solid white row: With Antique White, sc across, carrying Dark Country Blue inside the stitches. Ch 1 and turn.
- Geometric motif: Begin the first motif with three Antique White stitches between blue stitches, then offset the blue stitches on following colorwork rows to form the T and diamond shapes shown in the original graph. Alternate colorwork rows with plain rows as indicated by that graph. Continue carrying the unused color inside the stitches. Work the full chart; the supplied notes do not specify its row count.
- Plain body section: With Antique White, work 36 rows of sc, or continue until the panel reaches the desired position for the flower band. Ch 1 and turn at the end of each row.
- Flower band: Work the flower chart from the original tutorial. The notes describe starting with three Antique White stitches and one Dark Country Blue stitch, then placing blue stitches to form flower centers and petals against the white background. Follow the chart for all stitch placements and row counts.
- Upper body: With Antique White, work 9 rows of sc, or continue until the panel reaches the desired total length before shoulder shaping. Ch 1 and turn after each row.
Neckline and shoulder shaping
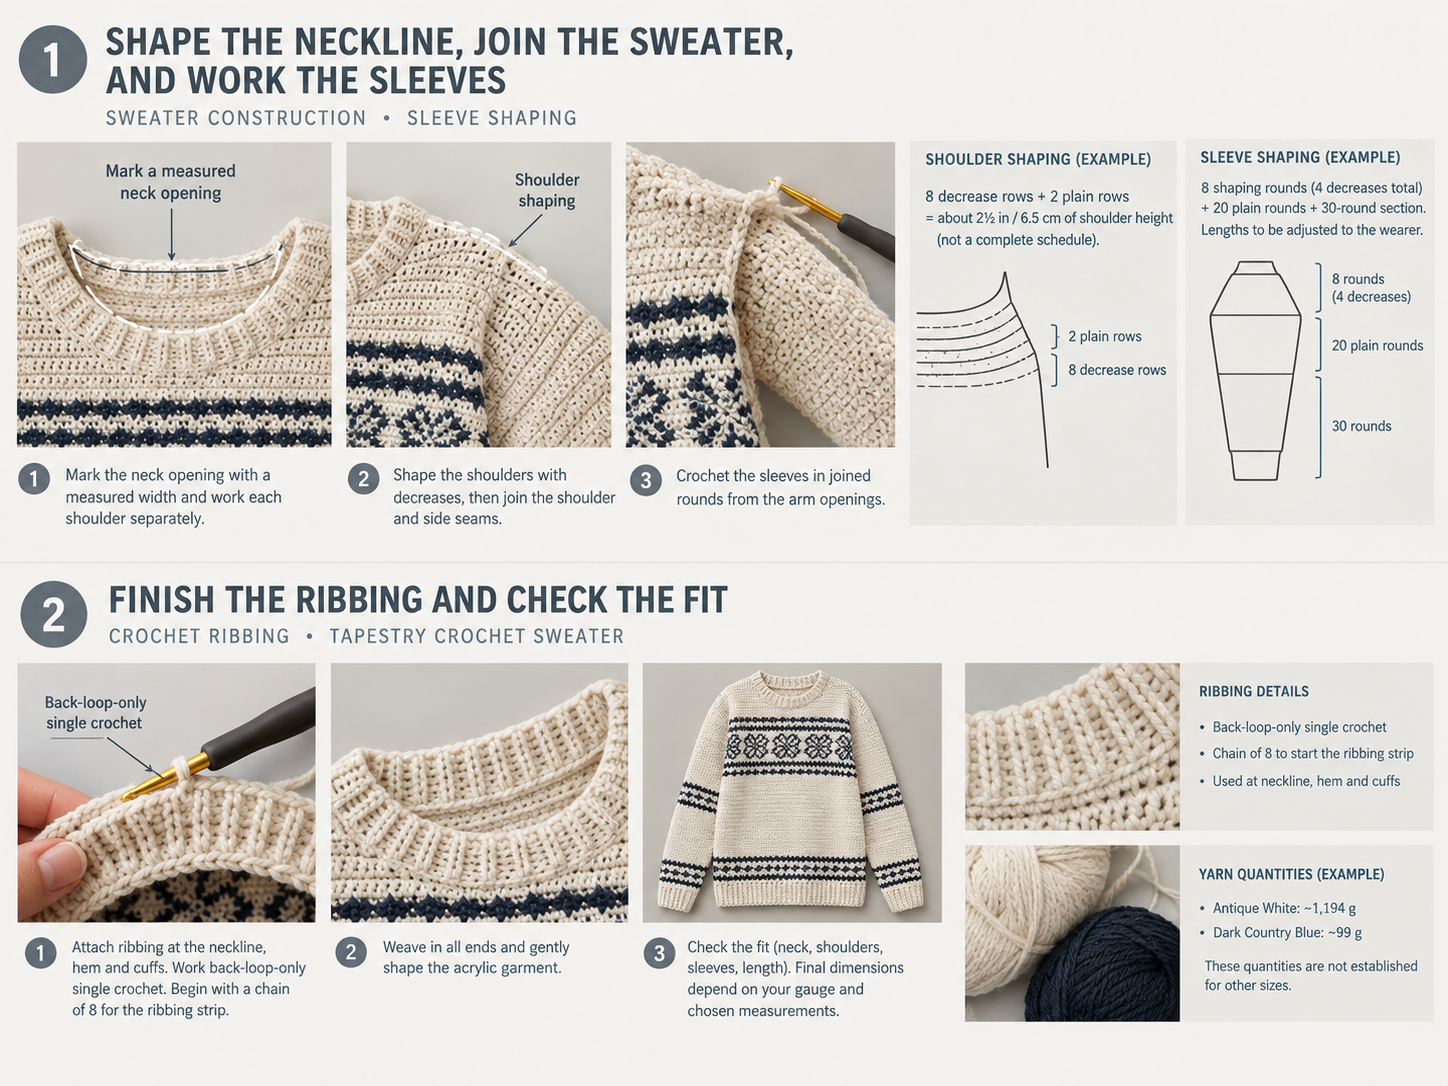
- Lay the panel flat with the RS facing you. Mark the center of the top edge for the neck opening. Choose an opening wide enough to fit comfortably over the wearer’s head and sit at the desired neckline.
- Divide the remaining stitches as evenly as possible into left and right shoulder sections. Mark the boundary of the neck opening.
- Work each shoulder separately. At the neck edge, decrease one stitch when needed to shape the neckline; keep the outside shoulder edge straight unless your fit requires a different shape.
- The tutorial’s example uses 8 decrease rows and 2 plain rows and aims for about 2½ in / 6.5 cm of shoulder height. These are example instructions, not a complete decrease schedule: the number of stitches to decrease depends on the panel width and chosen neck opening.
- Check the panel against the wearer. The shoulder seam should sit near the top middle of the shoulder. Work the second shoulder to match the first.
Back panel
Make a second panel to match the front. For a simpler back, omit the motifs and work in Antique White, but keep its width, length, shoulder height, and neckline opening consistent with the front.
Sleeve Panels
The tutorial’s sleeve lengths are given as row counts and approximate measurements. Match the sleeve to the wearer rather than relying on row counts alone.
- With RS facing, mark the arm opening on each side of the joined body. Make both openings the same depth and position.
- Join Antique White at the underarm. Work sc evenly around the opening, distributing stitches so the edge lies flat and is not tight or ruffled. Join with a sl st; ch 1. This is the first joined round. Place a marker at the beginning of the round.
- Shaping rounds: The example uses 8 rounds with 4 decreases total. Space the decreases evenly around the sleeve and work them at the same positions on the corresponding rounds. The notes do not specify which rounds contain decreases; distribute the four decreases evenly across the first eight rounds. Check that the sleeve remains comfortable around the upper arm.
- Plain sleeve section: Work 20 rounds of sc, or until the sleeve reaches the desired position just above the elbow.
- First sleeve motif: Work the matching design from the tutorial’s chart. The notes do not include the chart or its row count.
- Long sleeve section: Work 30 rounds of sc, or until the sleeve is about 1–2 in / 2.5–5 cm above the wrist.
- Second sleeve motif: Work the matching chart again, if it fits the remaining sleeve length. Adjust the plain sections as needed so the cuff lands at the desired wrist position.
- Work the cuff ribbing as described below. Repeat for the second sleeve, matching its length and stitch count.
If the sleeve opening is too loose or tight, adjust the number of stitches picked up around the arm opening before working the sleeve rounds. Explore more general step by step sweater construction guidance as you plan your project.
Assembly
- Shoulder seams: Place the front and back panels with RS facing each other. Slip stitch the shoulder edges together, keeping the joins loose enough for the seam to stretch comfortably. Leave the marked neck opening unjoined.
- Try on and mark: Turn the joined panels RS out and try them on. Mark the bottom of each arm opening; make sure the openings match.
- Side seams: With the panels aligned, slip stitch each side from the bottom hem up to the arm opening marker. Keep the seam relaxed and secure.
- Neckline finishing: Join Antique White at the neckline. Make a ribbing strip by chaining 8. Work sc in the back loop only across the ribbing strip, attaching it to the neckline edge as you go. The tutorial notes do not state a specific attachment repeat, so distribute the ribbing evenly without pulling the neckline out of shape. Join the strip ends with a sl st.
- Hem finishing: Work the hem ribbing in the same manner, attaching it evenly around the lower edge. Join the ends.
- Cuff finishing: Work matching ribbing around each sleeve opening, using the same chain 8, back loop only construction. Join the ends.
Custom Adjustments
To increase width:
- Measure the desired finished bust circumference, including the ease you want.
- Divide by 2 to find the width of one panel.
- Multiply panel width by your measured sc gauge.
Panel stitches = panel width × stitches per inch
Add or subtract the difference between that result and your current stitch count. Recheck that the motif chart can be centered and completed at the new count.
To increase length: Measure your row gauge in rows per inch, then calculate: Rows to add = extra length in inches × rows per inch. Add rows in a plain section before the upper body and shoulders, or adjust the plain sections between sleeve motifs. Check length against the wearer as you work.
To adjust sleeves:
- For a wider sleeve, add stitches evenly around the arm opening or reduce the number of decreases.
- For a narrower sleeve, pick up fewer stitches or add evenly spaced decreases.
- For a longer or shorter sleeve, use extra length × rows per inch to estimate the rows to add or remove.
- Keep the two sleeves the same length and make shaping changes at matching points.
Customizing the Fit
Use the supplied formulas and measured gauge to make width and length adjustments. For width, measure the desired finished bust circumference including ease, divide by 2 to find the width of one panel, then multiply panel width by your measured sc gauge. The calculation is Panel stitches = panel width × stitches per inch. Add or subtract the difference from the current stitch count and check that the motif graph remains centered and complete.
For length, measure your row gauge in rows per inch and calculate Rows to add = extra length in inches × rows per inch. Add rows in a plain section before the upper body and shoulders or adjust plain sections between sleeve motifs. For sleeve width, add stitches evenly around the arm opening or reduce decreases for a wider sleeve; pick up fewer stitches or add evenly spaced decreases for a narrower sleeve. For sleeve length, use extra length multiplied by rows per inch to estimate rows to add or remove. Keep both sleeves consistent.
For neckline adjustment, the notes do not provide a fixed opening stitch count or decrease schedule. Mark a center opening wide enough to fit comfortably over the wearer’s head, divide the remaining stitches as evenly as possible into shoulder sections, and shape each shoulder at the neck edge by decreasing one stitch when needed. Check the shoulder and neckline fit before joining the second shoulder. More fit planning tips are available in this crochet sweater pattern fit guide.
Finishing
- Weave in all ends securely, especially at color changes, shoulder seams, and sleeve joins.
- Check that the neckline, hem, and cuffs are comfortable and that the seams are secure.
- Acrylic yarn does not need aggressive blocking. If desired, lightly steam the sweater from a safe distance, following the yarn label’s care instructions. Do not press the iron directly onto the fabric; heat can flatten or damage acrylic.
- Lay the sweater flat to dry and shape it to your intended measurements.
- Re measure the finished bust, body length, sleeve length, and neckline. The final measurements depend on your gauge and chosen dimensions; they cannot be determined from the supplied tutorial notes alone.
For gauge, make and finish the swatch as you intend to finish the sweater, then let it dry before measuring. This pattern does not provide separate washing instructions for the finished garment; follow the yarn label’s care instructions.
Troubleshooting
| Problem | Solution |
|---|---|
| The panel is wider or narrower than planned. | Check the actual sc gauge in a larger swatch. Recalculate the panel stitch count using your measured stitches per inch. A 10 chain sample is too small to confirm garment gauge. |
| The edges are uneven. | Count stitches at the end of every row. Work the first sc into the first stitch, not into the turning chain, and do not count the ch 1 as a stitch. |
| Carried yarn pulls the colorwork tight. | Keep the carried strand loose inside the stitches. Pause every few stitches to spread the fabric along the hook and check that it is not puckering. |
| The motif does not fit or center on the panel. | Check the chart’s stitch count against the panel count before starting. Adjust the plain background stitches evenly at both sides, or change the panel width while preserving the motif’s repeat and symmetry. |
| The neckline or shoulders do not fit. | Check the marked neck opening and shoulder widths before joining the second shoulder. The source notes do not give a fixed neckline stitch count, so test the opening on the wearer or against a well fitting sweater. |
| The sleeves are too loose, tight, or uneven. | Check the number of stitches picked up around each arm opening and compare sleeve circumference at matching points. Adjust pickup counts or decrease placement, then keep both sleeves consistent. |
| You are running short of yarn. | Weigh the yarn before starting and keep the tutorial’s quantities as a reference for its example only. Larger panels, longer sleeves, and dense carried colorwork can use more yarn. For a different size, make and weigh a representative swatch or sample section before estimating the total. |
Pattern Summary
- Final size range: Custom made to measure; the chart provides provisional planning measurements from 34–66 in / 86.5–168 cm finished bust. These are not tested graded sizes.
- Yarn amount: Tutorial example uses approximately 1,194 g Antique White and 99 g Dark Country Blue. Requirements for other sizes are not established.
- Hook size: 5 mm, adjusted as needed to meet your measured gauge.
- Main stitch: Single crochet.
- Construction method: Two flat panels joined at the shoulders and sides; sleeves worked in joined rounds; ribbing added at the neckline, hem, and cuffs.
Conclusion
This made to measure pullover combines single crochet panels, geometric and flower colorwork, joined round sleeves, and ribbed finishing. Use your blocked gauge and measurements to adapt the panel width, body length, sleeve length, and neckline, while checking the original graph for exact motif placement. The tapestry crochet sweater pattern is a practical project for crocheters ready to work with color changes and simple seaming. Choose your measurements, prepare a gauge swatch, and follow the steps to start your sweater.
Watch the Step by Step Crochet Tutorial
Watch the complete crochet tutorial below and follow along with the written pattern.
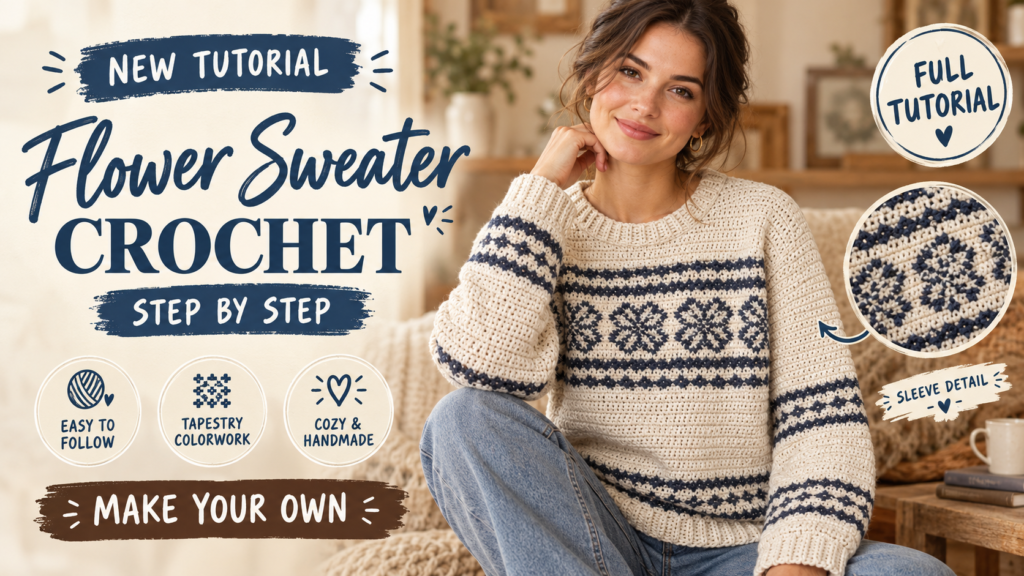
Use the play button to watch the tutorial without leaving this page.
Frequently Asked Questions
Is this tapestry crochet sweater pattern beginner friendly?
It is beginner friendly if you are comfortable with single crochet, changing colors, counting stitches, and basic seaming. Tapestry crochet requires careful yarn management.
Are the flower and geometric motif charts included here?
No. The supplied notes refer to an on screen graph but do not include the graph or its row by row stitch counts. Follow the original graph for exact motif placement and row counts.
What size does the sweater make?
This is a made to measure pattern. The planning chart lists provisional finished bust measurements from 34–66 in / 86.5–168 cm, not tested graded sizes. Choose panel width, length, and ease using your measurements and gauge.
What yarn and hook are used for the tutorial example?
The example uses medium weight category 4 acrylic yarn, approximately 1,194 g Antique White and 99 g Dark Country Blue, with a 5 mm crochet hook or a hook size needed to match your blocked single crochet gauge.
How do I adjust the sweater width?
Measure the desired finished bust circumference including ease, divide by 2 for one panel width, and multiply the panel width by your measured sc gauge. The calculation is Panel stitches = panel width × stitches per inch. Check that the motif chart remains centered and fits the resulting stitch count.
Free Pattern Delivery
Get Your FREE Crochet Pattern PDF
Love this pattern? Enter your name and email below to get your free printable crochet pattern PDF delivered straight to your inbox!