Every stitch tells a story · Free PDF Pattern with Weekly Newsletter Claim Free Guide →

Every stitch tells a story · Free PDF Pattern with Weekly Newsletter Claim Free Guide →
Off-the-shoulder crochet sweater: 5 Amazing Fit Tips Guide
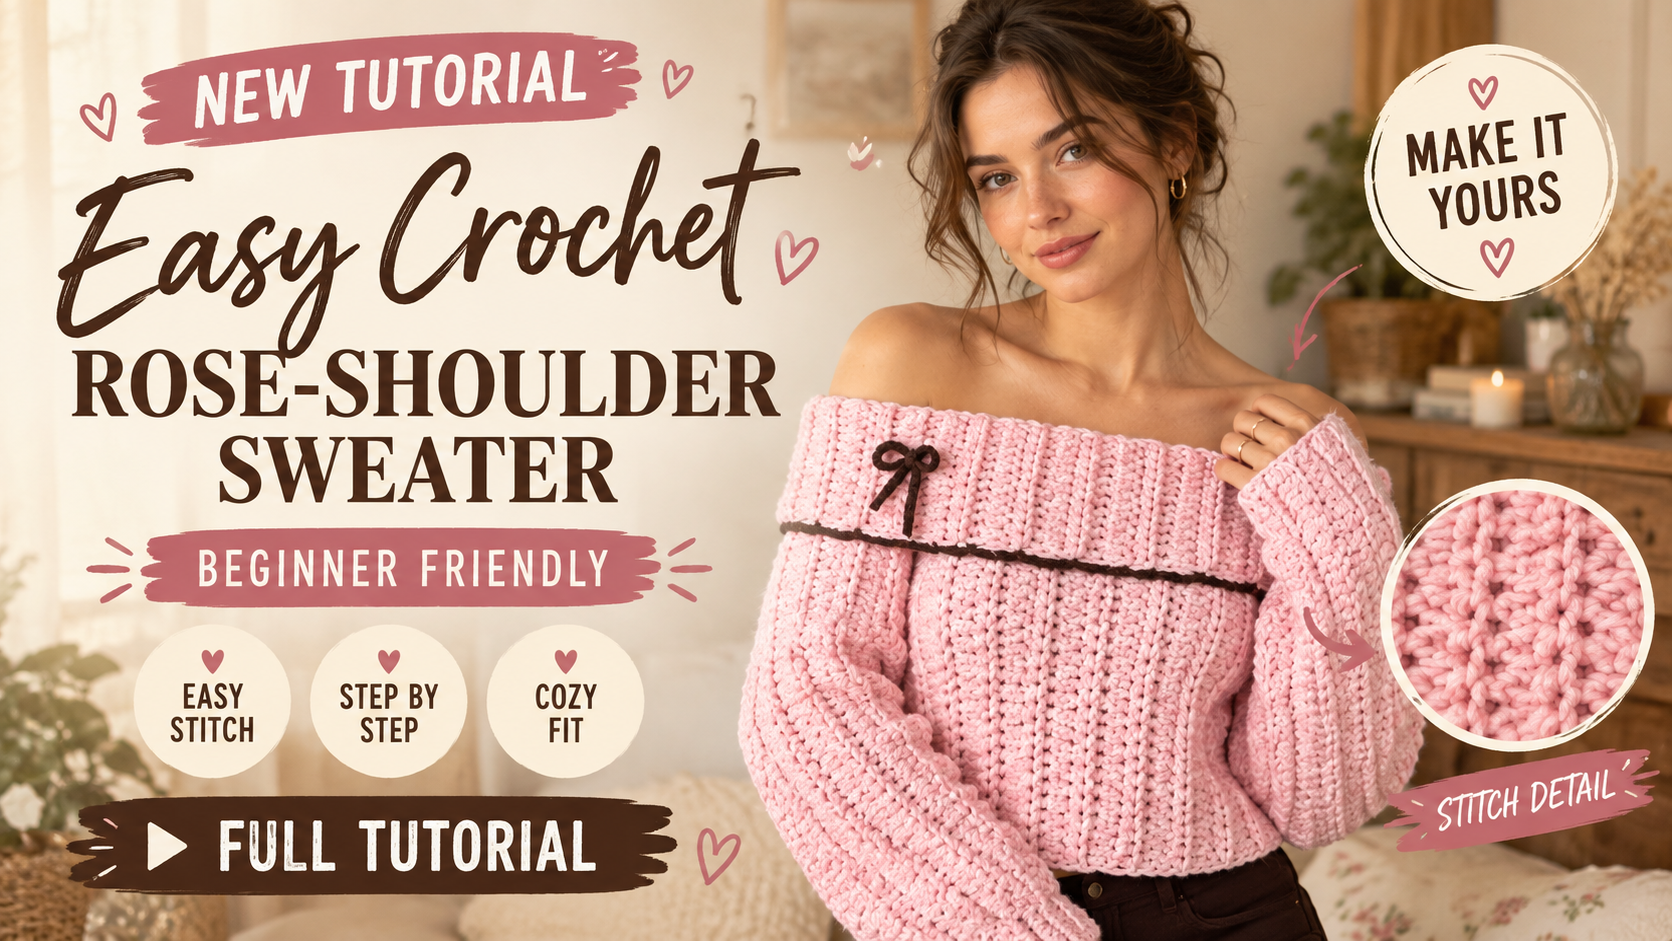
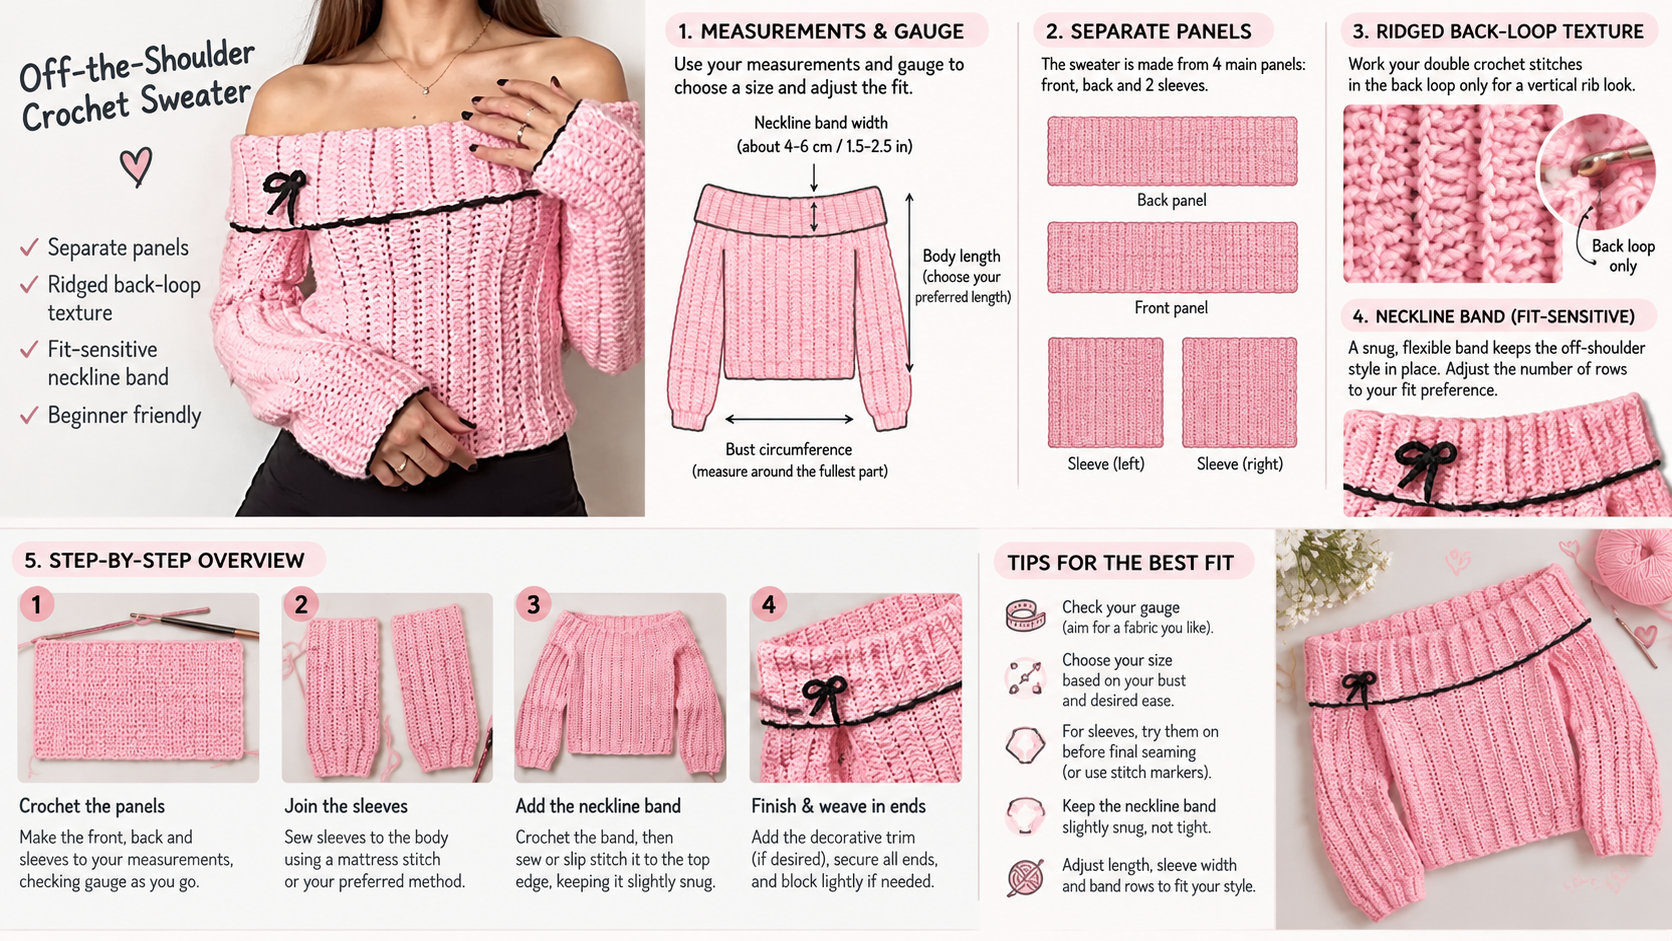
Off-the-shoulder crochet sweater makers can create this relaxed Rose-Shoulder Textured Sweater from simple flat panels, a ridged double crochet texture, and a separate wide neckline band. This beginner crochet pattern is for crocheters who know how to chain, double crochet, seam pieces, and weave in ends. Its panel construction keeps the body and sleeves straightforward to make, while the separate band lets you test the neckline fit before sewing it permanently.
Table of Contents
Introduction
The sweater is designed with approximately 4–6 in (10–15 cm) of positive ease. Choose a size by comparing your body measurements with the finished garment measurements and a sweater you like. The pattern includes sizes XS–5X, sleeve measurement formulas, and guidance for adjusting body width and length.
Key Takeaways
- The sweater is constructed from two seamed body panels, two separate sleeve panels, and a sewn on fold over neckline band.
- This is a beginner level pattern using chains, double crochet, seaming, and weaving in ends.
- Adjust the width, length, sleeves, and neckline using the measurements and formulas provided in the pattern.
Pattern Overview
- Description: A relaxed, drop shoulder pullover with a ridged double crochet texture, a wide fold over neckline band, and optional contrasting edging.
- Style: Off the shoulder. Choose a band fit that feels secure but comfortable.
- Construction method: Work two flat body panels and seam them at the shoulders and sides, leaving armhole openings. Work two sleeve panels flat, seam them into tubes, and attach them to the openings. Make the neckline band separately and sew it on.
- Skill level: Beginner. You should know how to chain, double crochet, seam pieces, and weave in ends.
- Finished measurements: The size chart gives approximate garment bust circumference, body length, and sleeve length. The sweater is designed with approximately 4–6 in (10–15 cm) of positive ease. Measure your body and compare it with a sweater you like before choosing a size.
Pattern status: The notes supplied do not include yarn weight, hook size, gauge, or wearer measurements. The sizes and quantities below are a practical starting specification based on the gauge listed here, not measurements verified by a physical sample. Make and block a gauge swatch before beginning, and adjust the pattern to match your gauge.
For more sweater construction ideas, browse crochet sweater tutorials and crochet sweater patterns. You may also find the step by step crochet sweater guide useful before beginning.
Materials
- Yarn: Medium weight or worsted yarn, Category 4, preferably a soft yarn with some drape. Use one main color; a contrasting color is optional.
- Approximate total yarn amounts, including a small buffer:
- XS–S: 1,200–1,500 yd (1,100–1,370 m)
- M–L: 1,500–1,900 yd (1,370–1,740 m)
- XL–2X: 1,900–2,400 yd (1,740–2,195 m)
- 3X–5X: 2,400–3,000 yd (2,195–2,745 m)
- These estimates assume worsted yarn and the stated gauge. Skein counts depend on the yardage per skein; four skeins may or may not be sufficient.
- Hook: US H/8 (5 mm), or the hook needed to obtain gauge.
- Notions: Yarn needle, locking stitch markers, measuring tape, and scissors.
- Optional tools and supplies: Row counter, blocking mats and pins, and contrasting yarn for edging or a small bow.
Explore additional crochet tools and maker essentials if you need hooks or blocking supplies. The yarn estimates are given in yardage and meters because skein sizes vary.
Gauge and Terms
Instructions use US crochet terminology. Check gauge in the textured stitch pattern after washing and drying the swatch as you plan to care for the sweater.
- Stitch gauge: 12 dc = 4 in (10 cm).
- Row gauge: 7 rows = 4 in (10 cm).
To make a swatch, chain 20. Work 18 dc across, then work at least 10 rows in the textured pattern. Measure across the center, avoiding the edges. If you have more stitches per 4 in, use a larger hook. If you have fewer stitches per 4 in, use a smaller hook. Row gauge affects length; add or remove rows if necessary.
- ch = chain
- dc = double crochet
- rep = repeat
- RS = right side, the public facing side
- sl st = slip stitch
- st(s) = stitch(es)
- WS = wrong side, the inside facing side
Textured dc: Work a dc into the back loop only of the stitch in the row below. This makes a raised ridge. This is a beginner friendly interpretation of the supplied “middle of the stitch” texture note. Do not insert the hook into the middle of the stitch post.
Before starting, note that the turning chain does not count as a stitch. Work the first body row in regular dc. Work subsequent rows in textured dc unless an instruction says otherwise. The body is made in two panels, each approximately half the finished bust circumference. The supplied notes do not give a reliable method for adding extra stitches at the chest midpoint, so this pattern uses even width panels instead. Choose a size with enough ease rather than adding unplanned increases.
Fit the sweater before finishing the seams because yarn can stretch, especially after washing. The neckline band fit depends on the wearer’s shoulder and upper chest measurements, so test it on the body before sewing it permanently. Place a marker at the center of each panel and at the corresponding center points on the garment to help keep the neckline and sleeves balanced.
Size Chart
Bust or width is the approximate finished garment circumference, not the wearer’s body measurement. The figures are based on two panels, each 18–34 in (46–86 cm) wide, worked at 12 dc per 4 in.
| Size | Bust/Width | Length | Sleeve Length | Yarn Required |
|---|---|---|---|---|
| XS | 36 in (91 cm) | 20 in (51 cm) | 17 in (43 cm) | 1,200 yd (1,100 m) |
| S | 40 in (102 cm) | 21 in (53 cm) | 17 in (43 cm) | 1,350 yd (1,235 m) |
| M | 44 in (112 cm) | 22 in (56 cm) | 18 in (46 cm) | 1,550 yd (1,420 m) |
| L | 48 in (122 cm) | 23 in (58 cm) | 18 in (46 cm) | 1,750 yd (1,600 m) |
| XL | 52 in (132 cm) | 24 in (61 cm) | 18 in (46 cm) | 1,950 yd (1,785 m) |
| 2X | 56 in (142 cm) | 24 in (61 cm) | 19 in (48 cm) | 2,150 yd (1,965 m) |
| 3X | 60 in (152 cm) | 25 in (64 cm) | 19 in (48 cm) | 2,400 yd (2,195 m) |
| 4X | 64 in (163 cm) | 25 in (64 cm) | 19 in (48 cm) | 2,700 yd (2,470 m) |
| 5X | 68 in (173 cm) | 25 in (64 cm) | 20 in (51 cm) | 3,000 yd (2,745 m) |
Complete Crochet Pattern
Body Panels
Make 2 panels, one front and one back. The chain counts below are calculated from the target panel width at 3 stitches per inch, plus 2 chains for the starting chain. Because the first dc is worked in the third chain from the hook, this produces the listed number of stitches. The row counts are rounded from the stated row gauge to approximate the chart lengths. Measure your panel as you work; use the measurement that gives your preferred finished length.
| Size | Starting chain | Stitches in Row 1 | Approx. body rows |
|---|---|---|---|
| XS | 56 ch | 54 dc | 35 |
| S | 62 ch | 60 dc | 37 |
| M | 68 ch | 66 dc | 39 |
| L | 74 ch | 72 dc | 41 |
| XL | 80 ch | 78 dc | 42 |
| 2X | 86 ch | 84 dc | 42 |
| 3X | 92 ch | 90 dc | 44 |
| 4X | 98 ch | 96 dc | 44 |
| 5X | 104 ch | 102 dc | 44 |
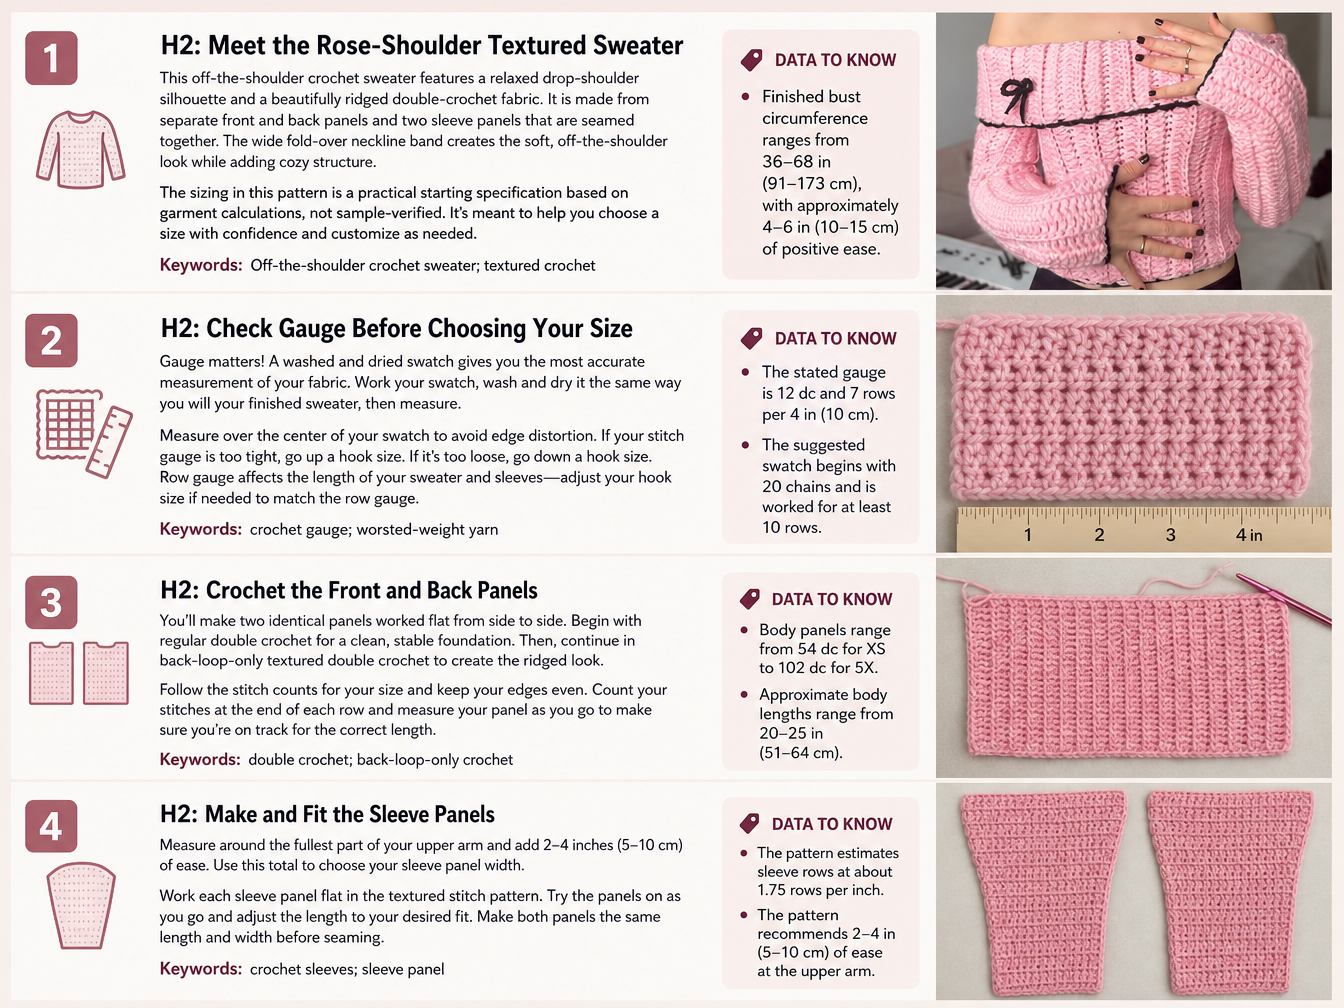
- Row 1: Ch the number listed for your size. Dc in the third ch from the hook and in each ch across. The turning chain does not count. Turn. Stitch count: Use the stitch count listed in the table.
- Row 2: Ch 2. Work 1 textured dc in each st across. Turn.
- Repeat: Repeat Row 2 until the panel measures the length listed for your size, or your desired length. Keep the stitch count the same in every row. Fasten off.
Make a second identical panel.
Sleeve Panels
Make 2 matching sleeves. Sleeve measurements can vary considerably by wearer. Before starting, measure from the shoulder point to the desired cuff and around the fullest part of the upper arm. Use the following calculations to choose a sleeve width and length:
- Sleeve panel width: desired upper arm circumference plus 2–4 in (5–10 cm) of ease.
- Starting chain: (desired sleeve panel width in inches × 3) + 2 chains.
- Rows for sleeve length: desired sleeve length in inches × 1.75, rounded to the nearest whole row.
- Row 1: Chain the calculated amount. Dc in the third ch from the hook and in each ch across. Turn.
- Row 2: Ch 2. Work 1 textured dc in each st across. Turn.
- Repeat: Repeat Row 2 until the sleeve panel measures your chosen sleeve length. Fasten off.
Make a second sleeve panel with the same chain count and row count. Try the panels against your arms before seaming; adjust both equally if needed.
Assembly
- Block the panels: Lightly wash or dampen the body and sleeve panels, then lay them flat to dry. Shape them to the measurements you want. Do not stretch them beyond those measurements.
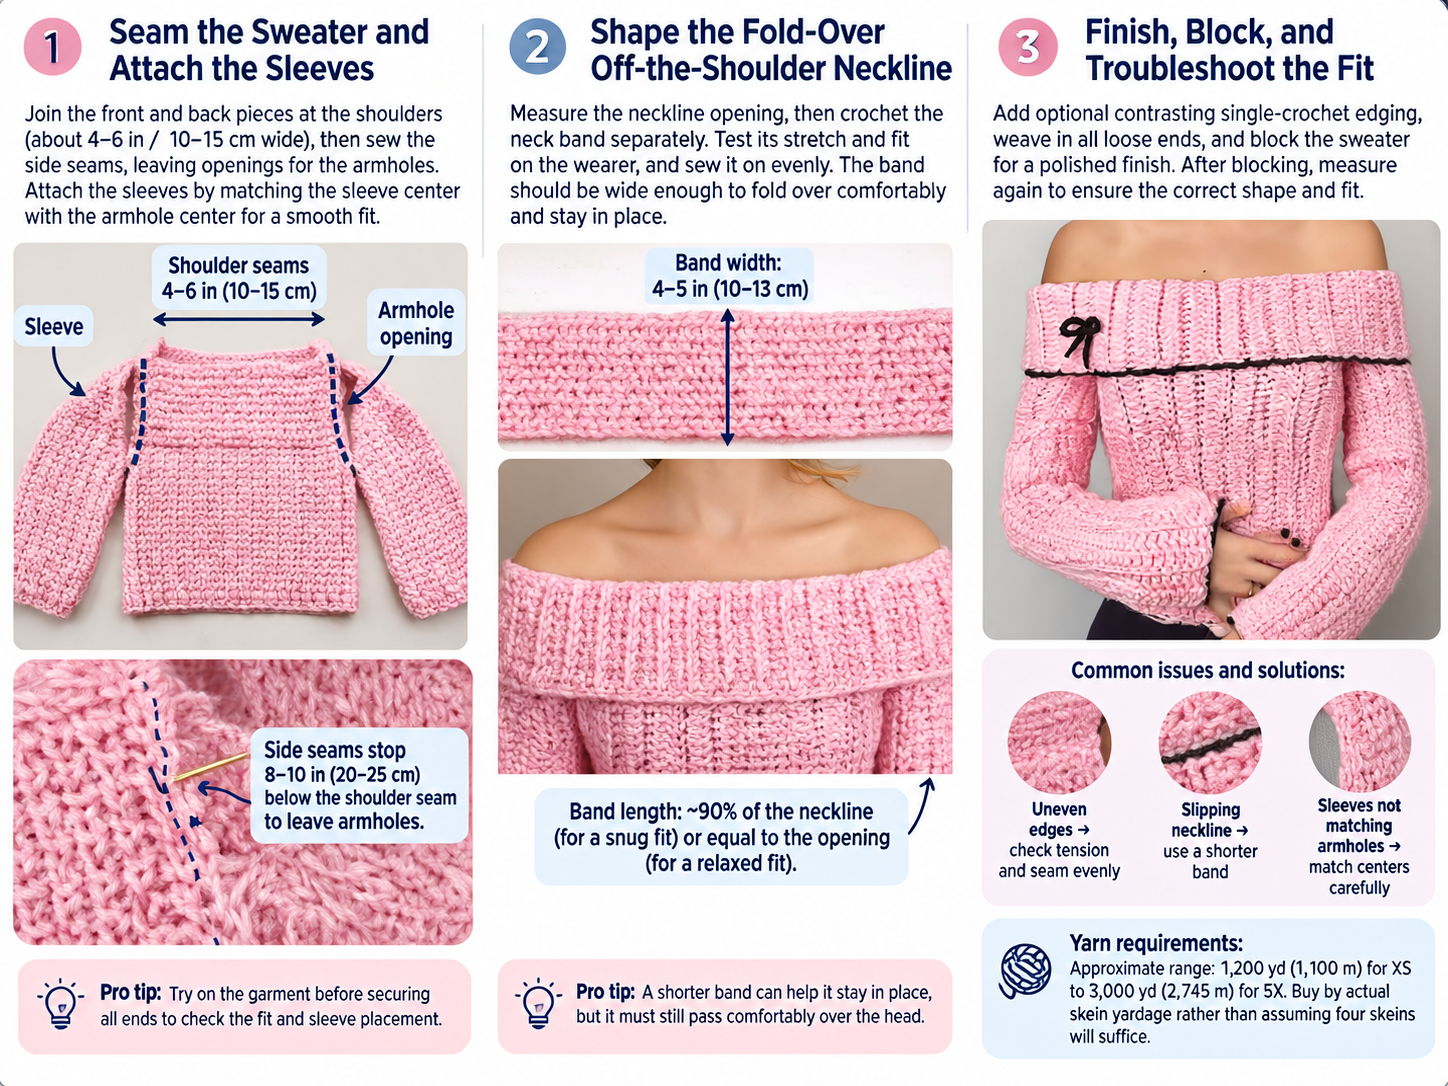
- Join the shoulders: Lay the front and back panels together with the RS facing inward. At both outer ends of the top edge, seam the panels together for a shoulder section approximately 4–6 in (10–15 cm) wide. Leave the center open for the neckline. Try the garment on and adjust the shoulder seams if the opening is too wide or too narrow.
- Seam the sides: Starting at the hem, seam each side edge upward. Stop 8–10 in (20–25 cm) below the shoulder seam to leave an armhole opening. Adjust the opening to suit your arm and shoulder.
- Make each sleeve into a tube: Fold a sleeve panel in half lengthwise, RS together. Seam the long edges. Turn the sleeve RS out.
- Attach the sleeves: With the sweater and sleeve RS facing each other, match the sleeve seam to the underarm area. Pin or clip the sleeve evenly around the armhole opening and sew it in place. If the sleeve edge is longer than the armhole, distribute the extra length evenly; do not bunch it in one spot. Repeat for the second sleeve.
- Check the fit: Try on the sweater before securing all yarn ends. Check that the sleeves hang evenly and the neckline sits comfortably.
- Neckline band: Measure around the neckline opening. For a snug band, make its finished length about 90% of the neckline measurement; for a more relaxed band, make it the same length as the opening.
- Chain the band length in stitches: neckline length in inches × 3, then add 2 chains.
- Row 1: Dc in the third ch from the hook and in each ch across. Turn.
- Row 2: Ch 2; work textured dc across. Turn.
- Repeat Row 2 until the band is 4–5 in (10–13 cm) wide.
- Join the short ends to make a loop. Fold the band in half lengthwise, if desired, and pin it evenly around the neckline. Sew it to the neckline with a flexible seam. Check that it stretches enough to go over your head and can sit securely off the shoulder.
- Optional contrast edging: With contrasting yarn, attach yarn at an edge and work a round of sc evenly around the lower edges, cuffs, or neckline band. Do not force a stitch into every row; space stitches evenly so the edge lies flat.
- Optional bow: Tie a small bow from a short length of yarn, secure it with a separate tie or a few stitches, and attach it where it will not interfere with wearing or washing the sweater.
Custom Adjustments
- To increase width: Add 3 stitches per 1 in (2.5 cm) to the stitch count of each body panel. Add 3 chains for each added stitch.
- To increase length: Add approximately 1.75 rows per 1 in (2.5 cm) to each body panel. Add approximately 1.75 rows per inch to the sleeve panel to lengthen the sleeves.
- To make a wider sleeve: Add 3 stitches per 1 in (2.5 cm) to the sleeve panel width.
- To make a longer sleeve: Add approximately 1.75 rows per 1 in (2.5 cm).
- To make a cuff narrower than the upper sleeve: Decrease evenly over the final rows. For a beginner friendly fit, instead use a narrower sleeve panel from the start and check that your hand can pass through the cuff.
For help assessing garment ease and measurements, see the crochet sweater pattern sizing guide. You can also read the off the shoulder sweater neckline guide for additional context on neckline fit.
Customization
Use only the provided formulas when adjusting this beginner crochet sweater. For body width, add 3 stitches per 1 in (2.5 cm) to the stitch count of each body panel, adding 3 chains for each added stitch. For body length, add approximately 1.75 rows per 1 in (2.5 cm) to each panel. These adjustments let you adapt the garment while retaining the same panel construction.
For sleeve width, add 3 stitches per 1 in (2.5 cm) to the sleeve panel width. For sleeve length, add approximately 1.75 rows per 1 in (2.5 cm). To narrow the cuff, decrease evenly over the final rows, or use a narrower sleeve panel from the start and check that your hand can pass through the cuff.
Neckline adjustment is based on the neckline opening measurement. Make the finished band length about 90% of the neckline measurement for a snug band, or the same length as the opening for a more relaxed band. The band length in stitches is calculated as neckline length in inches × 3, then add 2 chains. Test the band on the body before sewing it permanently, and check that it stretches over your head and can sit securely off the shoulder.
Finishing
- Weave in all yarn ends securely on the inside of the sweater.
- Wash and dry the finished sweater according to the yarn label. Lay it flat and shape it to the chart measurements; avoid hanging it while wet.
- Measure the finished bust, body length, and sleeve length after blocking. If a measurement differs from your target, use the blocked measurement, not the pre wash measurement, to guide any final adjustments.
- Try on the sweater once more and confirm that the neckline, shoulder seams, and both sleeves feel comfortable and even.
During assembly, block the body and sleeve panels lightly by washing or dampening them and laying them flat to dry. Shape them to the measurements you want, without stretching them beyond those measurements. Before securing the yarn ends, check that the sleeves hang evenly and the neckline sits comfortably. More garment finishing ideas are available in the crochet sweater guide.
Troubleshooting
| Problem | Solution |
|---|---|
| The panel edges look uneven. | Count the stitches at the end of every row. The turning chain does not count as a stitch; work the last dc into the final actual stitch. |
| The finished panel is wider or narrower than expected. | Check your blocked gauge. Recalculate using 3 stitches per inch: desired panel width × 3 = target stitch count. Change hook size or stitch count as needed. |
| The sweater is too tight. | Check your body measurement against the finished garment bust. You may need a larger size or additional stitches in both panels. Do not try to correct a tight fit by stretching the garment during blocking. |
| The sweater is too loose or slips off the shoulders. | Recheck the neckline and band fit. Shorten the band slightly, while ensuring it still stretches comfortably over your head. |
| One sleeve looks longer or wider than the other. | Compare the panels before seaming. Match their stitch counts and row counts, and measure both after blocking. |
| The sleeve does not fit the armhole evenly. | Mark the sleeve and armhole centers and underarm points, then pin between those markers. Distribute any small difference evenly. If there is substantial extra sleeve fabric, reduce the sleeve width or revise the armhole opening. |
| You may run out of yarn. | Compare your yarn’s yardage with the estimates before beginning, and buy an extra skein from the same dye lot when possible. The original note of “four skeins” cannot be relied on without knowing each skein’s yardage and yarn weight. |
Pattern Summary
- Final size range: XS–5X, approximately 36–68 in (91–173 cm) finished bust circumference.
- Yarn amount: Approximately 1,200–3,000 yd (1,100–2,745 m), depending on size and yarn.
- Hook size: US H/8 (5 mm), or size needed to obtain gauge.
- Main stitch: Double crochet, with subsequent rows worked through the back loop for a ridged texture.
- Construction method: Two seamed body panels, separate seamed sleeves, and a sewn on fold over neckline band.
Conclusion
The Rose-Shoulder Textured Sweater combines an easy ridged double crochet fabric with two body panels, separate sleeve panels, and a fold over neckline band. Its XS–5X size chart offers a starting point, while the provided calculations allow you to adjust body width, length, sleeve dimensions, and neckline band fit. Make and block a gauge swatch first, measure as you work, and try on the garment before completing the seams.
Use this Off-the-shoulder crochet sweater pattern as a beginner friendly project, and save the measurements and yarn details that work for you. Choose your size, gather your materials, and begin with the gauge swatch before making the panels.
Watch the Step by Step Crochet Tutorial
Watch the Step by Step Crochet Tutorial
Follow the video tutorial to see the construction, crochet techniques, and assembly process explained visually.
Watch the complete crochet tutorial below and follow along with the written pattern.
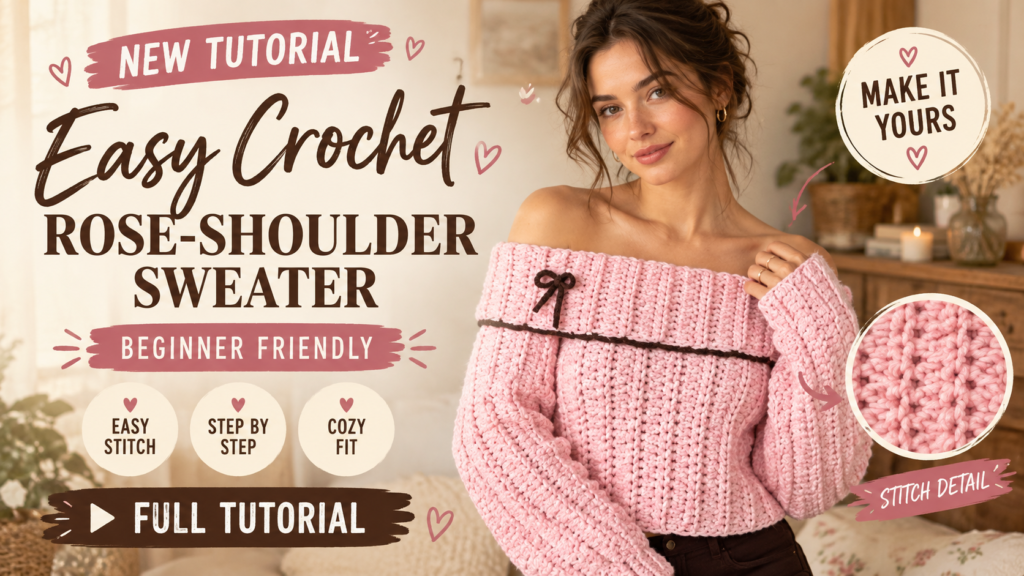
Use the play button to watch the tutorial without leaving this page.
Frequently Asked Questions
What skill level is this off the shoulder crochet sweater pattern?
The pattern is beginner level. You should know how to chain, double crochet, seam pieces, and weave in ends. It uses US crochet terminology.
What yarn and hook are recommended?
Use medium weight or worsted yarn, Category 4, preferably a soft yarn with some drape. The recommended hook is US H/8 (5 mm), or the hook needed to obtain gauge.
What gauge should I get for the sweater?
The gauge is 12 dc = 4 in (10 cm) and 7 rows = 4 in (10 cm). Check the textured stitch pattern after washing and drying your swatch as you plan to care for the sweater.
How do I choose the right size?
The bust or width measurements are approximate finished garment circumferences, not body measurements. The sweater is designed with approximately 4–6 in (10–15 cm) of positive ease. Compare your measurements with the chart and with a sweater you like before choosing a size.
How can I make the neckline band fit securely?
Measure around the neckline opening. Make the finished band length about 90% of the opening measurement for a snug band, or the same length as the opening for a more relaxed band. Test it on the body before sewing it permanently, and check that it stretches over your head and can sit securely off the shoulder.
Free Pattern Delivery
Get Your FREE Crochet Pattern PDF
Love this pattern? Enter your name and email below to get your free printable crochet pattern PDF delivered straight to your inbox!