Every stitch tells a story · Free PDF Pattern with Weekly Newsletter Claim Free Guide →

Every stitch tells a story · Free PDF Pattern with Weekly Newsletter Claim Free Guide →
Crochet topdown sweater: 5 Amazing Tips in This Proven Guide
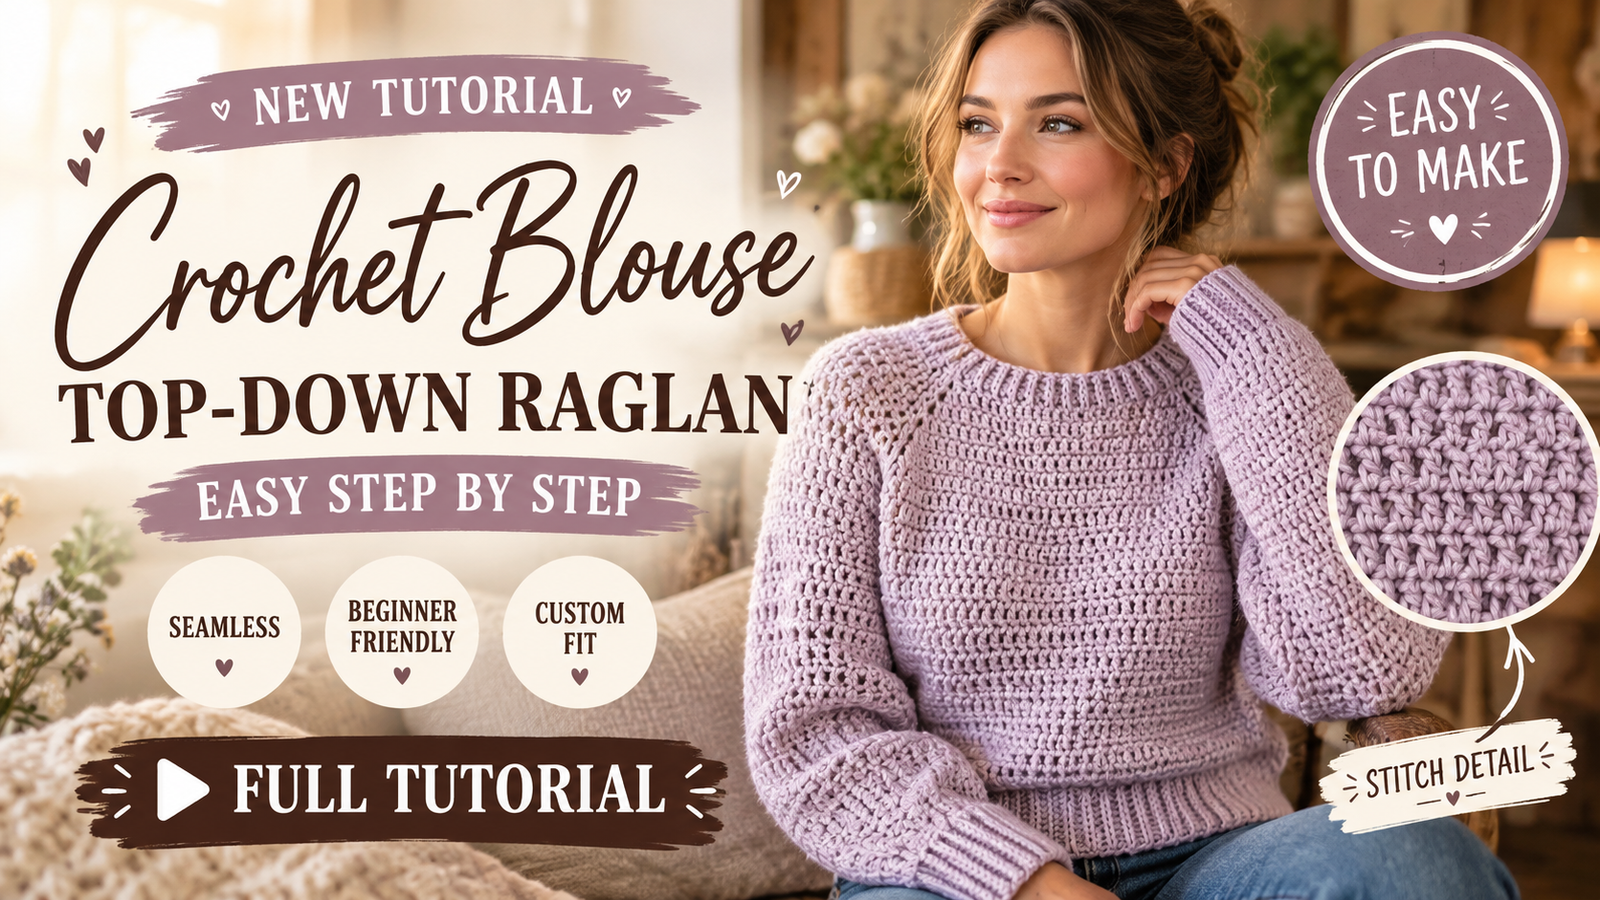
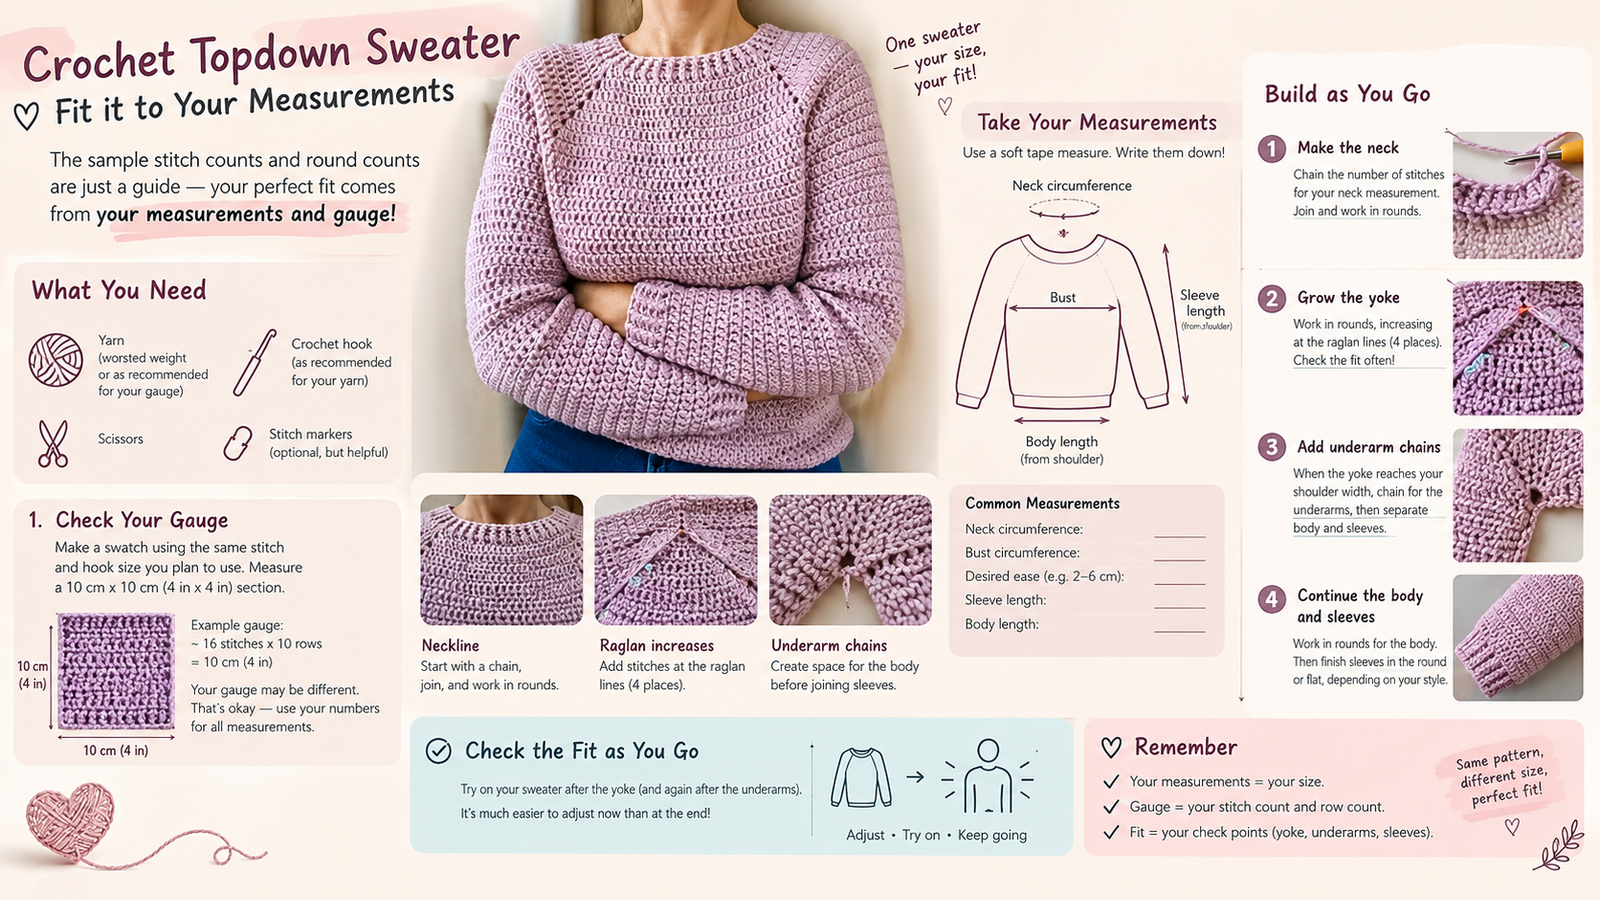
Crochet topdown sweater fans can make this beginner friendly seamless raglan pullover from the neckline down, using double crochet fabric, a ribbed hem, and sleeves worked in the round. It is for crocheters who know how to chain, slip stitch, single crochet, double crochet, and count stitches. The top down construction works by increasing at four raglan corners, then dividing the yoke into body and sleeves, so you can try on the sweater and adjust the body, underarm, and sleeve lengths as you work.
Table of Contents
Introduction
Key Takeaways
- The sweater is a seamless top down raglan worked in joined rounds, with four yoke increase points.
- Beginner skill level: chain, slip stitch, single crochet, double crochet, and stitch counting are required.
- The measurement based construction lets you adjust fit by checking the yoke, body, underarm chains, and sleeves as you work.
Pattern Overview
- Description: A simple, seamless sweater worked from the neckline down, with double crochet fabric, a ribbed hem, and sleeves worked in the round.
- Style: Relaxed, customizable pullover with a round neckline.
- Construction method: A top down, in the round raglan yoke is increased at four corners. The yoke is divided into body and sleeves; the body and sleeves are then worked separately.
- Skill level: Beginner. You should know how to chain, slip stitch, single crochet, double crochet, and count stitches. The sweater’s repeated rounds are simple, but careful measuring is important.
- Finished measurements: The tutorial notes describe a sample body approximately 43 cm (17 in) wide when laid flat, about 86 cm (34 in) around, and 42 cm (16½ in) long, before any extra length is added. These are sample measurements, not a complete size range. Choose a target size using the Size Chart and Custom Adjustments below.
Sizing note: The supplied notes do not include a tested gauge, a complete set of body and sleeve measurements, or yarn usage. To avoid presenting untested numbers as guaranteed sizes, this pattern is written as a measurement based recipe. The chart gives standard target measurements to help you choose a starting point; check the fit as you work.
For more sweater construction and fit guidance, see crochet sweater tutorials, crochet sweater patterns, and the crochet sweater pattern sizing guide.
Materials
- Yarn: Premier yarn, Tex 353, or a similar weight yarn. The notes do not specify the ball or skein meterage, so calculate the amount from your swatch and a comparable finished sample, or purchase extra and keep the dye lots consistent.
- Hooks: 5 mm crochet hook for the yoke, body, and sleeves. Use a 4 mm crochet hook for the neckline edging. Optional: use a 4 mm or 5 mm hook for the hem ribbing, depending on the firmness you want.
- Notions: Stitch markers, yarn needle, scissors, and tape measure.
- Optional tools: Digital kitchen scale, blocking mat, and rustproof pins.
Browse additional crochet tools and maker essentials if you need hooks or blocking supplies. For general sweater preparation, see how to crochet a sweater.
Gauge and Terms
US crochet terminology is used. A US dc is not the same stitch as a UK dc.
- ch = chain
- dc = double crochet
- sc = single crochet
- sl st = slip stitch
- st(s) = stitch(es)
- PM = place marker
- FPdc = front post double crochet
- BPdc = back post double crochet
- dc2tog = double crochet two stitches together; a decrease that turns two stitches into one
Special stitch, raglan corner: Work the stated double crochets into the marked corner space, chain 2, then work the stated double crochets into the same space again. The chain 2 space marks the corner for the next round.
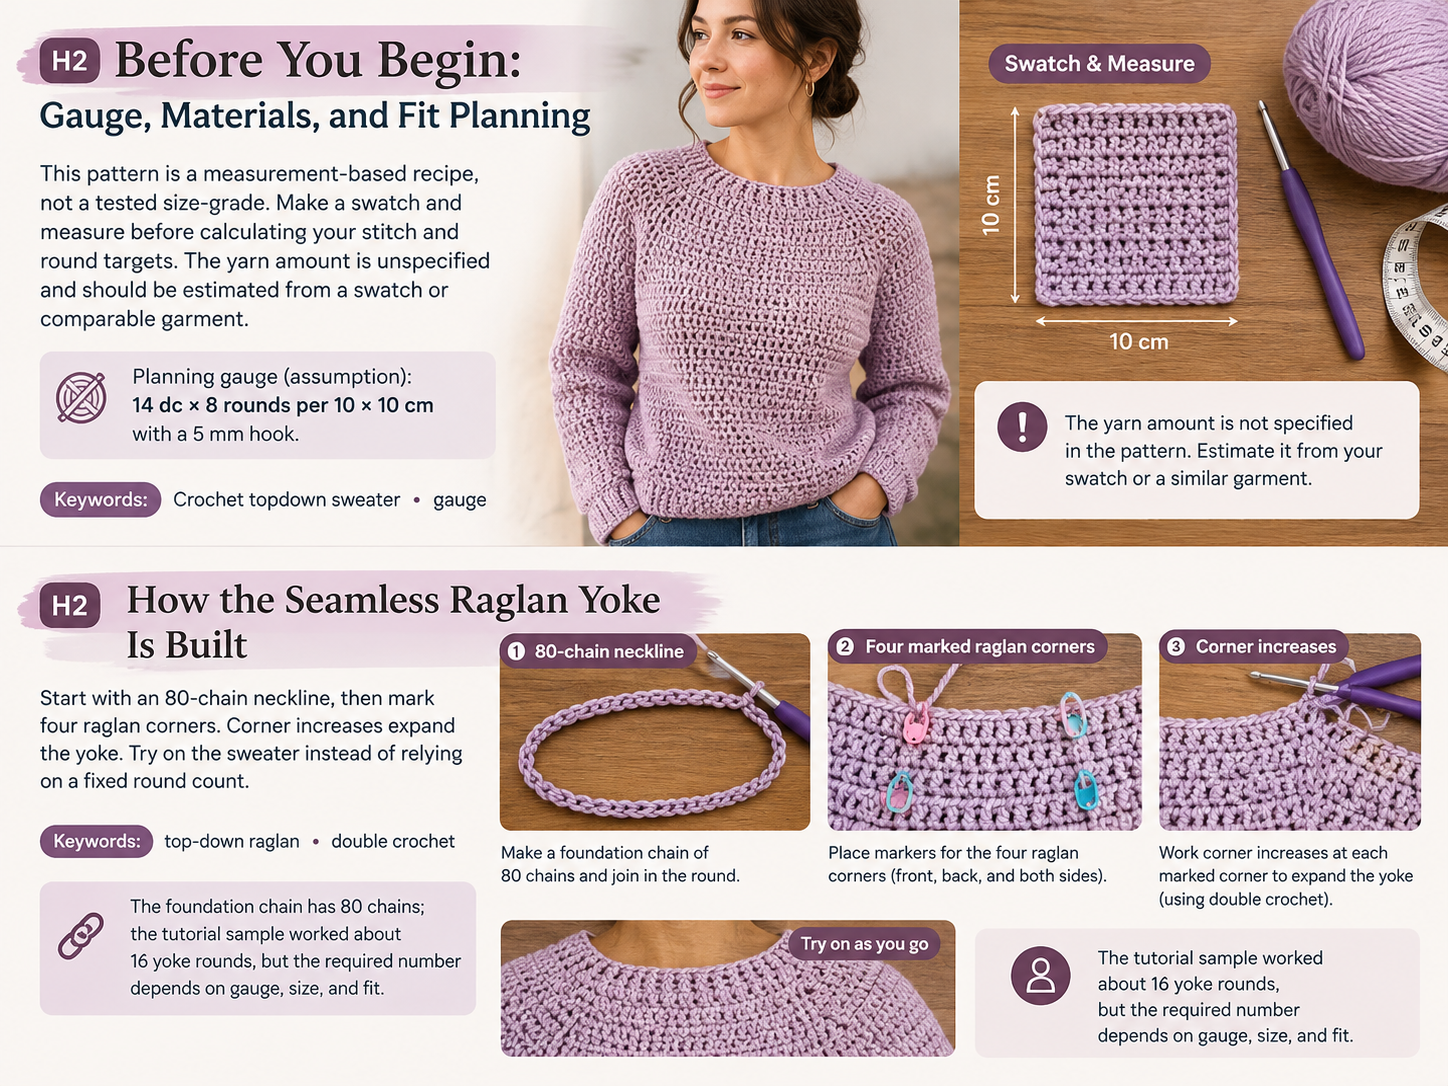
The tutorial notes do not provide a tested gauge. Make and measure a swatch before beginning; the finished size depends on it.
- Starting gauge assumption for planning: 14 dc × 8 rounds = 10 × 10 cm (4 × 4 in) in double crochet, worked in the round with the 5 mm hook. This is a planning target only, not a verified gauge for the specified yarn.
- Stitch gauge: Count the double crochets across the center 10 cm (4 in) of your swatch.
- Round gauge: Count the rounds across 10 cm (4 in) of the same swatch.
- How to check gauge: Crochet a swatch at least 15 cm (6 in) square in double crochet. Wash or block it as you plan to treat the finished sweater, let it dry, then measure the center. If you have more than 14 stitches in 10 cm, use a larger hook; if you have fewer, use a smaller hook. Recheck before starting the sweater.
Planning calculations at the assumed gauge: 14 dc per 10 cm = 1.4 dc per cm. 8 rounds per 10 cm = 0.8 rounds per cm. To estimate the body stitches needed for a target circumference, use Target circumference in cm × 1.4 = approximate body stitch count. To estimate the rounds needed for a target length, use Target length in cm × 0.8 = approximate number of rounds. Use your measured gauge, not the assumption, when calculating your own stitch and round targets.
For help choosing hooks and preparing a swatch, explore the crochet tools collection.
Size Chart
These are planning targets, not tested finished measurements from the tutorial. The width shown is the sweater’s approximate laid flat width, so the bust or body circumference is twice that value. Adjust the targets to suit the wearer and desired ease.
| Size | Bust/Width | Length | Sleeve Length | Yarn Required |
|---|---|---|---|---|
| XS | 86–91 cm (34–36 in) around / 43–46 cm (17–18 in) flat | Measure to preference | Measure from underarm to wrist | Not specified; calculate from swatch/sample |
| S | 91–97 cm (36–38 in) around / 46–49 cm (18–19 in) flat | Measure to preference | Measure from underarm to wrist | Not specified; calculate from swatch/sample |
| M | 97–102 cm (38–40 in) around / 49–51 cm (19–20 in) flat | Measure to preference | Measure from underarm to wrist | Not specified; calculate from swatch/sample |
| L | 102–112 cm (40–44 in) around / 51–56 cm (20–22 in) flat | Measure to preference | Measure from underarm to wrist | Not specified; calculate from swatch/sample |
| XL | 112–122 cm (44–48 in) around / 56–61 cm (22–24 in) flat | Measure to preference | Measure from underarm to wrist | Not specified; calculate from swatch/sample |
| 2XL | 122–132 cm (48–52 in) around / 61–66 cm (24–26 in) flat | Measure to preference | Measure from underarm to wrist | Not specified; calculate from swatch/sample |
| 3XL | 132–142 cm (52–56 in) around / 66–71 cm (26–28 in) flat | Measure to preference | Measure from underarm to wrist | Not specified; calculate from swatch/sample |
Yarn estimate: No reliable yardage can be calculated from the supplied notes alone. Make a swatch, weigh it, and compare the amount of fabric in the swatch with the intended sweater, or weigh a similar finished garment made in the same yarn and stitch. Buy extra to allow for longer sleeves or body adjustments.
Complete Crochet Pattern
Before starting, remember that the beginning ch 3 counts as a dc in the yoke and body. For sleeve rounds, the ch 3 does not count as a stitch. The neckline begins with 80 chains: 24 back stitches, 24 front stitches, 14 stitches for each sleeve, and 4 corner stitches. The four corner stitches separate the sections; they are not part of the stated section counts. Join the chain into a ring with a sl st, taking care not to twist it. Put a marker in each corner chain 2 space. On increase rounds, work 2 dc, ch 2, 2 dc into each marked corner space. This adds 8 dc around the yoke per increase round.
Body Panels
The body is worked in joined rounds after the yoke is divided; it is not made from separate panels.
- Set up: With the 5 mm hook, ch 80. Without twisting the chain, join with a sl st to the first ch.
- Yoke Round 1: Ch 3 (counts as dc). Work 23 dc across the back section. In the next chain, work dc, ch 2, dc to make the first corner. Work 14 dc across the first sleeve section. In the next chain, work dc, ch 2, dc to make the second corner. Work 24 dc across the front section. In the next chain, work dc, ch 2, dc to make the third corner. Work 14 dc across the second sleeve section. In the final chain, work dc, ch 2, dc to make the fourth corner. Join with a sl st to the top of the beginning ch 3. Place a marker in each ch 2 corner space.
- Yoke Round 2: Ch 3 (counts as dc). Work dc in each dc to the first marked corner space. In the corner space, work 2 dc, ch 2, 2 dc. Repeat from the beginning of the corner instructions at each of the remaining three corner spaces. Join with a sl st to the top of the beginning ch 3.
- Yoke Rounds 3 onward: Repeat Round 2, working dc in each dc and 2 dc, ch 2, 2 dc in each marked corner space. Move the corner markers up into the new ch 2 spaces each round.
- Yoke repeat: Continue increasing in every round until the yoke reaches comfortably from the neckline to the underarm and the front and back sections span the wearer’s chest and back. The tutorial sample used about 16 rounds, but do not rely on that number for every size or gauge. Try the sweater on, or compare it with a well fitting garment. Stop increasing when the yoke reaches the underarm comfortably and is wide enough across the body.
The yoke sections are the back, first sleeve, front, and second sleeve. Keep the four corner spaces at the raglan boundaries.
- Work across the back section to the first corner.
- Skip all stitches across the first sleeve section. Ch enough stitches to bridge comfortably beneath the arm; place a marker in the middle of this underarm chain if helpful.
- Work across the front section to the next corner.
- Skip all stitches across the second sleeve section. Ch the same number of underarm stitches as for the first arm.
- Join the round as before.
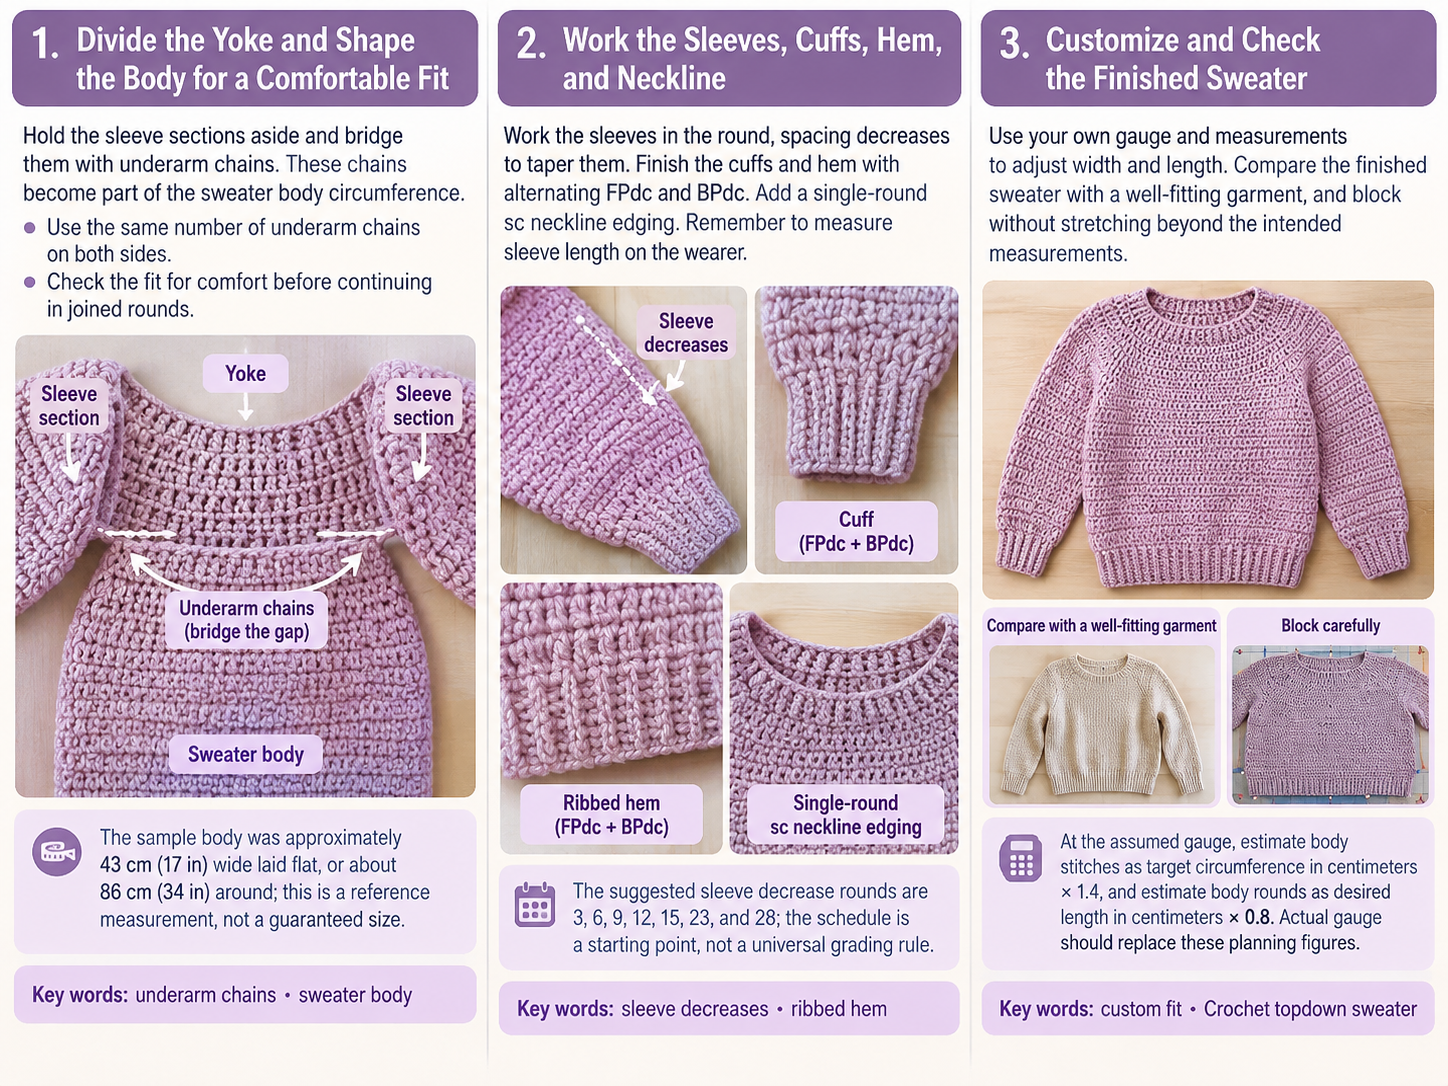
The underarm chains are added to the body circumference. Their number is not specified in the supplied notes: choose it by trying the garment on and making the underarm comfortable without pulling. Record the chain count and use the same count on the other side.
- Body Round 1: Ch 3 (counts as dc). Work 1 dc in each back stitch, across the underarm chain, in each front stitch, and across the second underarm chain. Join with a sl st to the top of the beginning ch 3. Count your stitches and note the total.
- Body Round 2: Ch 3 (counts as dc). Work 1 dc in each stitch around. Join with a sl st to the top of the beginning ch 3.
- Repeat: Repeat Body Round 2 without increasing or decreasing until the sweater reaches the desired length. The sample body was about 42 cm long, but measure from the shoulder or neckline to your preferred hem position. Add length here if desired; the hem ribbing adds a little more.
Sleeve Panels
Make both sleeves alike. Attach yarn at the center of an underarm chain, or at another convenient underarm point. Use the 5 mm hook.
- Sleeve Round 1: Ch 1. Work sc evenly around the armhole, including the stitches across the underarm chain and the yoke stitches left unworked for the sleeve. Join with a sl st to the first sc. Count the stitches. The notes do not provide a sleeve stitch count, so use the same count for both sleeves and make sure the round lies flat without puckering or stretching.
- Sleeve Round 2: Ch 3 (does not count as a stitch). Work 1 dc in the same stitch as the join, then work 1 dc in each stitch around. Join with a sl st to the first dc.
- Sleeve Round 3: Repeat Sleeve Round 2, working 1 dc in each stitch around. Join to the first dc.
- Sleeve decrease round as initially stated: Ch 3 (does not count as a stitch). Work 1 dc in the same stitch as the join. Work dc to 2 stitches before the end of the round; work dc2tog over the next 2 stitches, then dc2tog over the next 2 stitches. Join with a sl st to the first dc.
- Important decrease correction: The supplied notes say to decrease two stitches together at both the beginning and end of selected rounds, but do not specify exactly how those decrease placements are counted. For a balanced sleeve, make one dc2tog near the beginning and one dc2tog near the end of each decrease round, for a total of 2 stitches decreased per decrease round. Do not use the four decrease sequence above; use the clearer placement below instead.
- On a decrease round: After the beginning ch 3 and dc in the same stitch, work dc2tog over the next 2 stitches. Work dc to the final 3 stitches, then work dc2tog over the next 2 stitches and 1 dc in the final stitch. Join to the first dc. This decreases 2 stitches total.
- Decrease schedule: Work the decrease rounds on sleeve rounds 3, 6, 9, 12, 15, 23, and 28, counting the first all dc round after the sc setup round as Sleeve Round 2. On each listed round, use the decrease instructions above; on other rounds, work 1 dc in each stitch. Continue to about 31 sleeve rounds for a long sleeve, or stop when the sleeve is the desired length from the underarm. The notes do not provide finished sleeve measurements, so measure the wearer rather than relying on the round count alone.
- Sleeve cuff: Work about 4 rounds of alternating FPdc and BPdc around the sleeve opening. For example, *FPdc in the next stitch, BPdc in the next stitch; repeat from * around. Keep the post stitches stacked over the same type on the next round. If the number of stitches is odd, the ribbing will not alternate perfectly at the join; adjust by adding or omitting one stitch in the final plain sleeve round if needed.
Assembly
This sweater is worked mostly seamlessly, so there are no body or sleeve seams to sew.
- Joining pieces: No separate pieces are assembled. The front and back are connected under each arm with the chains made when dividing the yoke.
- Neckline finishing: With the 4 mm hook, join yarn at the neckline. Work one round of sc evenly around the opening and join with a sl st. If the edge looks loose, use fewer stitches; if it puckers, use more. Fasten off.
- Hem finishing: At the bottom edge, work about 4 rounds of alternating FPdc and BPdc, keeping the post stitches aligned from round to round.
- Edge finishing: At the sleeve cuffs, work the same post stitch ribbing as described in Section 2. Weave in all ends.
Joining round alignment: Keep a stitch marker at the first stitch of each round. To reduce the appearance of a diagonal join line, you can move the start point gradually by one stitch between rounds, but do not skip or add stitches when doing so. Check the stitch count after any change to the join position.
Custom Adjustments
Use the supplied formulas as planning estimates and recheck the fit with your measured gauge.
- To increase width: Measure the wearer’s bust or a garment that fits well. Add the ease you want for the sweater. At the assumed gauge, calculate the target body stitch count: target finished circumference in cm × 1.4 = approximate body stitches. The body count includes the stitches worked across the underarm chains. Make the underarm chain long enough for comfort, and stop yoke increases when the front and back sections plus the underarm chains give the required circumference. For a specific increase to the body, add approximately 14 dc for each 10 cm (4 in) of circumference, based on the assumed gauge. Recalculate using your actual stitch gauge.
- To increase length: At the assumed row gauge, add about 8 dc rounds per 10 cm (4 in) of body length. Measure the body on the wearer; row gauge can change the actual length, so use the tape measure as the final guide.
- To adjust sleeves: For a wider sleeve, increase the starting sleeve circumference by adding stitches evenly in a plain round, or reduce the number of decrease rounds. Check the sleeve on the wearer. For a narrower sleeve, add gradual decrease rounds, spaced evenly, while avoiding a tight fit at the upper arm. For a longer or shorter sleeve, at the assumed row gauge, add or remove about 8 rounds per 10 cm (4 in). Measure from the underarm to the desired cuff position. Keep sleeve decrease rounds the same on both sleeves. The supplied schedule, rounds 3, 6, 9, 12, 15, 23, and 28, is a starting point, not a universal grading rule.
- To adjust the neckline: The supplied notes do not provide a separate neckline adjustment formula. For neckline finishing, work one round of sc evenly around the opening; if the edge looks loose, use fewer stitches, and if it puckers, use more. The starting chain and its relaxed tension also affect neckline comfort.
Customization
Choose the target body circumference using the wearer’s bust measurement or a garment that fits well, then add the preferred ease. At the planning gauge, use target finished circumference in cm × 1.4 for approximate body stitches, or add approximately 14 dc for each 10 cm (4 in) of circumference. These are estimates based on the assumed gauge, so recalculate with your measured stitch gauge.
For added body length, plan about 8 dc rounds per 10 cm (4 in), then use the tape measure as the final guide. For sleeves, adjust starting circumference or the number and spacing of decrease rounds, keep the decrease schedule the same on both sleeves, and measure from underarm to cuff. There is no separate neckline adjustment formula in the supplied notes; the neckline edging is adjusted by using fewer sc if loose or more if puckered.
Finishing
- Fasten off, leaving a tail long enough to weave in.
- Thread the yarn tail onto a yarn needle and weave it through several stitches on the wrong side. Change direction once so the end is secure.
- Wash or block according to the yarn label. Do not stretch the sweater beyond the measurements you want.
- Lay the sweater flat to dry. Smooth the neckline, hem, and cuffs, and check that the sleeves are the same length.
- Measure the finished sweater and compare it with your intended bust, body, and sleeve measurements.
Sample reference: The tutorial’s body was approximately 43 cm (17 in) wide when laid flat and 42 cm (16½ in) long. Your finished measurements will depend on gauge, yoke depth, underarm chains, and the amount of length you add.
Troubleshooting
| Problem | Solution |
|---|---|
| The foundation chain twists when joined. | Before joining, lay the chain flat and check that the top edge faces the same way all around. If it has already twisted, undo the join and correct it before crocheting the first round. |
| The yoke feels tight at the underarm. | Add more stitches to the underarm chains when dividing the yoke. Check the fit before continuing the body. |
| The neckline or yoke is too small. | Check your stitch gauge and try a larger hook if you have more stitches per 10 cm than the pattern’s planning gauge. A tighter starting chain can also make the neckline uncomfortable; remake it with a relaxed tension. |
| The body is too wide or too narrow. | Measure your gauge and count the body stitches, including underarm chains. Compare the finished circumference with the desired measurement and adjust at the yoke or underarms. |
| The yoke does not reach the underarm. | Work additional increase rounds, then try the sweater on again. Do not stop based only on the sample’s 16 rounds. |
| A sleeve or body round has the wrong stitch count. | Count each section and check the corner spaces, underarm chains, and join. If a stitch was missed or added, correct it in the current round rather than allowing the error to grow. |
| The joins form a slanted line. | Mark the first stitch of each round and make sure the join does not add or remove a stitch. You may shift the join position gradually, but keep the total stitch count unchanged. |
| The hem or cuffs flare or feel too tight. | Try a smaller hook for firmer ribbing if it flares, or a larger hook if it feels restrictive. Check that FPdc and BPdc alternate consistently. |
| You may run short of yarn. | The source notes do not specify yardage. Weigh your yarn before and during the project, reserve enough for both sleeves and finishing, and buy extra in the same dye lot if possible. |
Pattern Summary
- Final size range: Measurement based; use the chart as a starting guide and adjust the yoke and underarm chains to fit.
- Yarn amount: Not specified in the supplied notes; calculate from a swatch or comparable sample and allow extra.
- Hook size: 5 mm for the sweater; 4 mm for neckline finishing.
- Main stitch: Double crochet.
- Construction method: Seamless top down raglan, worked in joined rounds with four yoke increase points.
Explore more crochet sweater for beginners guidance and crochet fashion ideas for inspiration on wearing your finished pullover.
Conclusion
This seamless raglan sweater combines a double crochet yoke and body with sleeves worked in the round, ribbed cuffs and hem, and a simple neckline finish. Because the supplied notes do not provide tested gauge, yarn usage, or a full set of finished measurements, use the chart as a planning guide, make a swatch, and measure as you go. Adjust the width, body length, sleeve shaping, and underarm chains to suit the wearer. Save this Crochet topdown sweater pattern, gather your tools, and begin with a gauge swatch before starting the neckline.
Watch the Step by Step Crochet Tutorial
Watch the Step by Step Crochet Tutorial
Follow the video tutorial to see the construction, crochet techniques, and assembly process explained visually.
Watch the complete crochet tutorial below and follow along with the written pattern.
Use the play button to watch the tutorial without leaving this page. The supplied crochet sweater video tutorial reference opens the same video on YouTube.
FAQ
Is this crochet topdown sweater suitable for beginners?
Yes. The pattern is beginner level for crocheters who know how to chain, slip stitch, single crochet, double crochet, and count stitches. Careful measuring is important because the pattern is measurement based.
What gauge should I use for this sweater?
The planning assumption is 14 dc × 8 rounds = 10 × 10 cm (4 × 4 in) with a 5 mm hook, but it is not a verified gauge for the specified yarn. Make and measure a swatch, then use your measured gauge for calculations.
How many rounds should I work for the yoke?
The tutorial sample used about 16 yoke rounds. The correct number depends on gauge, size, and underarm fit, so try the yoke on and stop when it reaches the underarm comfortably and is wide enough across the body.
How much yarn does the pattern require?
The supplied notes do not specify yarn usage or reliable yardage. Make and weigh a swatch, compare it with a similar finished sample, or purchase extra and keep the dye lots consistent.
How can I adjust the sweater body and sleeves?
Use the width and length planning formulas with your measured gauge, adjust underarm chains for comfort, and check sleeve circumference and length on the wearer. Keep sleeve decrease rounds the same on both sleeves.
Free Pattern Delivery
Get Your FREE Crochet Pattern PDF
Love this pattern? Enter your name and email below to get your free printable crochet pattern PDF delivered straight to your inbox!