Every stitch tells a story · Free PDF Pattern with Weekly Newsletter Claim Free Guide →

Every stitch tells a story · Free PDF Pattern with Weekly Newsletter Claim Free Guide →
Boho Crochet Sweater: 5 Amazing Custom Fit Secrets
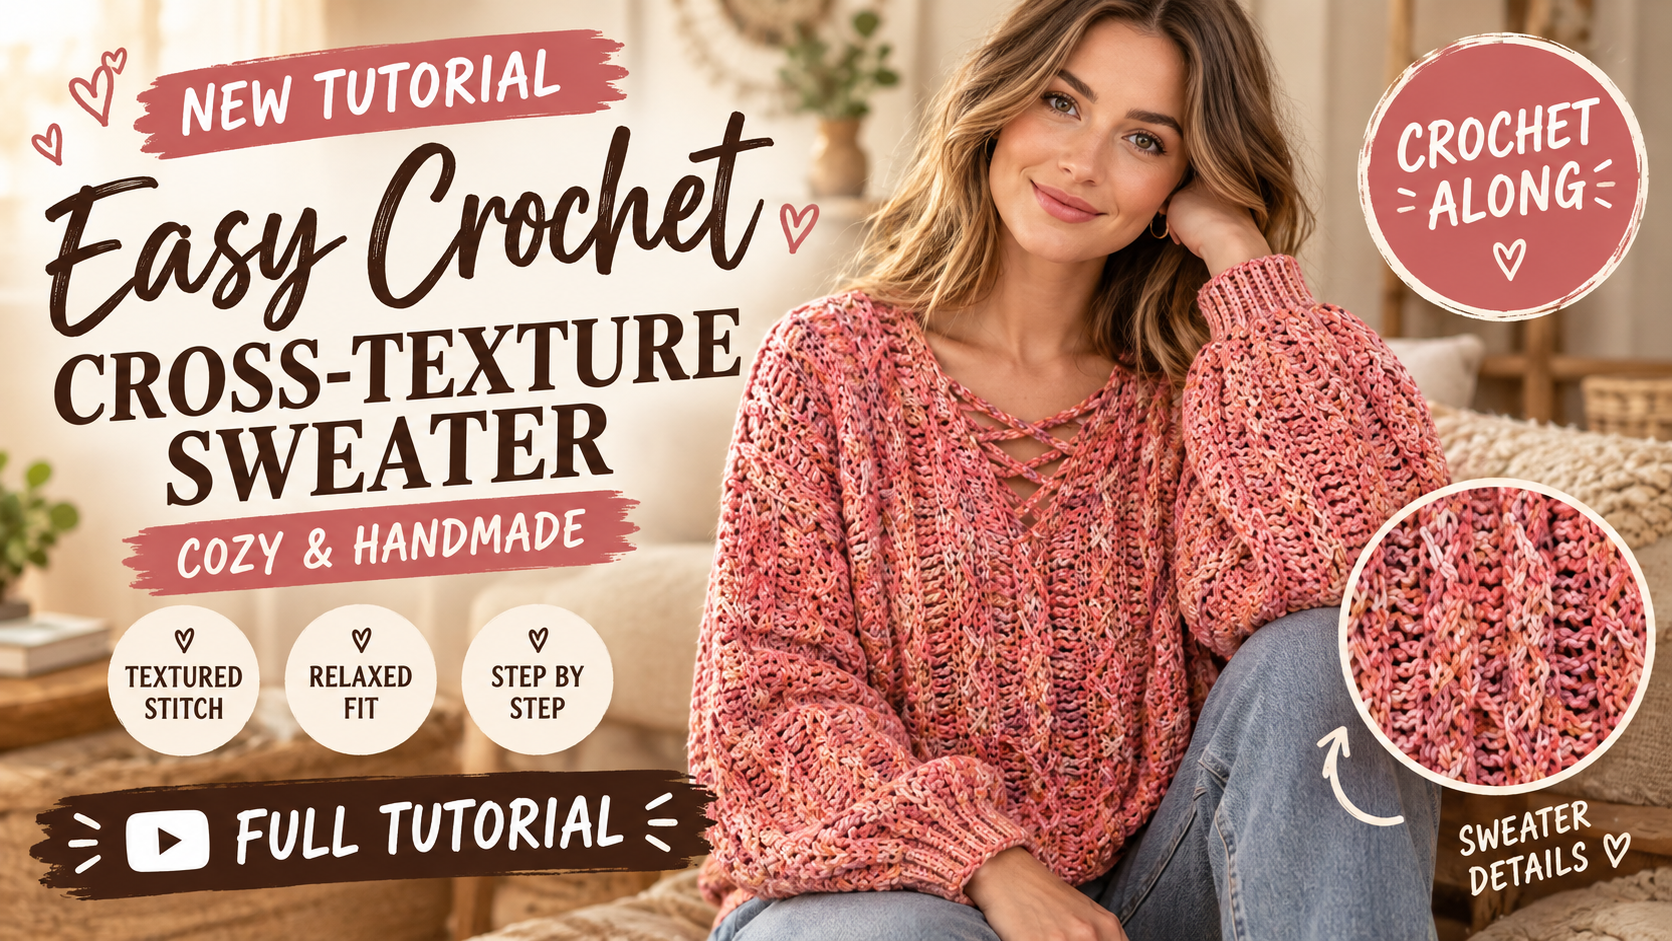
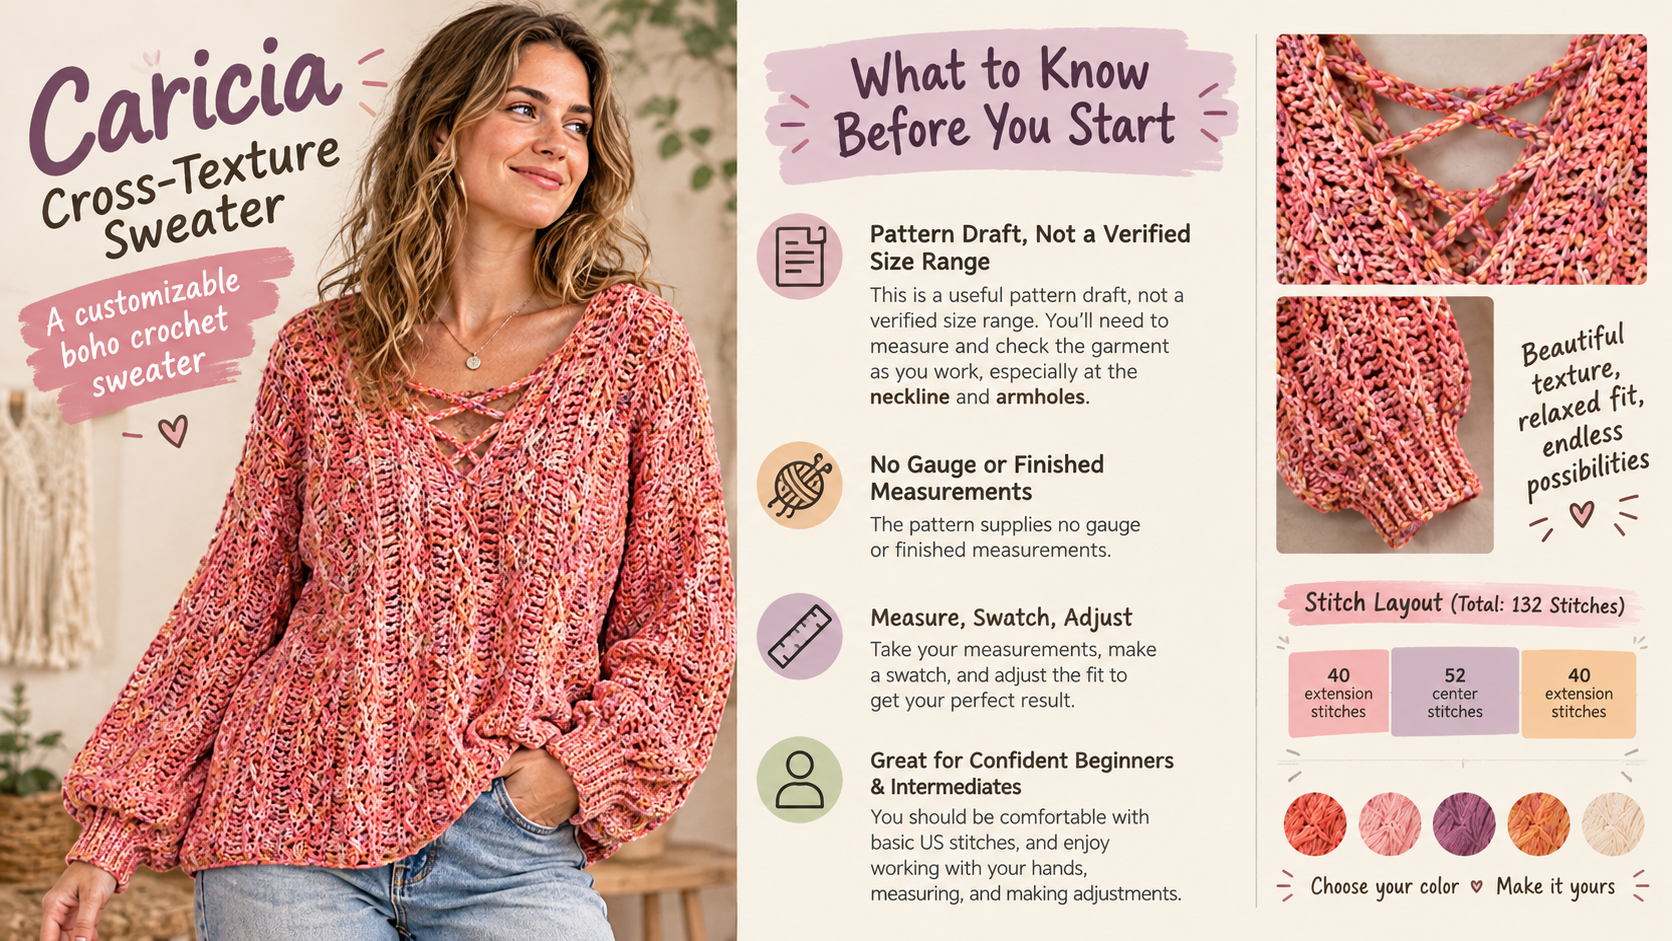
This boho crochet sweater pattern is a relaxed, oversized project for crocheters who are comfortable working rows and want to practice a textured stitch motif with crossed treble details. The sweater is made from two matching flat pieces, then joined at the shoulders and sides, leaving openings for the neck and arms. That simple panel based construction makes the main motif approachable, while fitting the neckline and arm openings as you go allows you to customize the finished shape.
Table of Contents
Introduction
This is a customizable pattern draft rather than a tested, graded size range. The source notes do not provide gauge, complete finished measurements, sleeve circumference, or exact neckline shaping. Measure the wearer, make a blocked swatch, and check the openings before you complete the seams. For more sweater construction help, see our crochet sweater tutorials and step by step crochet sweater guide.
Key Takeaways
- The sweater uses two matching flat pieces, with a 52 stitch center section and two 40 stitch side extensions in the sample layout.
- The stitch motif is easy to approach, with crossed treble stitches; garment shaping is not fully specified in the supplied notes.
- Customize width and length from your blocked gauge, and fit the neckline and arm openings to the wearer before seaming.
Pattern Overview
- Description: An oversized, two piece sweater with a six row textured motif, crossed treble details, and optional lacing.
- Style: Relaxed, customizable fit.
- Construction method: Two matching flat pieces are worked in rows. The supplied notes describe a 52 stitch center section with 40 stitches added at each side, for 132 stitches total. The pieces are joined at the shoulders and sides, leaving openings for the neck and arms.
- Skill level: Easy, with crossed treble stitches. The stitch pattern is approachable, but the supplied notes do not give enough detail to fully specify or verify garment shaping.
- Finished measurements: Not provided. Measure the wearer and use the gauge formulas below to set width and length. The stated 32 cm measurement is for the side extension from underarm to hem in the sample, not a complete sweater length.
Important pattern limitation: The notes provide one sample setup, but no gauge, finished garment measurements, sleeve circumference, or exact neckline shaping instructions. This is a carefully organized, customizable pattern draft, not a tested, graded XS to 5XL pattern. Measure and check your work as you go, especially at the neckline and arm openings. Browse more crochet sweater patterns or review our crochet sweater pattern sizing guide for general fit guidance.
Materials
- Yarn: Caricia New Batik, color 103, 100% acrylic, 75 g / 200 m per ball. The sample materials list specifies 5 balls for size M, 1,000 m total. Yarn quantities for other sizes are not known.
- Main hook: 5 mm.
- Optional hook: 4 mm for firmer cuffs.
- Notions: Tapestry needle, stitch markers, measuring tape, and scissors.
- Optional tools: Row counter, blocking mats and pins, and a removable contrast thread for marking the center. More supplies are listed in our crochet tools section.
Gauge and Terms
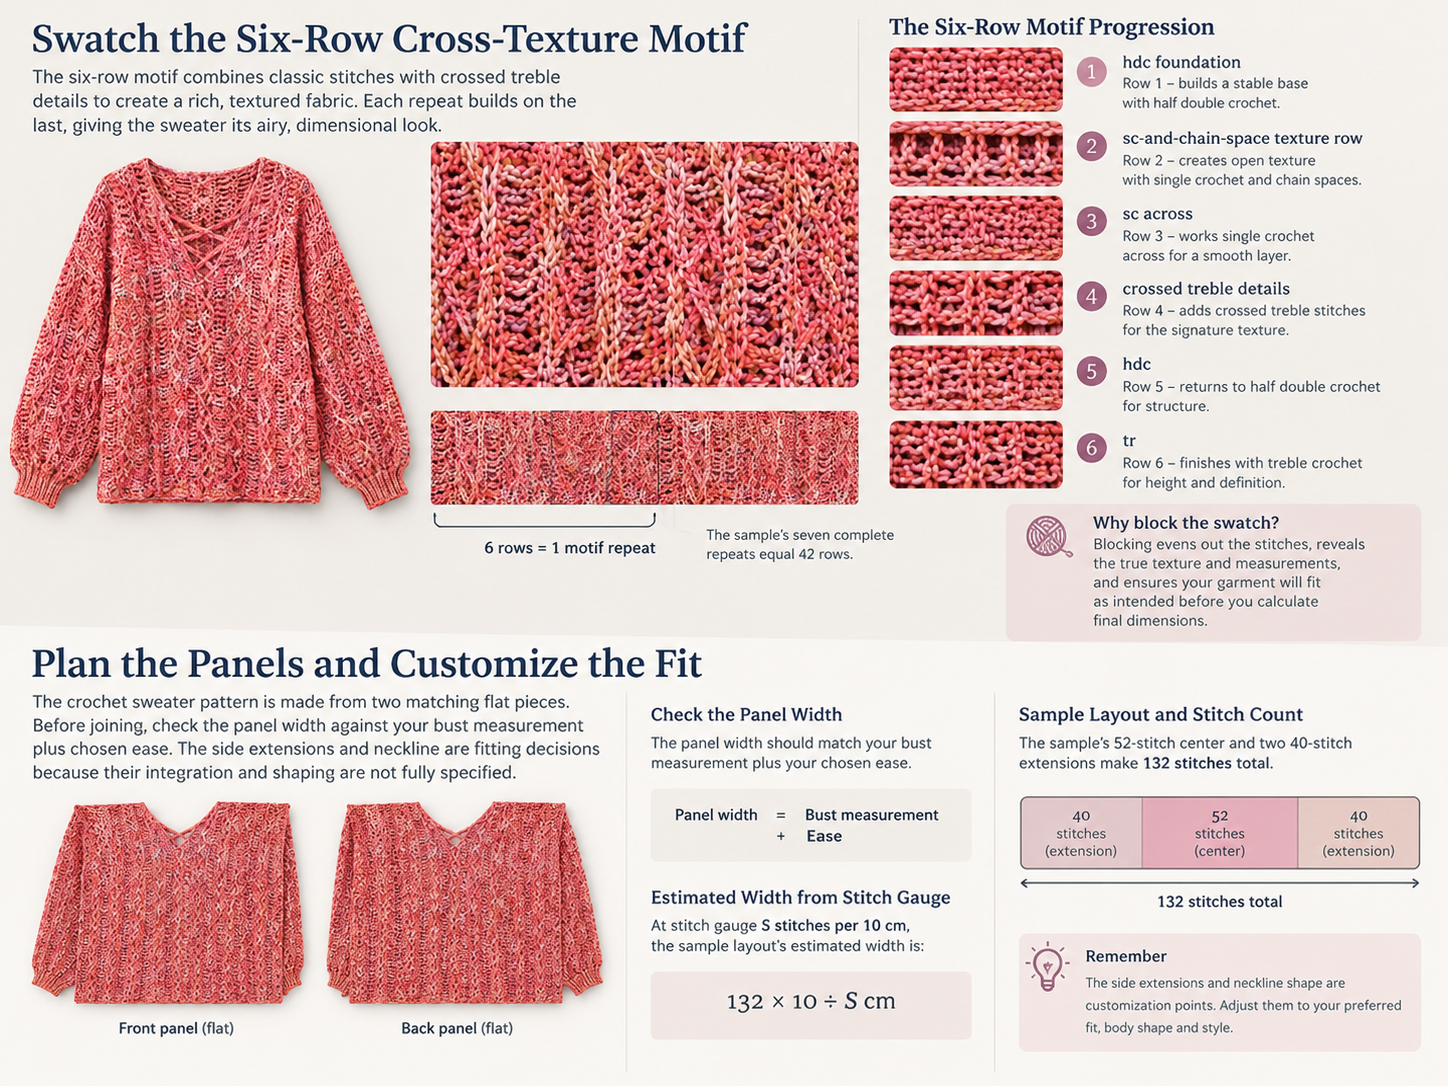
US crochet terminology is used. Gauge was not supplied, so no reliable finished measurements can be stated. Make and block a swatch in the six row motif before starting. Work several complete six row repeats, then wash or block the swatch the way you plan to finish the sweater. Measure the center of the swatch without stretching it.
Abbreviations
- ch = chain
- sc = single crochet
- hdc = half double crochet
- tr = treble crochet
- sl st = slip stitch
- st(s) = stitch(es)
- sp = space
- RS = right side, the public facing side of the fabric
- WS = wrong side, the inside facing side of the fabric
- BLO = back loop only
- rep = repeat
Crossed treble (crossed tr): Skip the next stitch, work 1 tr in the following stitch, then work 1 tr in the skipped stitch, passing in front of the first treble. The crossed pair uses two stitch positions and creates two stitches.
Gauge measurements and calculations
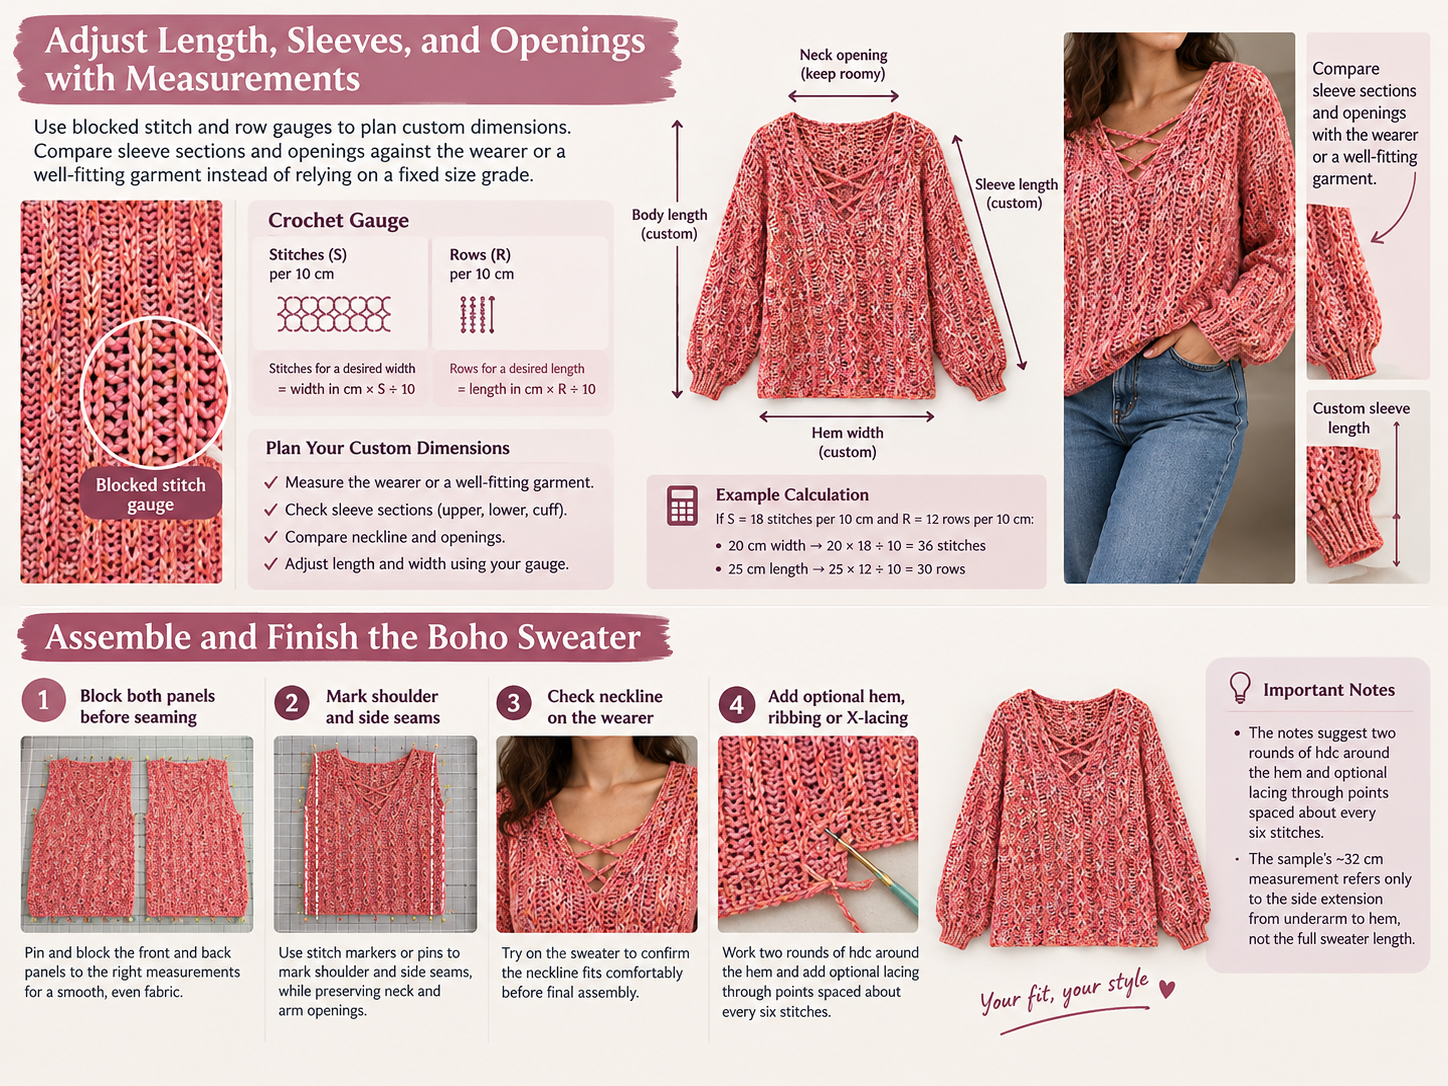
- Stitch gauge: Count motif stitches across 10 cm (4 in). Record this as S stitches per 10 cm.
- Row gauge: Count motif rows over 10 cm (4 in). Record this as R rows per 10 cm.
- Stitches for a desired width: width in cm × S ÷ 10.
- Rows for a desired length: length in cm × R ÷ 10.
The sample’s 52 stitch center section and two 40 stitch extensions total 132 stitches. At your measured gauge, that width would be 132 × 10 ÷ S cm. Do not assume it will fit without checking that measurement against the wearer.
Size Chart
The notes do not provide graded measurements. Use this chart as a worksheet: fill in the wearer’s measurements and calculate panel width and length from your blocked gauge.
| Size | Bust/Width | Length | Sleeve Length | Yarn Required |
|---|---|---|---|---|
| XS | Custom: body bust + chosen ease | Custom, measured on wearer | Custom, measured from shoulder to wrist | Estimate by fabric area; not supplied |
| S | Custom: body bust + chosen ease | Custom, measured on wearer | Custom, measured from shoulder to wrist | Estimate by fabric area; not supplied |
| M | Custom: body bust + chosen ease | Custom, measured on wearer | Custom, measured from shoulder to wrist | 5 balls stated for sample (1,000 m) |
| L | Custom: body bust + chosen ease | Custom, measured on wearer | Custom, measured from shoulder to wrist | Estimate by fabric area; not supplied |
| XL | Custom: body bust + chosen ease | Custom, measured on wearer | Custom, measured from shoulder to wrist | Estimate by fabric area; not supplied |
| 2XL | Custom: body bust + chosen ease | Custom, measured on wearer | Custom, measured from shoulder to wrist | Estimate by fabric area; not supplied |
| 3XL | Custom: body bust + chosen ease | Custom, measured on wearer | Custom, measured from shoulder to wrist | Estimate by fabric area; not supplied |
| 4XL | Custom: body bust + chosen ease | Custom, measured on wearer | Custom, measured from shoulder to wrist | Estimate by fabric area; not supplied |
| 5XL | Custom: body bust + chosen ease | Custom, measured on wearer | Custom, measured from shoulder to wrist | Estimate by fabric area; not supplied |
Estimating yarn for another size
If you know the finished fabric area for the sample and your planned garment, use this formula:
Estimated yarn = 1,000 m × (your planned fabric area ÷ sample fabric area)
This is only a rough estimate. Add extra yarn for swatching, seaming, ribbing, and finishing. The sample’s complete fabric area is not included in the notes, so a numeric estimate for other sizes cannot be calculated from the supplied information.
Complete Crochet Pattern
Work flat, turning at the end of each row. A turning chain does not count as a stitch. Make two matching pieces. The row by row motif below is written for a 52 stitch center section. The side extensions and neckline require fitting decisions because their exact joining and shaping instructions were not supplied.
Body Panels
- Foundation: With the 5 mm hook, ch 53.
- Row 1 (WS): Hdc in the second ch from hook and in each ch across. 52 hdc. Ch 1 and turn.
- Row 2: Sc in each of the first 3 sts, ch 1, skip the next st; *sc in each of the next 4 sts, ch 1, skip the next st; rep from * 8 more times; sc in each of the last 3 sts. 42 sc and 10 ch sps. Ch 1 and turn.
- Row 3: Sc in each sc and once in each ch sp across. 52 sc. Ch 1 and turn.
- Row 4: Sc in each of the first 3 sts; *work a crossed tr over the next 2 sts, then sc in each of the next 3 sts; rep from * across, working any remaining sts in sc. Keep the row at 52 stitches. Ch 1 and turn.
- Row 5: Hdc in each st across. 52 hdc. Ch 1 and turn.
- Row 6: Tr in each st across, inserting the hook through the top loops of the stitches so the texture remains on the RS. 52 tr. Ch 1 and turn.
- Repeat: Repeat Rows 1 to 6 for the desired length. The sample uses seven complete repeats (42 rows) for its long sleeve section. Check the actual length against your measurements rather than relying on the repeat count alone.
- Side extensions: For the sample layout, add a 40 chain section at each side of the center section, giving a stated total of 132 stitches. The notes also mention making 43 chains temporarily and working back across 40; they do not specify the exact attachment method. Before making the second piece, confirm that the first piece is the width and shape you want. Do not count the three unused temporary chains as garment stitches.
- Neckline markers: For the sample’s 132 stitch layout, mark the center after 66 stitches. The notes state that the back neckline is worked down to 62 stitches, with a slightly deeper front neckline, but do not specify the number or placement of decreases, or the shape of the opening. Mark the neck opening on both pieces before joining and check that it fits over the wearer’s head.
Sleeve Panels
The supplied notes do not specify a separate sleeve stitch count, finished sleeve width, or complete sleeve shaping. They only state that the sample maker uses seven six row repeats for her long sleeve section.
- Measure from the shoulder or armhole to the desired cuff.
- Work the six row motif in the direction used by your chosen panel layout.
- Use the blocked row gauge to calculate the approximate rows needed: sleeve length in cm × R ÷ 10.
- Try the piece against the wearer or a well fitting garment before seaming.
- Make the second sleeve or matching section to the same measured dimensions.
Do not rely on seven repeats for every size or yarn. If the sleeve is made as part of the main panels, mark its boundaries before assembly so that both arm openings are the same size.
Assembly
- Block before seaming. Pin or lay both pieces to matching measurements and allow them to dry.
- Join the shoulders and back: With RS together, sew or slip stitch the top edges as planned, leaving an opening for the neckline. The exact shoulder seam length is not provided; measure and mark it on both sides.
- Shape and check the neckline: The sample notes call for a 62 stitch back neckline and a slightly deeper front neckline, but do not give a shaping sequence. Check the opening on the wearer before fastening off or adding ribbing.
- Join the sides: Sew or slip stitch the side edges, leaving openings for the arms. The notes allow a side opening instead of a fully sewn side seam.
- Finish cuffs and neckline: Work ribbing around the cuffs and neckline. The ribbing stitch and number of rows are not specified; use a 4 mm hook if you want a firmer cuff, and check that the opening remains comfortable.
- Finish the hem: Work two rounds of hdc around the hem as noted. Add stitches evenly where needed so the edge lies flat.
- Optional X lacing: Work lacing through evenly spaced points about every six stitches. Check spacing on both sides before threading the lacing.
Custom Adjustments
Use the formulas below with your blocked gauge. The notes do not provide fixed size grading, sleeve circumference, or shaping rates, so check the fit as you work and keep the two pieces symmetrical.
- To increase width: Calculate the additional width needed in cm. Convert it to stitches: additional width × S ÷ 10. If adjusting the 52 stitch center, keep the foundation count compatible with the stitch repeat. The notes specify a foundation chain in multiples of 5 plus 3; after skipping the first chain, the resulting stitch count is 5n + 2. The sample’s 53 chains produce 52 stitches. If keeping the sample’s two 40 stitch extensions, the total layout is center stitches + 80. Recheck the garment width before making the second piece.
- To increase length: Calculate extra rows: additional length in cm × R ÷ 10. Add rows in complete six row motif repeats where possible. One complete repeat is six rows; if the measurement does not fit an exact repeat, add partial rows and check that both pieces match.
- To adjust sleeves: For sleeve length, add or remove rows using additional sleeve length in cm × R ÷ 10. For sleeve width, calculate stitches using additional width in cm × S ÷ 10, then keep the two sleeves symmetrical. The notes do not provide sleeve circumference or shaping rates, so check fit as you work rather than using a fixed size grading.
- Neckline adjustment: The notes state that the back neckline is worked down to 62 stitches and the front neckline is slightly deeper, but do not specify the number or placement of decreases or the opening shape. Mark and check the opening on both pieces, and check that it fits over the wearer’s head before fastening off or adding ribbing.
For additional beginner friendly pattern reading and construction support, browse our crochet sweater for beginners guide.
Customization
Choose the wearer’s measurements and desired ease, then use the blocked stitch and row gauge to plan the pieces. A relaxed sweater usually needs positive ease, meaning extra garment width beyond the body measurement, but the amount is a personal fit choice.
- Width adjustment: additional width × S ÷ 10. The sample layout totals 40 + 52 + 40 = 132 stitches. If keeping the two 40 stitch extensions, the total layout is center stitches + 80.
- Length adjustment: additional length in cm × R ÷ 10. Add complete six row repeats where possible; if the measurement does not fit an exact repeat, add partial rows and check that both pieces match.
- Sleeve adjustment: sleeve length in cm × R ÷ 10 for approximate rows. For sleeve width, additional width × S ÷ 10, then keep the two sleeves symmetrical.
- Neckline adjustment: Exact shaping is not provided. The sample notes identify a 62 stitch back neckline and a slightly deeper front neckline. Measure and mark the desired opening on both pieces, and check that it fits over the wearer’s head.
The sample’s side extension is approximately 32 cm from underarm to hem. Treat this as a reference for that section only, not as a total body length.
Finishing
- Weave in all ends securely on the WS.
- Wet block or steam block only in a way that is safe for your yarn; follow the yarn label and avoid stretching the fabric.
- Let the pieces dry completely before seaming.
- Measure the finished pieces after blocking. Confirm that both panels match and that the neck and arm openings are comfortable.
- The sample’s side extension is approximately 32 cm from underarm to hem. Use this only as a reference for that section, not as a finished garment length.
Check the yarn label before washing or steam blocking. The supplied yarn is 100% acrylic, but the source does not specify a particular washing method.
Troubleshooting
| Problem | Solution |
|---|---|
| The panel edges are uneven. | Count stitches at the end of every row. Mark the first and last stitch, and make sure the turning chain is not being counted as a stitch. |
| The sample 132 stitch layout is too wide or too narrow. | Check your blocked stitch gauge and calculate the actual width as 132 × 10 ÷ S cm. Adjust the center section to suit your measurements before making the matching piece. |
| The fabric is too stiff or too loose. | Make another blocked swatch. A larger hook usually creates looser fabric; a smaller hook usually creates firmer fabric. Recheck gauge after changing hooks. |
| The neckline or arm opening does not fit. | Check the opening on the wearer before completing the seams. The supplied notes do not include exact neckline or armhole shaping, so adjust the marked openings to the wearer’s measurements and make both sides symmetrical. |
| The yarn is running short. | The five ball amount is stated for the sample’s size M only. Weigh the yarn remaining after the first piece and compare it with the amount needed for the second piece and finishing. If buying more, check the dye lot when possible. |
Pattern Summary
- Final size range: Customizable; no verified XS to 5XL measurements supplied.
- Yarn amount: 5 balls / 1,000 m stated for the size M sample; other sizes require a fabric area estimate.
- Hook size: 5 mm; optional 4 mm for cuffs.
- Main stitch: Six row motif using hdc, sc, and tr, with crossed treble sections.
- Construction method: Two matching flat pieces with side extensions, then seamed at the shoulders and sides. The exact neckline and sleeve shaping must be fitted and checked because those instructions were not included in the source notes.
Conclusion
The Caricia Cross Texture Sweater combines an easy to follow six row motif with crossed treble details and optional X lacing. Its two piece construction provides a clear starting point, while the made to measure approach lets you plan width, length, and sleeve dimensions from your blocked gauge. The supplied notes do not include exact neckline or armhole shaping, so take time to measure, mark, and check those openings before finishing the seams.
Make a swatch, keep both panels aligned, and use the customization formulas to adapt this boho crochet sweater to the wearer. Save the pattern, gather your materials, and explore our crochet fashion ideas for more inspiration.
Watch the Step by Step Crochet Tutorial
Watch the Step by Step Crochet Tutorial
Follow the video tutorial to see the construction, crochet techniques, and assembly process explained visually.
Watch the complete crochet tutorial below and follow along with the written pattern.
Use the play button to watch the tutorial without leaving this page.
Frequently Asked Questions
Is this boho crochet sweater pattern suitable for beginners?
The stitch pattern is described as easy and uses hdc, sc, tr, and crossed treble stitches. The garment shaping is not fully specified, so makers should be comfortable measuring and checking the neckline and arm openings as they work.
What size does the pattern make?
Finished measurements are not provided. The size chart is a worksheet for custom measurements, and there are no verified graded XS to 5XL measurements.
How much yarn is needed?
The sample materials list specifies 5 balls of Caricia New Batik for size M, equal to 1,000 m. Yarn quantities for other sizes are not known. The supplied fabric area information is incomplete, so a numeric estimate for other sizes cannot be calculated.
How do I adjust the width and length?
Use your blocked gauge. Calculate stitches for width as width in cm × S ÷ 10, and rows for length as length in cm × R ÷ 10. For extra width or length, use the additional measurement formulas in the customization section and make the two pieces match.
Does the pattern give exact neckline and sleeve shaping?
No. The notes mention a 62 stitch back neckline, a slightly deeper front neckline, and seven six row repeats as a sample sleeve reference. Exact neckline decreases, sleeve stitch count, sleeve circumference, and full shaping instructions are not supplied. Fit and check these areas before seaming.
Free Pattern Delivery
Get Your FREE Crochet Pattern PDF
Love this pattern? Enter your name and email below to get your free printable crochet pattern PDF delivered straight to your inbox!